
Smart Sale Scheduler PRO
This guide explains the Smart Sale Scheduler PRO plugin. Please review it before installation. For support, contact [email protected].
4th of July Sale: 10% OFF on all KrishaStore Products. Code: INDEPENDENCE10. Limited time.
This guide explains the Smart Sale Scheduler PRO plugin. Please review it before installation. For support, contact [email protected].
WooCommerce is a free and popular WordPress plugin that allows you to turn your website into a fully functional online store.
With its flexibility and wide range of themes and extensions, WooCommerce is suitable for both small businesses and large-scale online stores. However, setting up and managing advanced features may require some time and basic technical knowledge.
To make store management easier, especially during high-traffic periods like festivals, seasonal sales, or special promotions, we have developed the Sale Scheduler for WooCommerce plugin.
We have developed a plugin that improves and extends the features of WooCommerce. During special days or festival seasons, your website usually gets more visitors. Our plugin helps you run flash sales or rush sales during these busy times, allowing you to sell more products and increase your company’s profit.
Managing many sales manually takes a lot of time and can cause mistakes, like starting or ending promotions late. If you want to run flash sales on hundreds of products at different times, this plugin makes the process easy and reliable.
Before installing Smart Sale Scheduler for WooCommerce, please ensure the following requirements are met:
If you are using Smart Sale Scheduler for WooCommerce Pro, you must first install and activate the free version of the Smart Sale Scheduler for WooCommerce plugin. After activating the free plugin, install and activate the Pro version to access all premium features.
It’s always recommended to use the latest versions of WordPress, WooCommerce, and PHP to ensure optimal performance and security. Additionally, make sure to have a backup of your website before installing any new plugin, including Smart Sale Scheduler for WooCommerce, to prevent any potential issues.
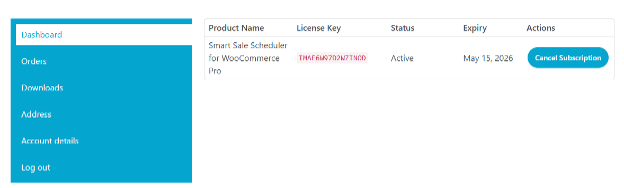
When you purchase the Smart Sale Scheduler for WooCommerce Pro plugin from the KrishaStore website, your license key is available in the My Account section on the front-end dashboard. This license key is required to activate Pro features within your WordPress admin panel.
Once the admin enters a valid license key, the user can access and use all the Pro features of the Smart Sale Scheduler for WooCommerce plugin.
The subscription remains active until the end of the current billing cycle, even if you choose to cancel it.
Follow these steps to activate your Smart Sale Scheduler for WooCommerce Pro license from the WordPress admin panel:
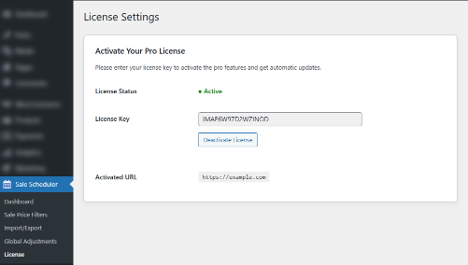
This process ensures that your Smart Sale Scheduler for WooCommerce Pro plugin is fully activated and ready to use with all premium features.
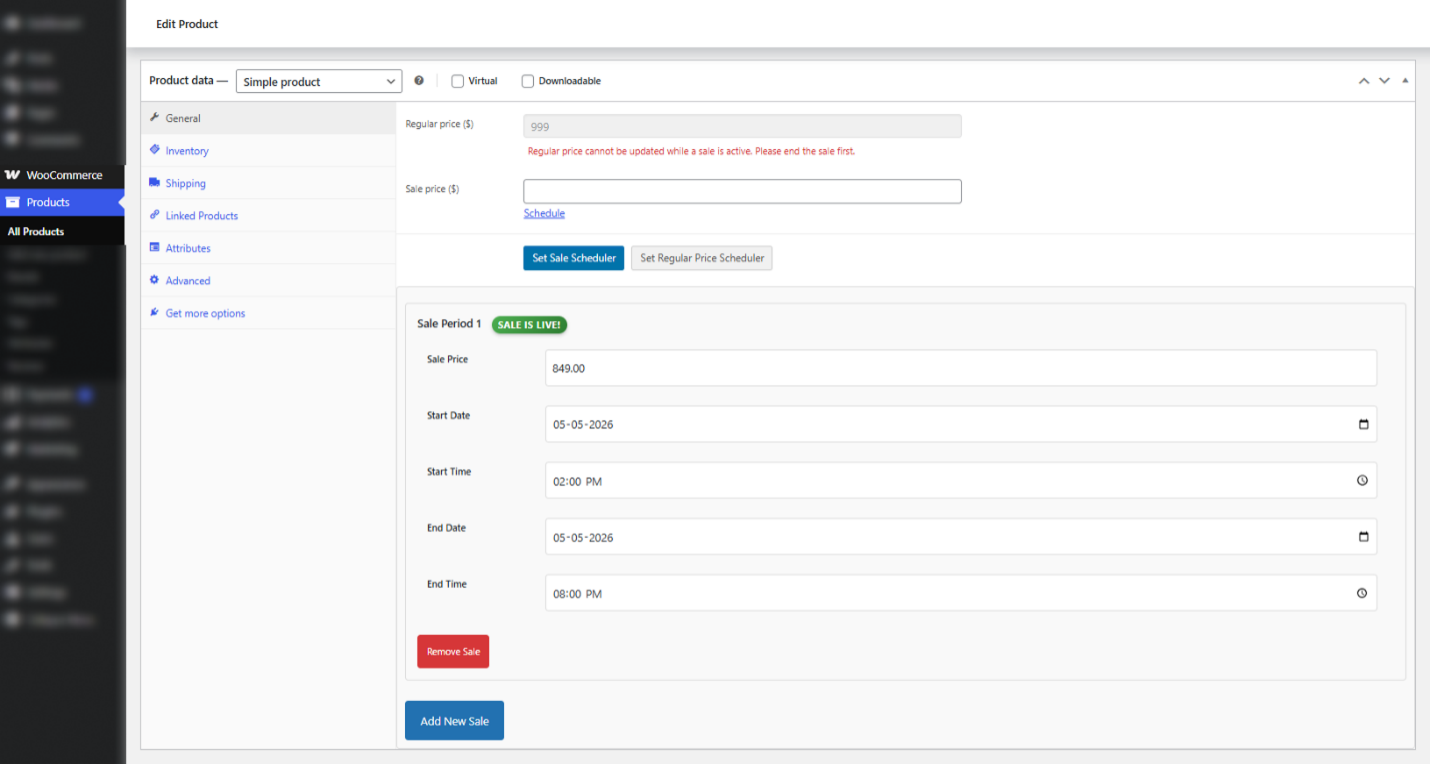
The Sale Price Scheduling with Date & Time feature allows you to automatically apply discounts to your products for a specific period.
Instead of manually changing prices during a sale, you can simply set a start date-time and an end date-time. The plugin will automatically:
This makes it very easy to run flash sales, limited-time offers, and seasonal promotions without worrying about timing errors.
You can use this feature to plan different types of promotions, such as:
One-Day Sale: When the admin sets a sale price with a start date of today at 12:00 AM and an end date of today at 11:59 PM.
Hourly Flash Sale: When the admin schedules a sale price from 2:00 PM to 4:00 PM on the same day. Then the discounted price is applied only during that 2-hour window.
Half-Day Promotion: The admin schedules a sale from 9:00 AM to 9:00 PM on the same day. The product displays the discounted price only within the defined 12-hour period.
One-Day Sale: The admin sets the sale to start at 12:00 AM and end at 11:59 PM on a specific date. The product remains on sale for the entire day and automatically returns to its original price afterward.
Multi-Day Festival Sale: When the admin sets a sale price starting on December 25, 2025, at 10:00 AM and ending on December 31, 2025, at 10:00 PM. The system maintains the sale price consistently across all days without interruption.
Multiple Sale Periods for One Product: Given a product with multiple promotions planned. When the admin adds more than one sale period using the Add New Sale button, then each sale runs automatically according to its scheduled date and time.
This feature works with all default WooCommerce product types:
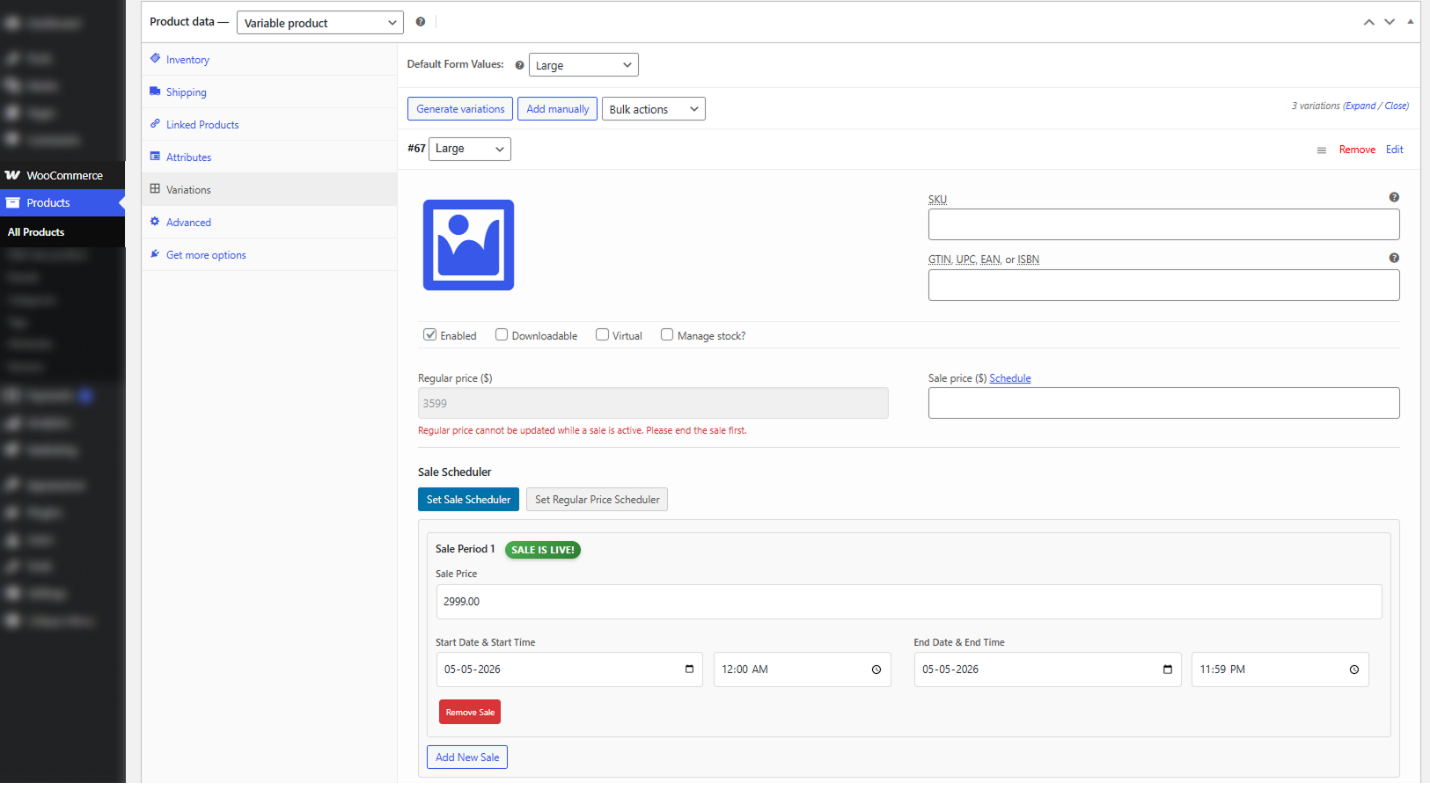
Each variation (e.g., Small, Medium, Large) has its own pricing.
The Scheduled Regular Price feature allows you to automatically change the regular price of a product at a specific date and time.
Instead of manually updating prices, you can plan ahead by setting a new regular price along with a start date and time. The plugin will automatically update the product price when the scheduled time is reached.
This feature is useful for:
Example: If a product currently costs $500, and you want to increase it to $600 on January 1, 2026, at 5:00 PM, you can schedule it in advance.
This feature works with all default WooCommerce product types:
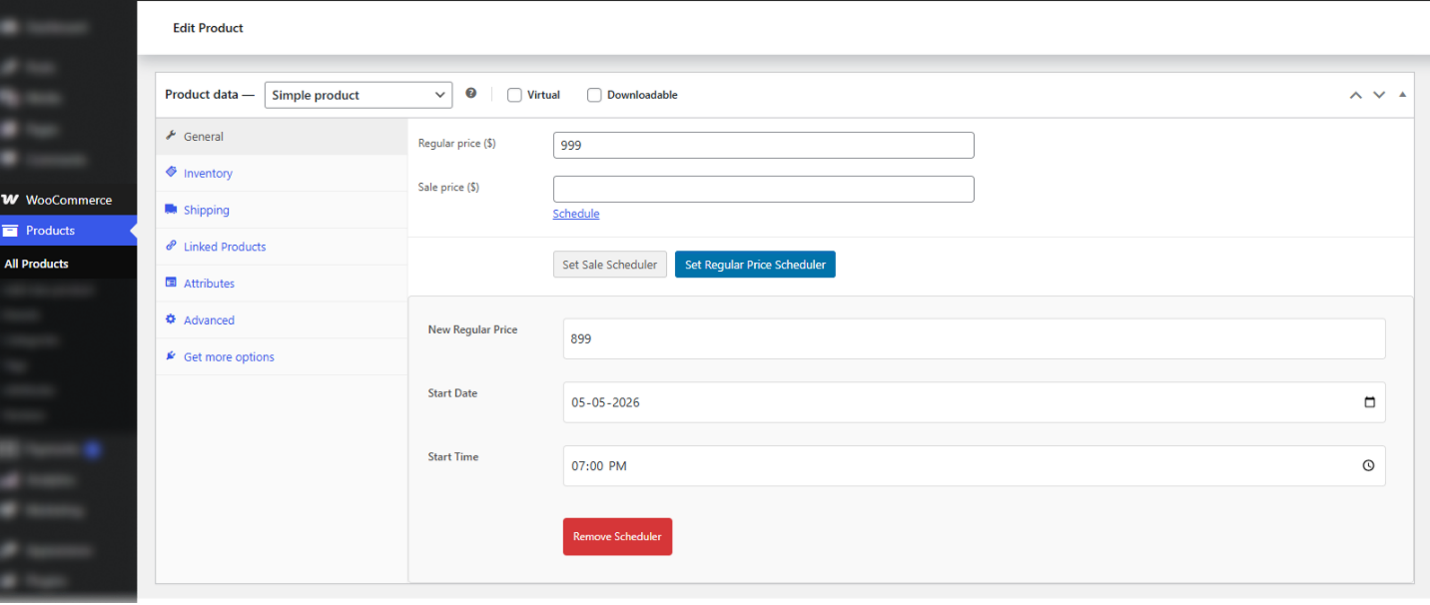
Remove Scheduler: Cancels the scheduled price change
Once scheduled:
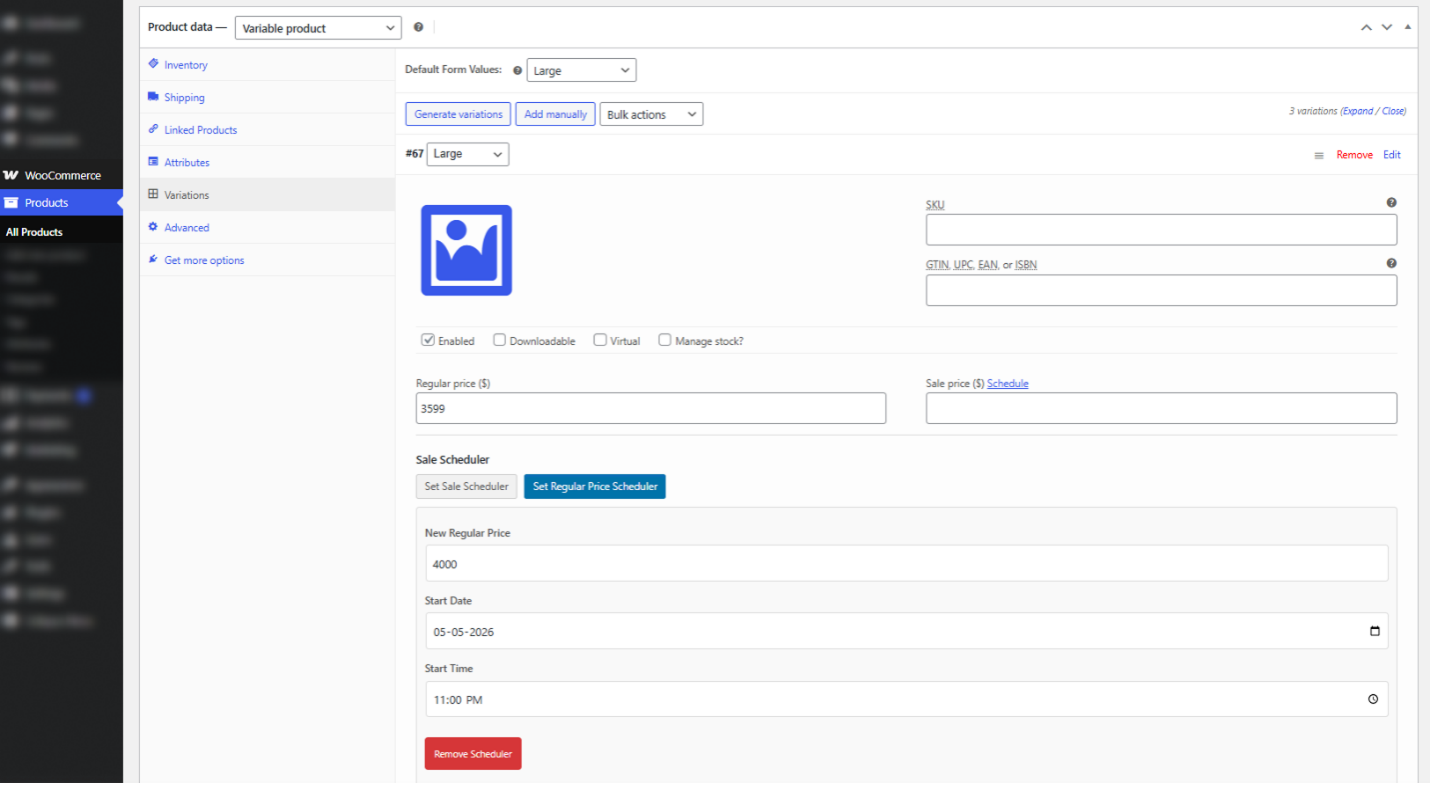
In WooCommerce, each variation (such as size, color, etc.) has its own pricing. You need to set the scheduler separately for each variation.
Once scheduled:
The Sale Price Management section helps you view and manage all scheduled product sales in one place. It gives you a clear overview of your discounts, including active, upcoming, and past sales. Instead of opening each product individually, you can easily monitor and control all your sales from a single screen. This saves time and makes it easier to manage multiple promotions. This feature works for both simple products and variable products, so you can handle all types of pricing from one dashboard.
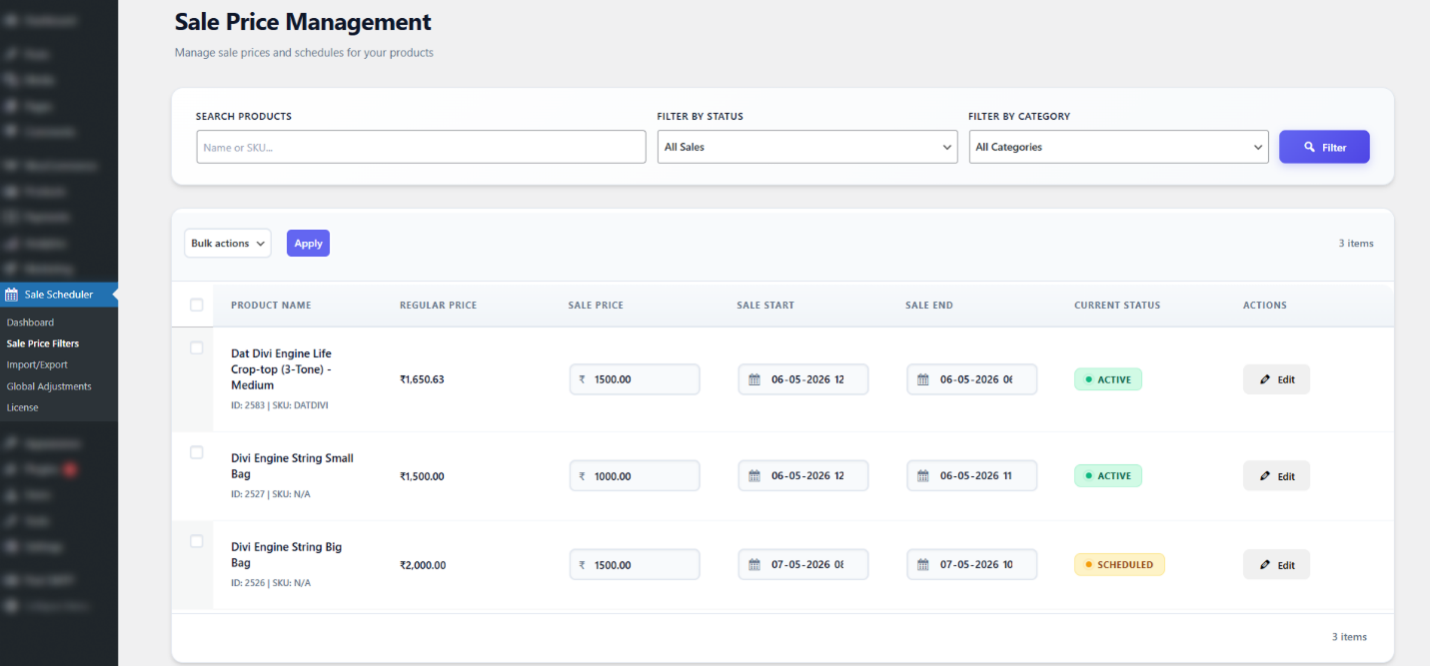
In this section, you will see a complete list of all product sales that have been created in WooCommerce.
Each sale is displayed separately, even if multiple sales are created for the same product. For example, if you schedule different discounts for different dates and times, each one will appear as an individual entry. This helps you track and manage every sale clearly without confusion.
Each row in the list shows important information about the sale:
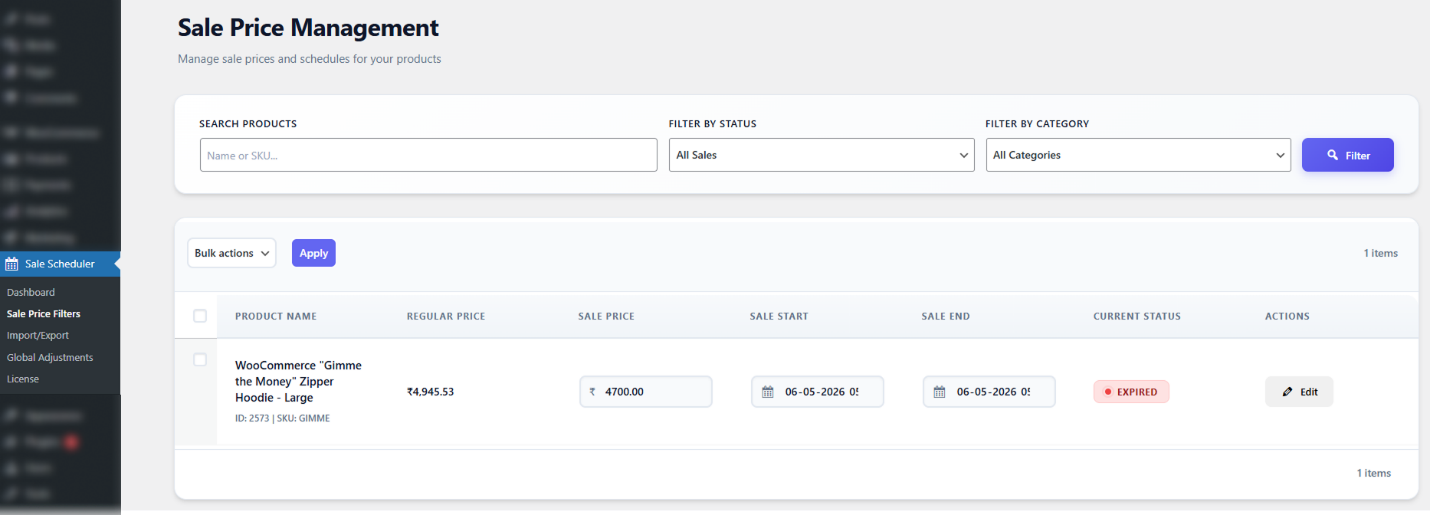
The status column shows the current state of each sale:
To make management easier, the plugin provides useful filtering options:
These filters help you quickly locate specific products or sales, especially when managing a large store.
You can manage multiple sales at once using Bulk Actions.
This will remove the sale for the selected products and restore their regular prices.
You can easily update any existing sale directly from this page.
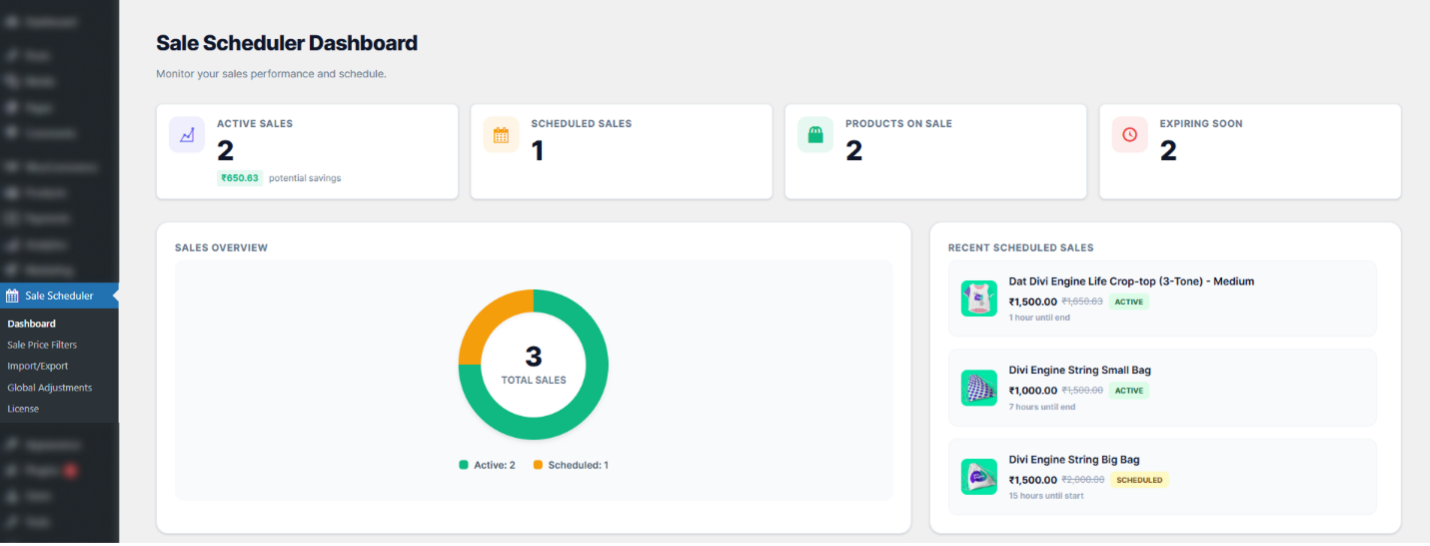
The Sale Scheduler Dashboard is the main control center for managing your product sales and promotions in WooCommerce. It provides a simple and real-time overview of all your store discounts in one place. Instead of checking products one by one, you can quickly monitor:
In this section, you will see a complete list of all product sales that have been created in WooCommerce.
The Active Sales card shows the number of sales that are currently running on your store. It also displays the Total Potential Savings, which represents the total amount customers can save from all active discounts combined. This helps you quickly understand the impact of your current promotions.
Example
The dashboard will show a total potential savings of $150.
The Scheduled Sales section displays the number of promotions planned for future dates. This helps you:
This will remove the sale for the selected products and restore their regular prices.
The Products on Sale card shows the total number of individual products currently discounted. This section focuses on products rather than sales events.
For example, one sales campaign may include multiple discounted products. Each discounted product is counted separately here. This helps you quickly understand how many products are currently part of active promotions.
The Expiring Soon section highlights products whose sale prices will end within the next 24 hours. This is useful for:
It also helps store admins prepare for products returning to their regular prices.
The Recent Scheduled Sales section displays the latest active and upcoming promotions. For each product, you can view:
A countdown timer is also shown to help you easily track your sales schedule.
This helps you stay updated on your promotional timeline without manually checking each product.
The dashboard also includes a visual Sales Overview chart. This chart gives a quick summary of:
Using visual indicators makes it easier to understand your store’s promotion status at a glance.
The Global Price Adjustments feature allows you to automatically increase or decrease prices for multiple products at the same time. Instead of editing products one by one, you can create a single pricing rule and apply it to:
This makes it much easier to manage large promotional campaigns, seasonal pricing updates, bulk discounts, or temporary price increases.
For example, you can:
Once the scheduled time begins, the plugin automatically applies the adjustment. When the schedule ends, the prices automatically return to their original values.
You can create a new pricing rule by filling in the adjustment form. Below is an explanation of each field.

Rule Name
Enter a name for the pricing rule. This name is for admin reference only and helps you identify the rule later.
Example: Winter Sale – 10% Off / Summer Brand Discount
Adjustment
Choose whether you want to: Increase prices or Decrease prices
Then enter the percentage amount.
Example: Decrease by 10% / Increase by 15%
Apply To
Select where the rule should apply. You can apply adjustments to:
This helps you target specific groups of products easily.
Price Type
Choose which product price should be affected:
The Existing Adjustment Rules section displays all pricing rules created in the system. Here you can quickly view:
This makes it easy to monitor and manage all active and past pricing adjustments.
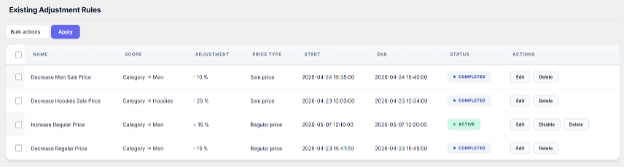
Each rule displays a status label to help you understand its current condition.
Available actions include:
When the Price Type is set to Sale Price, the adjustment is applied to the product’s existing sale price. This is useful when you want to provide an extra discount during:
The additional adjustment works on top of the already discounted sale price.
Suppose a product in the Men category has:
Now create a global rule:
The plugin will apply an extra 10% discount to the current sale price.
Customers will see the final adjusted price of $810 during the scheduled period. Once the global rule ends, the extra discount will be removed automatically, and the product price will return to its normal sale price or regular price.
When the Price Type is set to Regular Price, the adjustment changes the original regular product price instead of the sale price. This option is useful for:
Suppose a product in the Men category has:
Now create a global rule:
The plugin will increase the regular price by 15%.
Customers will see the updated regular price of $1150 while the rule is active. After the scheduled adjustment ends, the product price will automatically return to its original regular price.
The Import/Export Sale Data feature makes it easy to move sale information in and out of the plugin using a CSV file. This is useful when you want to back up your sales records, share data between stores, or create many sales at one time without editing products manually.
You can export all existing sale records from your store, including active, scheduled, and expired sales. You can also download a sample CSV template first, so you know the correct file format before importing any data.
When you import a properly formatted CSV file, the plugin reads the file and creates sale records for the matching products automatically. This saves time, reduces typing work, and helps you manage large numbers of sales more easily.
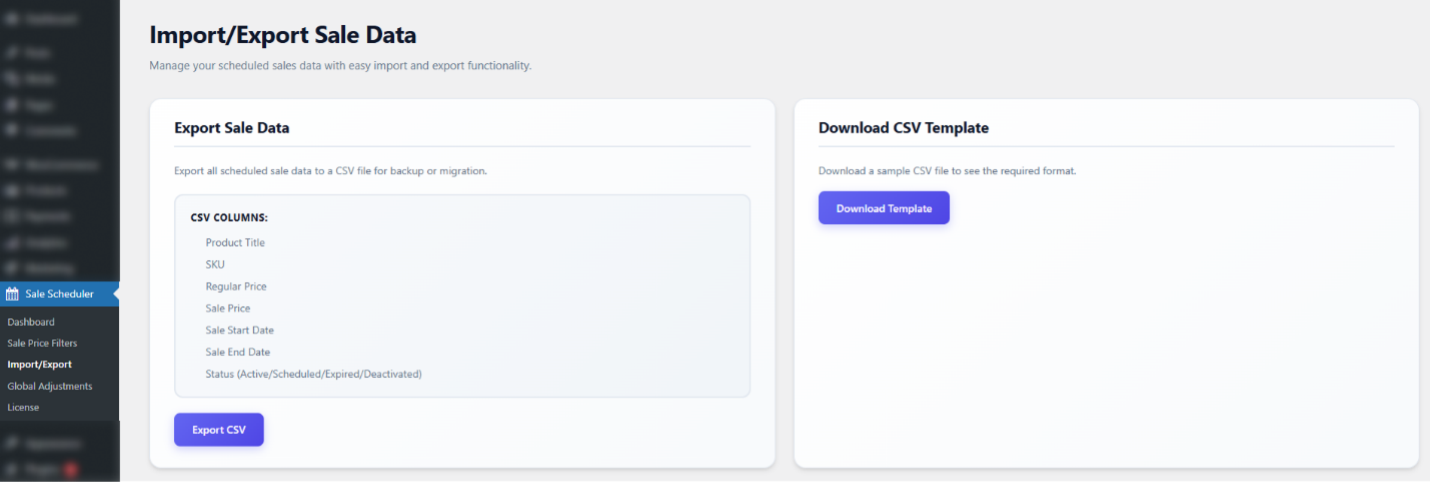
The Export Sale Data option lets you download all your sale records as a CSV file. This is helpful for backup, reporting, migration, or keeping an offline copy of your sales information.
The exported file includes important details such as:
This gives you a clear view of your sales data and makes it easy to review or reuse later.
The Download CSV Template option gives you a ready-made sample file with the correct column structure. This helps you understand how the CSV file should be arranged before you import sales data.
The template is useful because it shows the exact format expected by the system, which helps reduce mistakes during import. You can fill in your own product details and sale dates using the same structure.
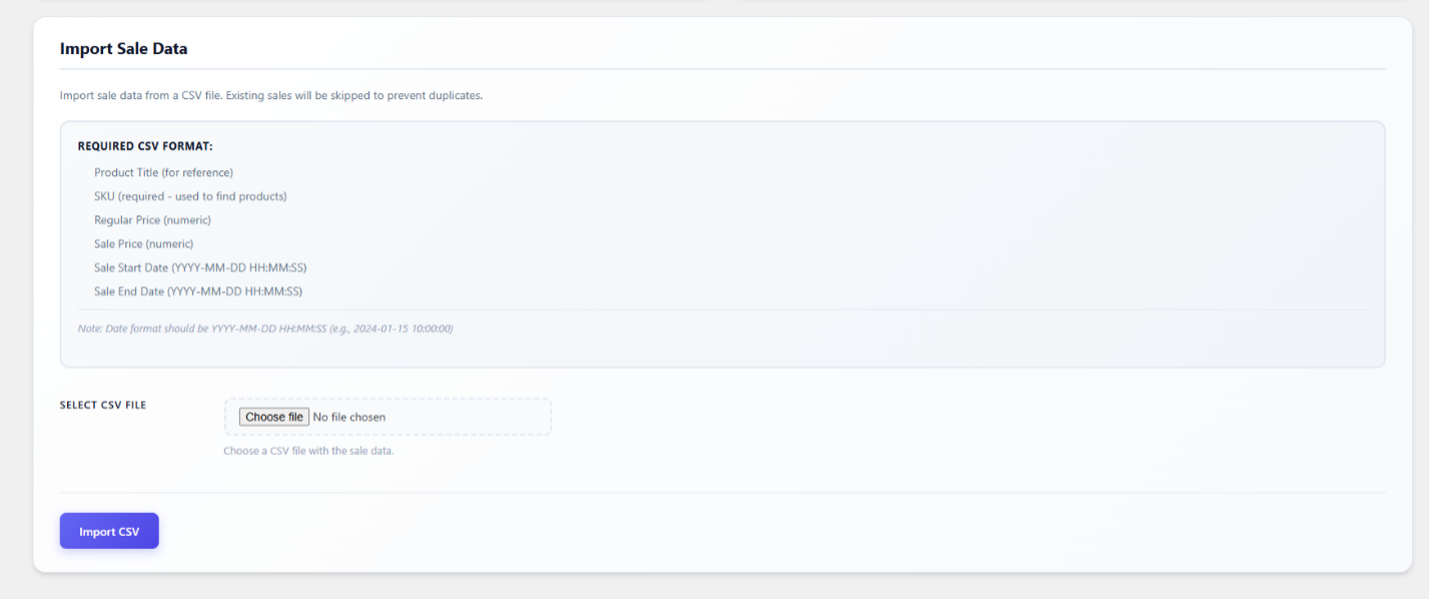
The Import Sale Data option allows you to upload a CSV file and create sales for multiple products at once. The plugin matches products using the SKU and then applies the sale details from the file.
This is especially helpful when you need to schedule many product sales quickly. Instead of editing each product one by one, you can prepare the data in a spreadsheet and import it in a single step.
If a sale already exists for a product, the plugin can skip it to avoid duplicates. This helps keep your sales data clean and organized.
Your CSV file should include the following columns:
The date format should follow the required structure shown in the plugin, so the system can read it correctly.
The Email Notification feature helps store admins stay updated about upcoming sales. Instead of manually checking each product, the plugin automatically sends a reminder email before a sale starts. This helps you review everything in advance and avoid mistakes like incorrect pricing or wrong timing.
The plugin automatically sends an email reminder to the site admin one day before a scheduled sale begins. This advance notification allows the admin to review sale details, verify pricing, and make any last-minute adjustments if needed.
Each notification email provides a clear summary of all products that are scheduled to go on sale the following day. The email includes the following information for each product, you will see:
This makes it easy to review multiple products at once without opening each product page.
On January 2, 2026, the admin will receive an email listing all products that are scheduled to go on sale on January 3, 2026, along with their pricing and sale duration details.

