
Post Type Transfer
This guide explains the Post Type Transfer plugin. Please review it before installation. For support, contact [email protected].
4th of July Sale: 10% OFF on all KrishaStore Products. Code: INDEPENDENCE10. Limited time.
This guide explains the Post Type Transfer plugin. Please review it before installation. For support, contact [email protected].
Post Type Transfer is a feature-rich WordPress plugin that helps you easily convert posts, pages, and custom post types directly from the post editor, Quick Edit, or Bulk Edit screens. It supports all registered WordPress post types, including WooCommerce products, CPT UI, and ACF post types, while preserving content, metadata, taxonomies, and custom fields. The plugin also includes CSV import/export, content visibility controls, and translation-ready support, making content management faster and more efficient.
Post Type Transfer Pro extends these capabilities with bulk transfers, selective enablement, and advanced taxonomy management, giving you greater control over how content is organized and migrated across your website. Whether you're restructuring a website, cleaning up content, or managing large-scale migrations, the plugin helps streamline your workflow while maintaining content integrity.
In addition, the Pro version includes powerful post duplication and drag-and-drop reordering features, allowing you to quickly organize and manage content. It is fully compatible with popular page builders such as Elementor, WPBakery, and Divi, supports multilingual websites powered by WPML and Polylang, and works seamlessly across WordPress Multisite networks, making it a complete solution for content transfer, duplication, and organization.
Before installing Post Type Transfer Pro, please ensure the following requirements are met:
If you are using Post Type Transfer Pro, you must first install and activate the free version of the Post Type Transfer plugin. After activating the free plugin, install and activate the Pro version to access all premium features.
It is always recommended to keep your WordPress, PHP, and MySQL/MariaDB versions up to date for security and performance reasons.
You can purchase the Post Type Transfer Pro plugin from KrishaStore. After purchasing, you will receive a .zip file containing the plugin. You can install the plugin using one of the following methods:
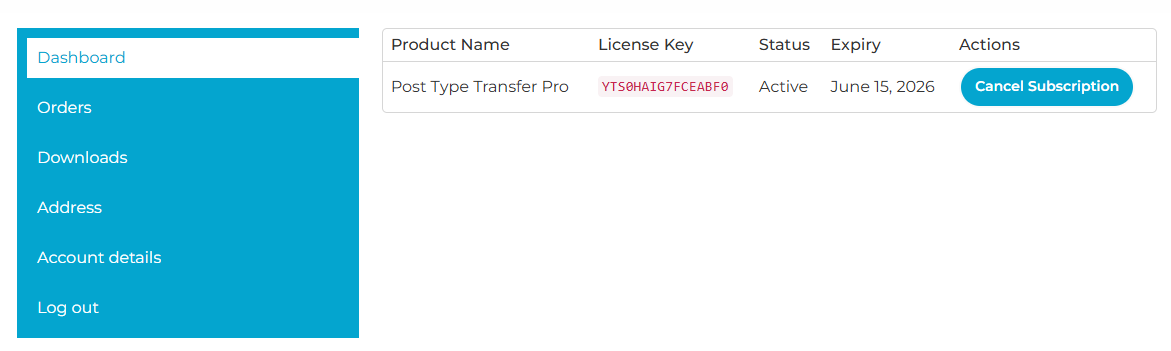
When you purchase the Post Type Transfer Pro plugin from the KrishaStore website, your license key is available in the My Account section on the front-end dashboard. This license key is required to activate Pro features within your WordPress admin panel.
Once the admin enters a valid license key, the user can access and use all the Pro features of the Post Type Transfer Pro plugin.
The subscription remains active until the end of the current billing cycle, even if you choose to cancel it.
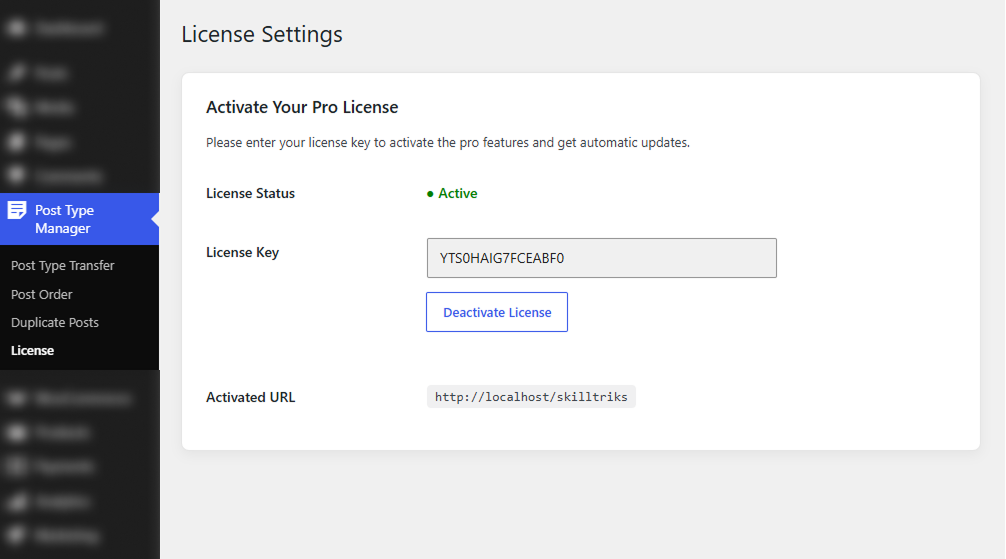
Follow these steps to activate your Post Type Transfer Pro license from the WordPress admin panel:
Step 1: Copy License Key
Step 2: Open License Settings in WordPress
Step 3: Enter License Key
Step 4: Verify Activation
Once activated, you will see:
This process ensures that your Post Type Transfer Pro plugin is fully activated and ready to use with all premium features.
Before Transferring a Page to a Post
Post Type Transfer allows you to convert a Page into a Post while keeping your content. However, Pages and Posts work differently in WordPress, so please review the following points before transferring:
Note: We recommend reviewing your content structure after transfer to ensure the layout and functionality work as expected.
Once the Post Type Transfer plugin is activated, you can transfer any post to other post type from the post editor.
Follow the steps below:
The quick edit option allows you to change the post type without opening the full editor. Follow the steps below:
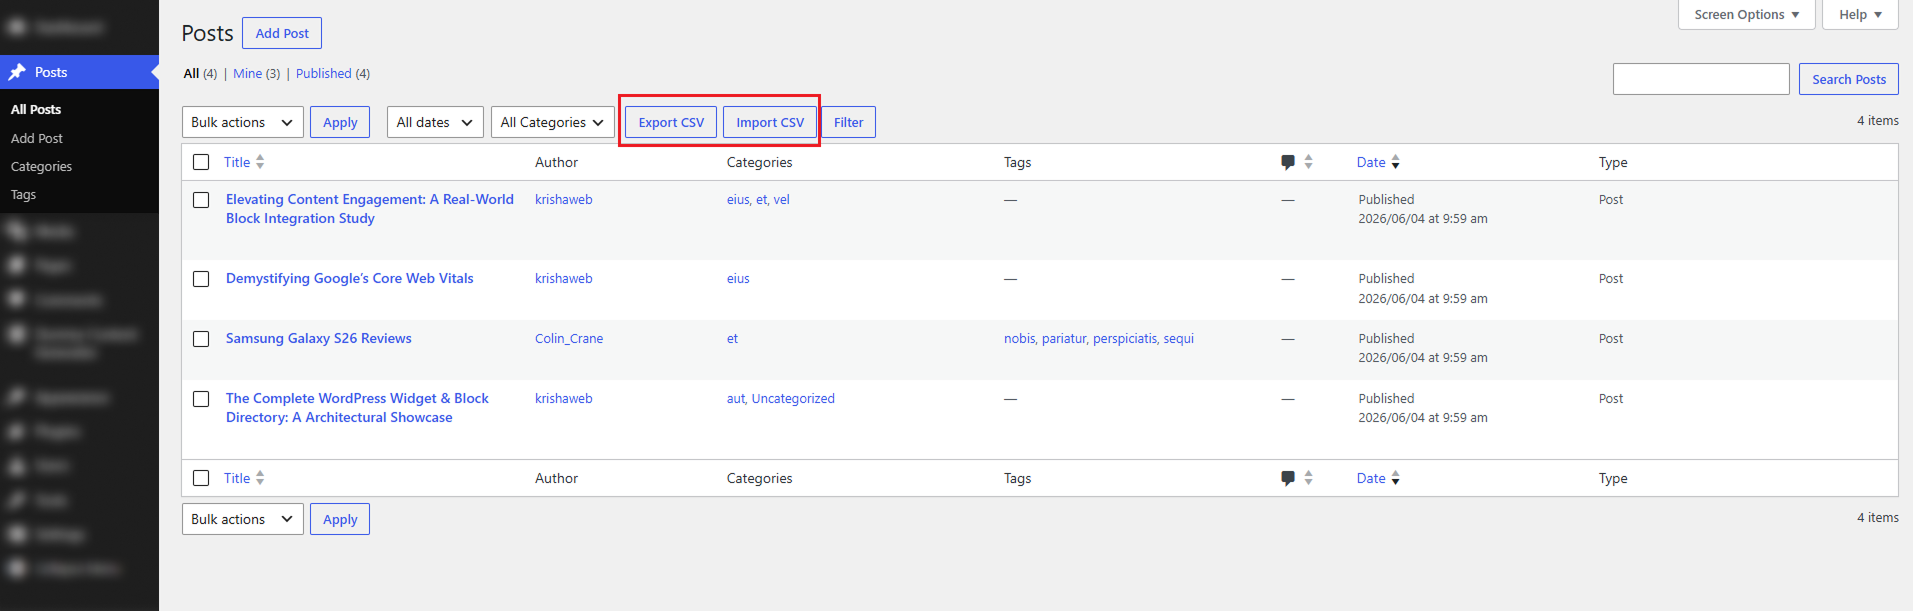
Clicking the Export CSV button downloads a CSV file that contains the posts available under the selected post type on your website. This export includes both draft and published posts, making it useful for backup, reporting, content auditing, and migration tasks. The file captures important post details such as the post title, post content, featured image URL, categories, tags, and other relevant metadata, along with the original publication date and time.
Preserving this publishing information helps maintain the correct order and historical context of your content when you need to review, transfer, or restore it later.
The Import CSV feature lets you upload a previously exported CSV file and bring those posts into another WordPress site or move them from one post type to another within the same site. This is especially helpful when migrating content between environments, restoring saved posts, or reorganizing content into a different structure. During the import process, the plugin reads the supported data from the CSV file and recreates the posts with their title, content, featured image, categories, and other included information.
It also preserves the original publish date and time from the file, helping maintain the same chronology and keeping the imported content consistent with the source data.
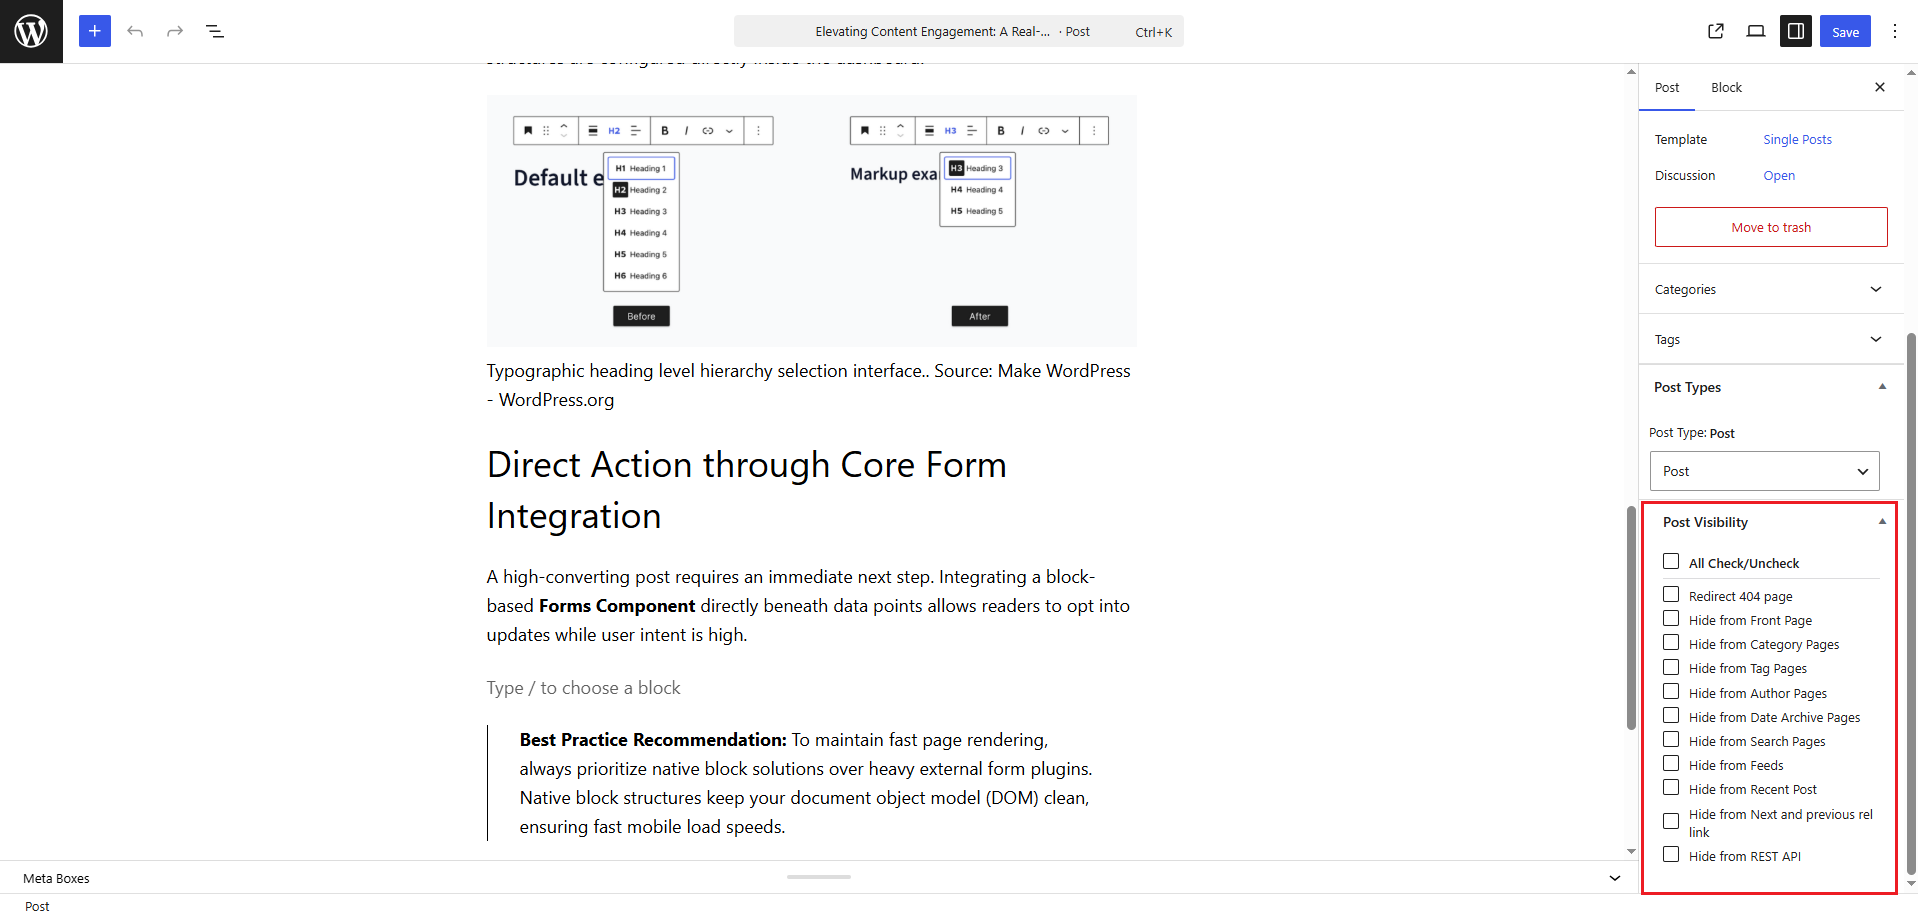
The Post Visibility section gives administrators fine-grained control over where a specific post appears across the WordPress website. Instead of hiding a post completely, you can choose exactly which areas should display it and which areas should not. This is useful when you want to keep a post published but limit its visibility in search results, archive pages, widgets, feeds, or other sections of the site.
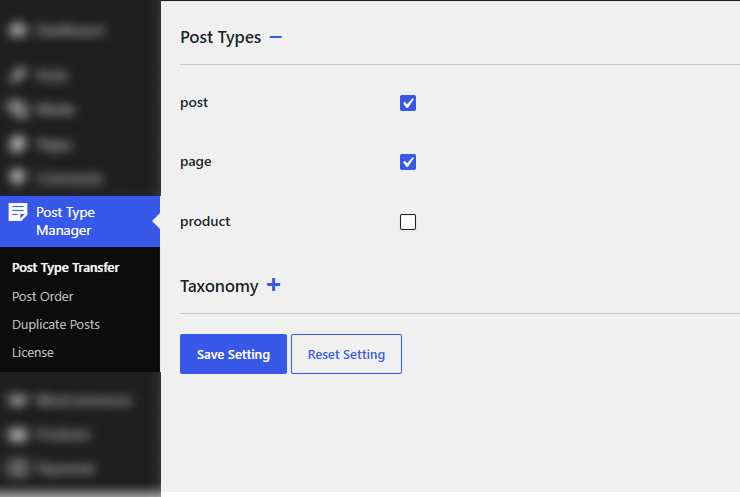
The Post Type Transfer Pro settings let you choose which post types can use the transfer functionality. By default, all post types are disabled, helping keep the WordPress admin area clean and focused.
Once enabled, transfer options become available only for the selected post types. The Pro version also includes taxonomy management settings, allowing you to control how categories, tags, and custom taxonomies are handled during transfers.
The Allowed Post Types to Transfer option lets you choose which post types can use the Post Type Transfer feature. Only the post types selected in this section will display the transfer functionality in the editor, Quick Edit, or Bulk Edit screens.
Step-by-Step Instructions:
Once saved, the Post Type Transfer option will become available only for the selected post types in the editor and Quick Edit sections.
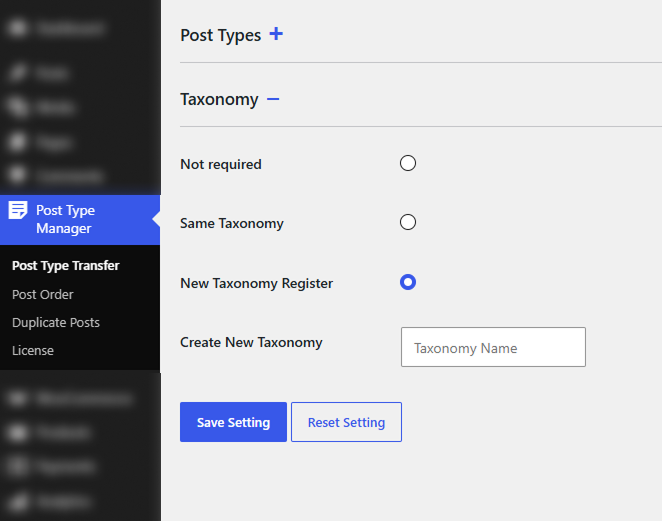
The Manage Taxonomy option controls how taxonomies are handled when content is transferred from one post type to another. This ensures categories, tags, or custom taxonomies can either be ignored, retained, or newly created based on your requirements.
Available Taxonomy Options
Step-by-Step Instructions:
Now, when transferring a post type, the selected taxonomy behavior will automatically apply during the transfer process.
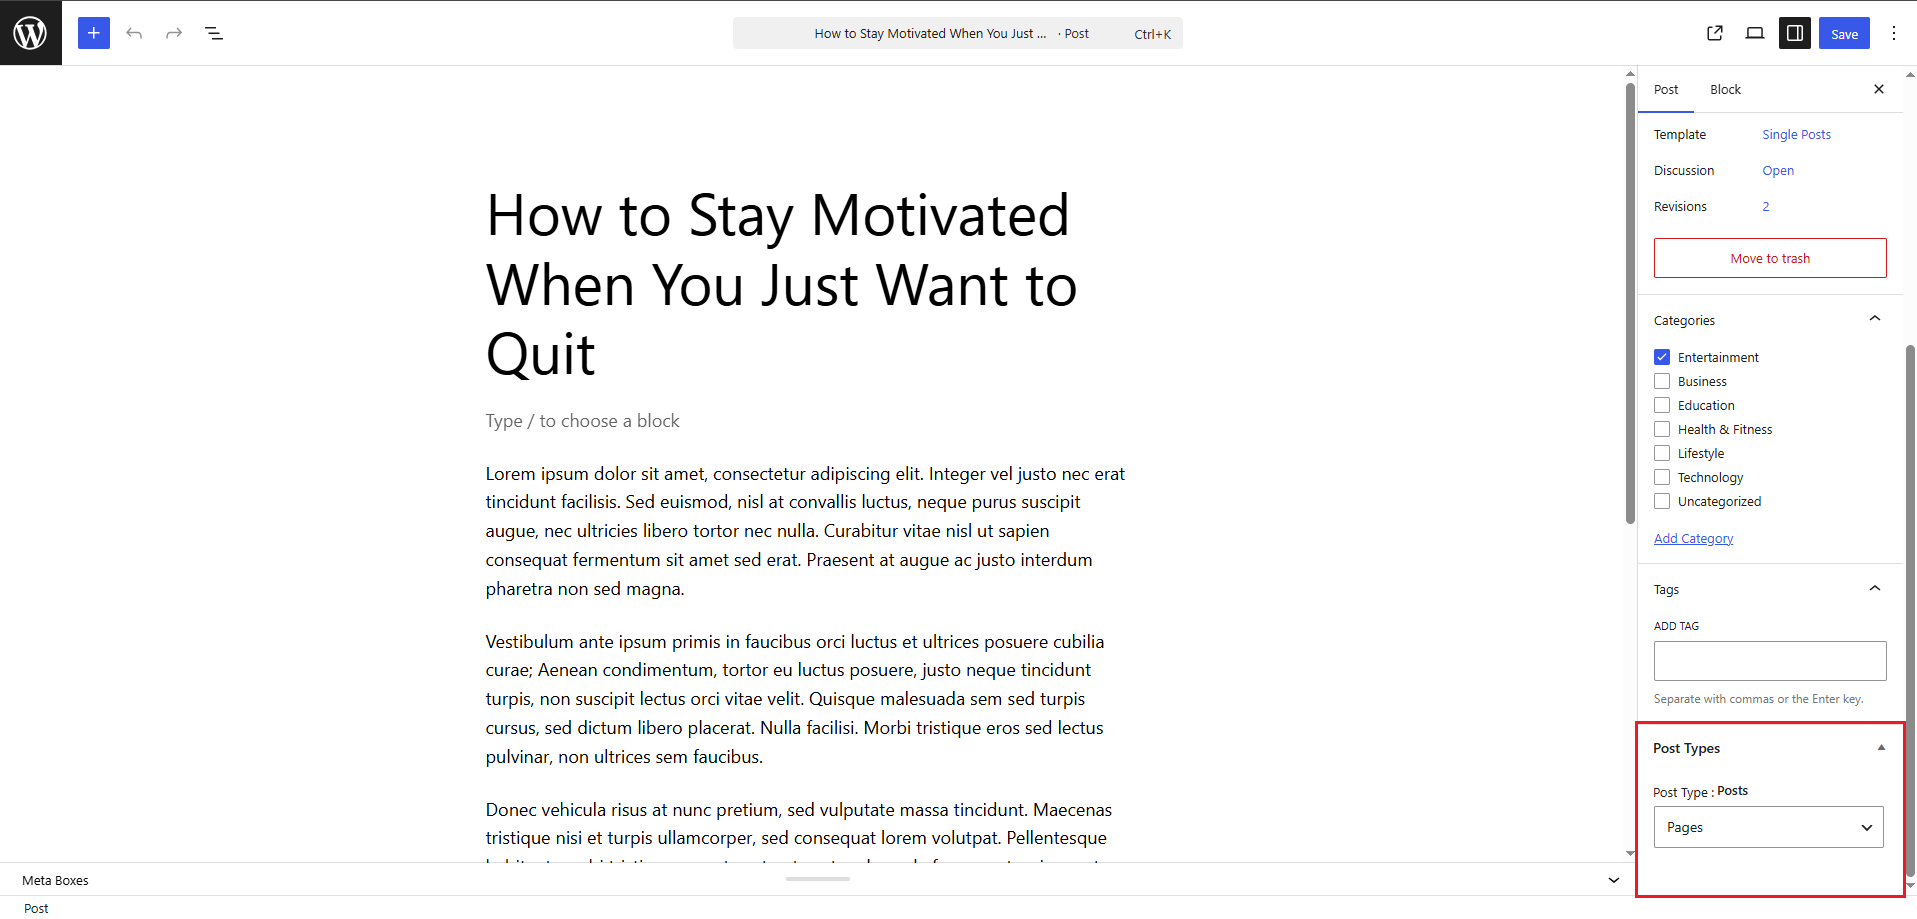
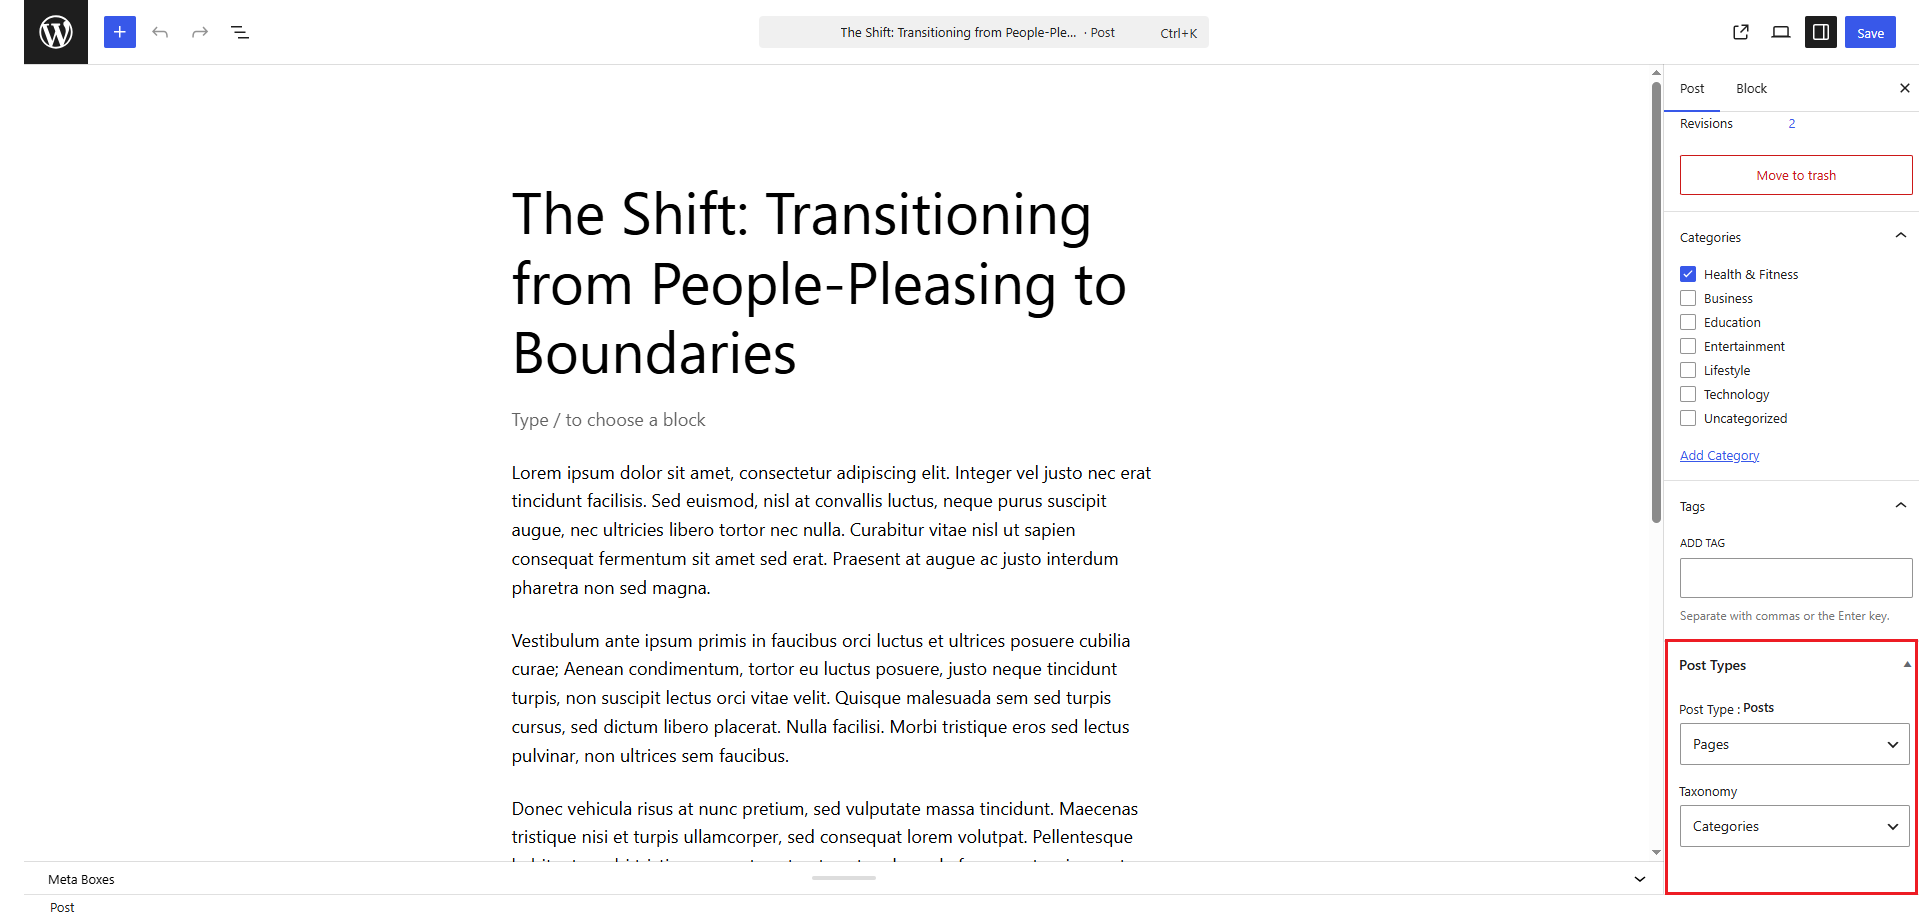
In the Post Type Transfer Pro settings, you can choose the post types and taxonomy that should be available on the post edit screen. In this example, the same taxonomy has been selected in the Taxonomy setting, and both Post and Page have been enabled in the Post Type setting. Because of this, the Post Type and Taxonomy options appear in the post editor sidebar.
When you transfer content from a Post to a Page, the selected taxonomy will also be transferred to the new post type. This makes it easier to keep related content organized while moving it between different post types.
Step-by-Step Instructions
After saving, the content will be transferred successfully to the selected post type along with the chosen taxonomy.
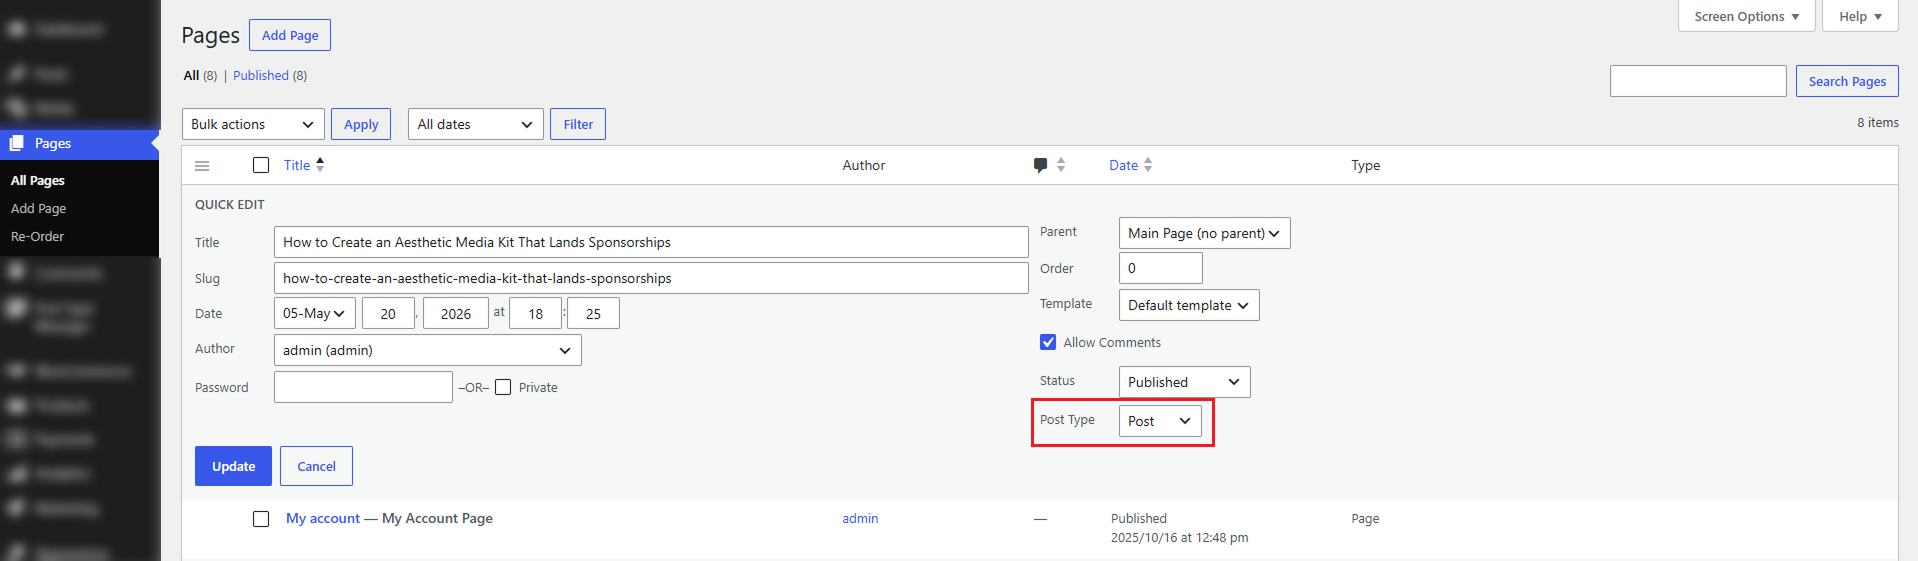
The Quick Edit option lets you change the post type and taxonomy without opening the full editor. This is useful when you want to quickly transfer content and keep its taxonomy settings at the same time.
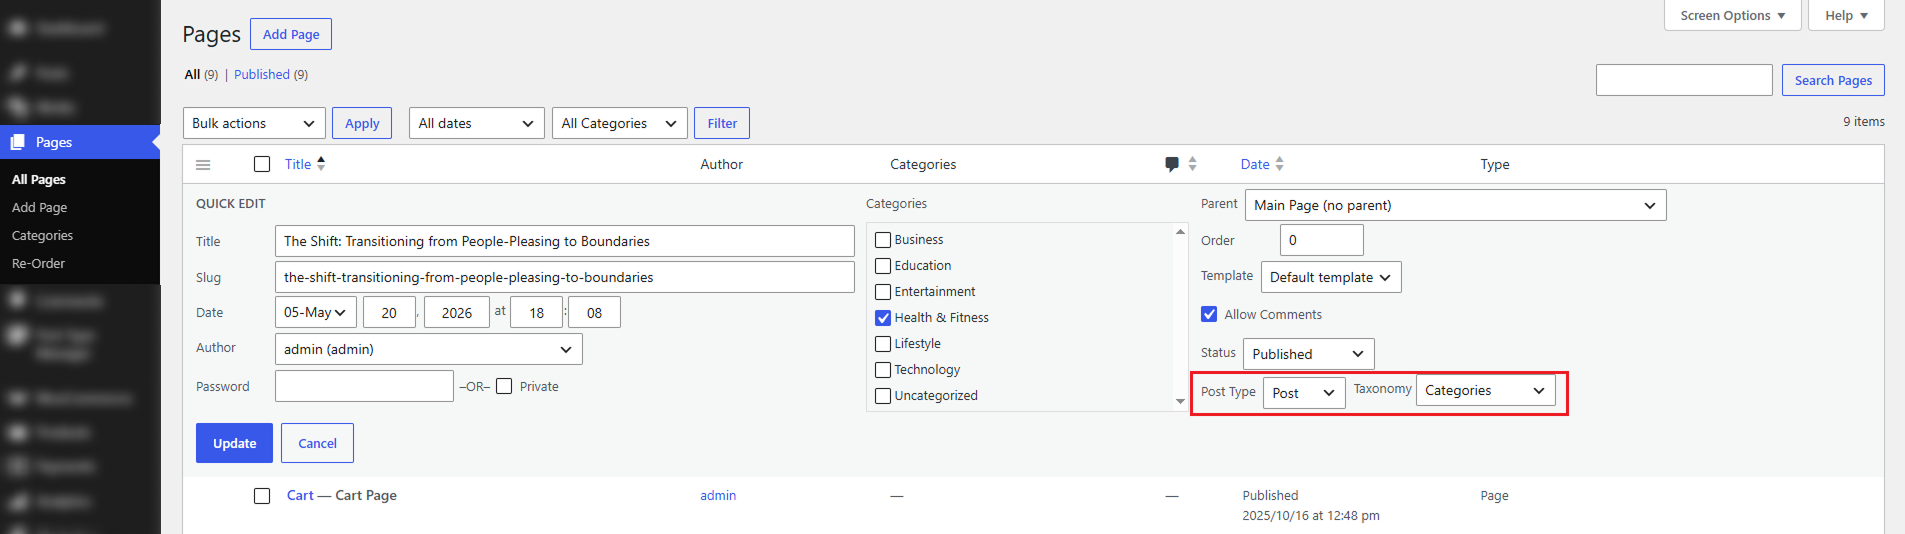
Step-by-Step Instructions
After updating, the page will be transferred to the selected post type along with the chosen taxonomy.
The Bulk Edit option allows you to transfer multiple posts at once without opening each post separately. This is useful when you want to change the post type for several items at the same time and apply the selected taxonomy setting in one step.
In this example, you can select multiple posts from the Posts list, open the Bulk Edit panel, and choose a new Post Type and Taxonomy. After updating, all selected posts will be transferred according to the options you selected.
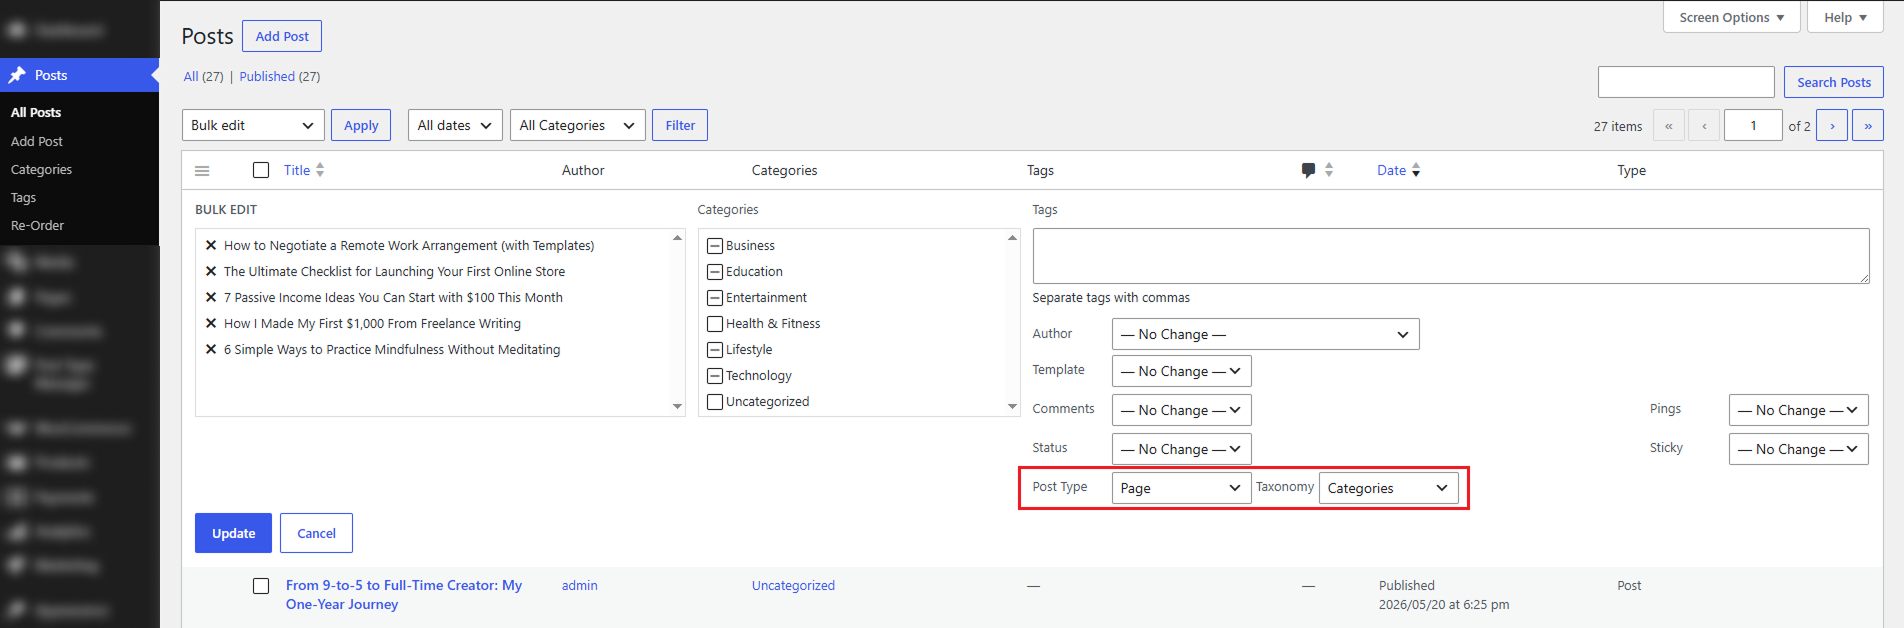
Step-by-Step Instructions
After saving, the selected posts will be transferred to the new post type with the chosen taxonomy settings.
The Post Reorder feature in the Post Type Transfer Pro plugin allows administrators to easily organize and rearrange posts within selected post types directly from the WordPress admin panel. Instead of relying on publish dates or default WordPress sorting methods, this feature gives you full control over the display order of your content using a simple drag-and-drop interface. It is especially useful for websites where the order of content is important, such as blogs, announcements, portfolios, product listings, or custom post types.
By enabling this feature, you can quickly manage the sequence of posts without editing each post individually. The plugin also includes an AutoSort option, which automatically applies the custom backend order to the frontend of your website. This helps maintain a consistent content structure across both the WordPress admin area and the live website, making content management more organized, flexible, and user-friendly.
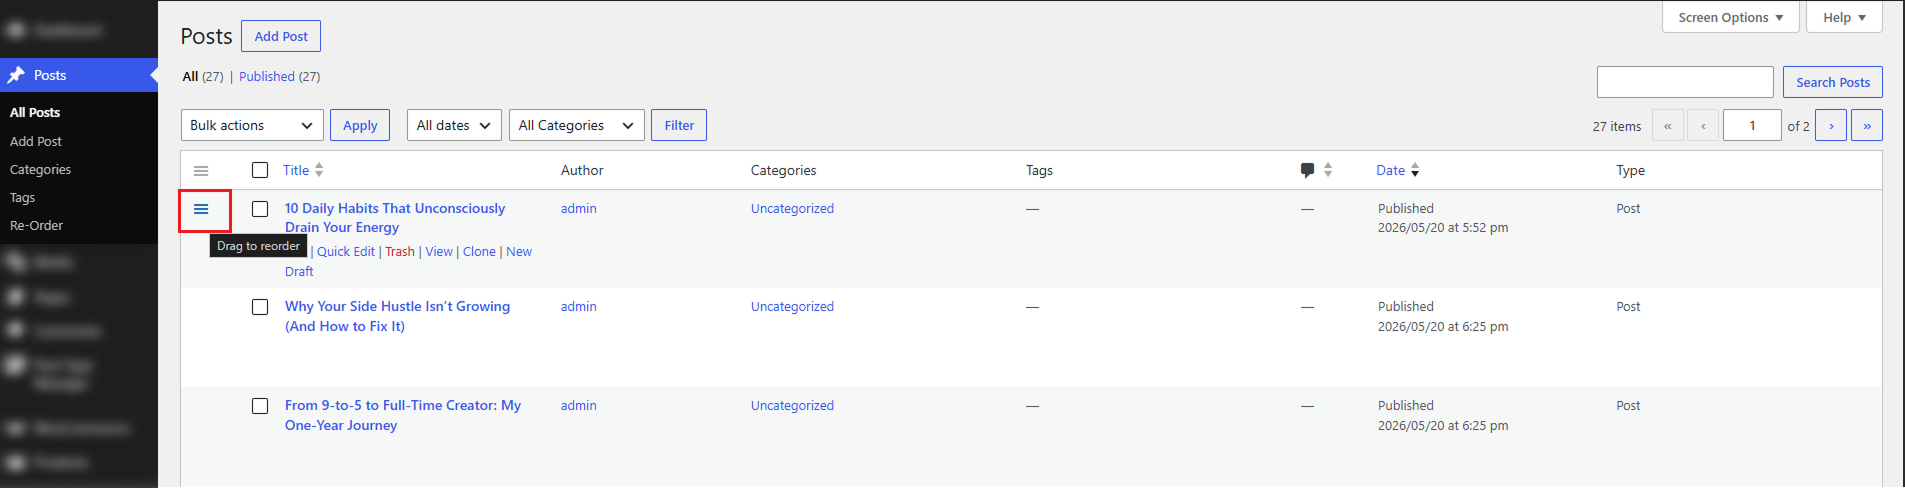
The Enable Ordering option allows you to manually rearrange posts and pages directly from the WordPress admin listing page. Once enabled for a specific post type, a reorder (drag-and-drop) icon will appear when you hover over the posts in the listing table. You can then drag items up or down to arrange them in your preferred order.
By default, the reordered sequence is visible only in the backend admin listing page. The frontend website order will remain unchanged unless the Enable AutoSort option is also activated.
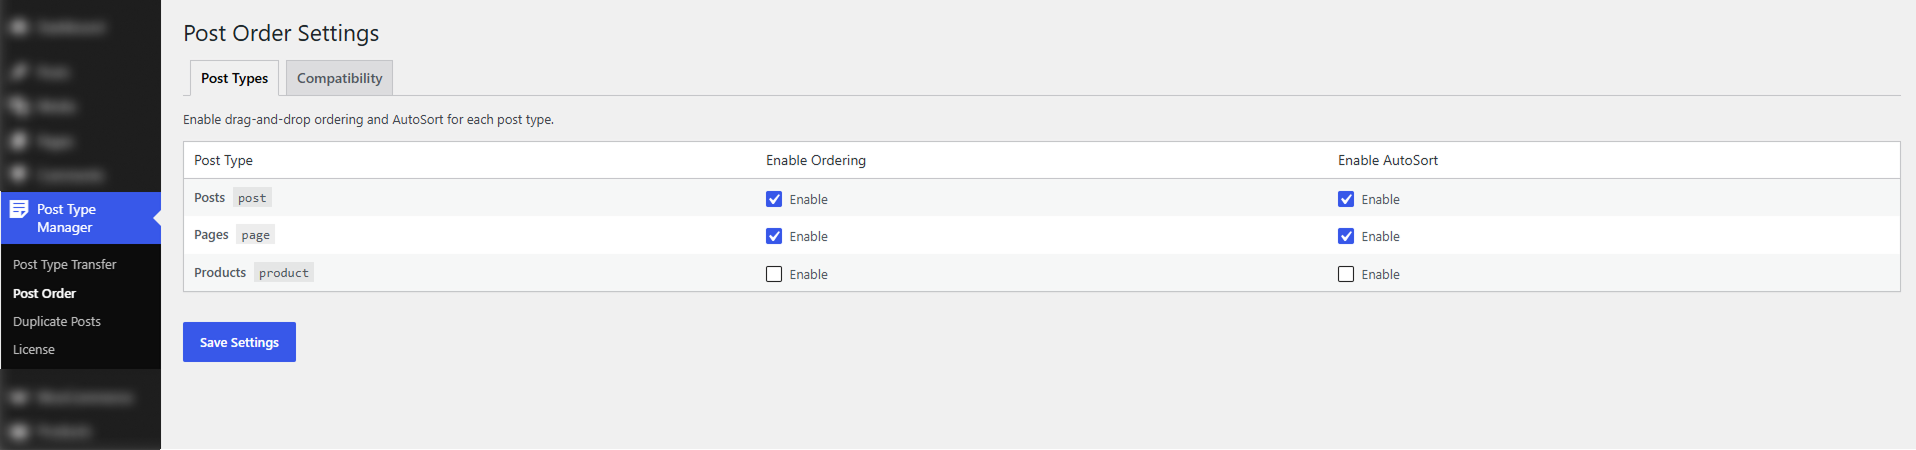
Step-by-Step Instructions
The Enable AutoSort option automatically applies the custom post order from the admin area to the frontend of your website. When this setting is enabled, visitors will see posts displayed in the exact same order you arranged using the drag-and-drop feature in the admin listing page.
This feature is useful when you want complete control over how posts appear on the live website instead of relying on WordPress’s default sorting methods, such as publish date or alphabetical order.
This ensures consistency between the backend management view and the frontend website display, helping create a more organized and controlled content experience for visitors.
The Re-Order page in Post Type Transfer Pro provides an easy way to organize posts, pages, and custom post types directly from the WordPress admin area. Instead of relying on publish dates or default WordPress sorting, you can create a custom content order that better matches your website’s structure and priorities.
The page includes drag-and-drop reordering, multi-select support, post pinning, filtering options, and pagination for managing large content libraries. Additional tools such as Undo, Save Order, and Reset to Default help you manage changes safely and efficiently. When AutoSort is enabled, your custom post order is automatically reflected on the frontend, ensuring a consistent content experience across your website.
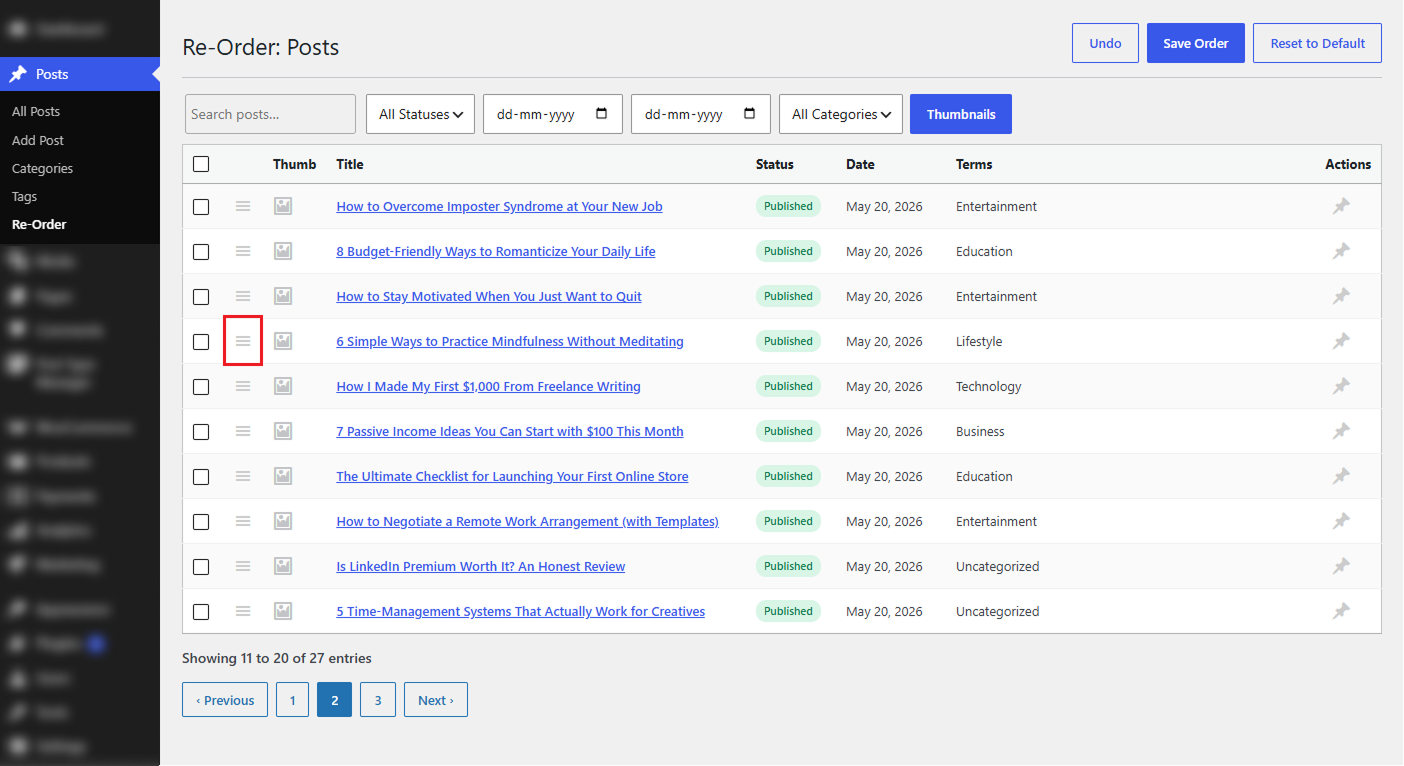
When Enable Ordering is enabled, a Re-Order submenu appears under the selected post type in the WordPress admin menu. This page lets you quickly rearrange posts using a drag-and-drop interface without editing individual posts.
Additional features such as search, category and date filters, pagination, and thumbnail support make it easy to find and organize content efficiently.
Undo Button
When you rearrange posts using drag-and-drop, the Undo and Save Order buttons become active automatically. The Undo button allows you to reverse the most recent reorder action, helping you quickly correct mistakes and restore the previous arrangement without manually moving posts again.
Save Order Button
After rearranging posts, click Save Order to permanently apply your changes. Once saved, the custom order is reflected on the WordPress admin listing page and, when AutoSort is enabled, automatically displayed on the frontend as well. This ensures a consistent content order across both the admin area and your website.
Reset to Default Button
The Reset to Default button removes all custom ordering and restores the default WordPress post order. This clears any manual rearrangements and pinned positions, returning posts to their original sorting behavior. If AutoSort is enabled, the frontend order is also reset to match the default WordPress sorting.
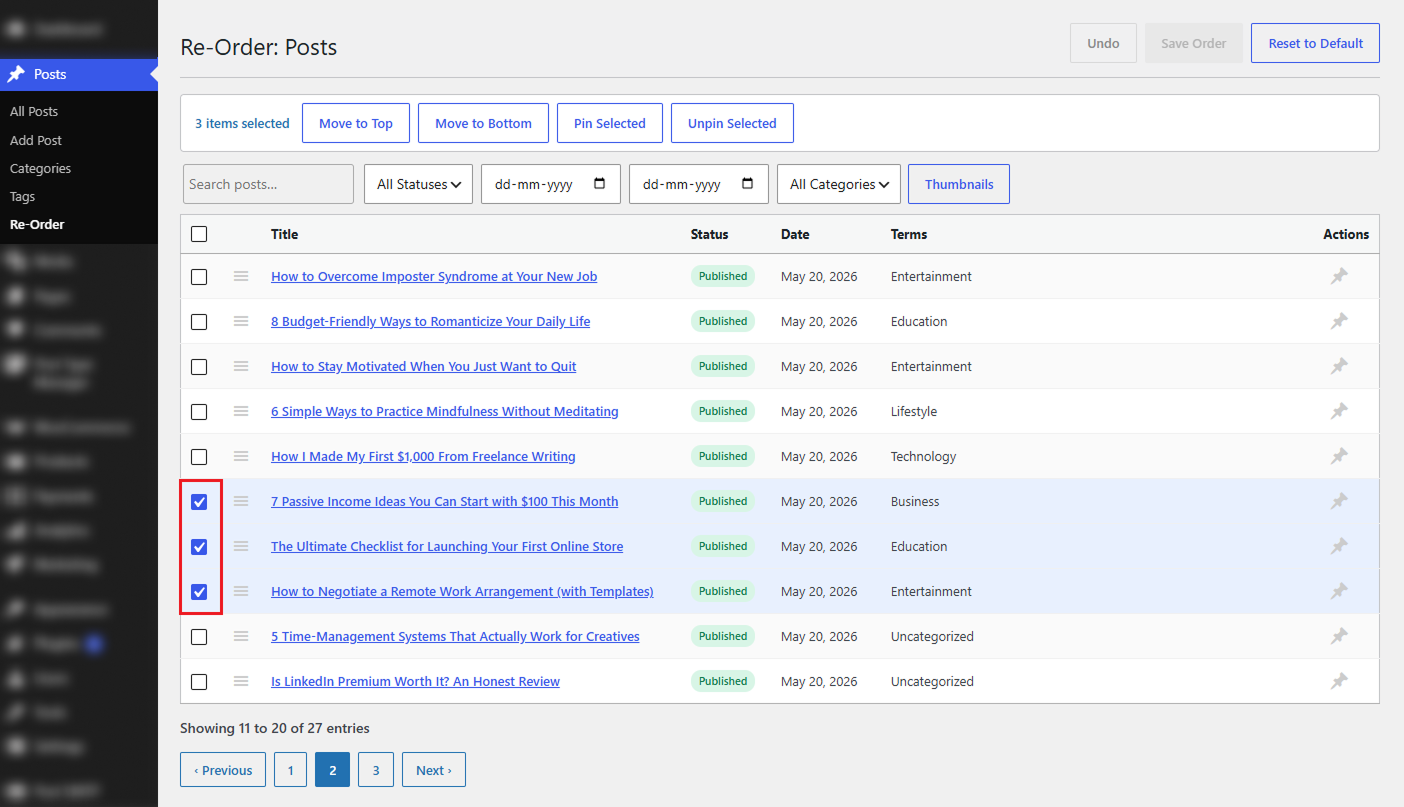
The Re-Order page supports multiple post selection, allowing administrators to manage several posts at once instead of rearranging them individually. Simply select the desired posts using the checkboxes, and additional bulk action options become available.
Available actions include Move to Top, Move to Bottom, Pin Selected, and Unpin Selected, making it easy to organize large content libraries more efficiently. Selected posts remain highlighted, helping you quickly identify and manage the items included in the current action.
Move To Top
The Move to Top option instantly places all selected posts at the top of the current list. This provides a quick way to prioritize important content without manually dragging each post, making content organization faster and more efficient.
Move To Bottom
The Move to Bottom option instantly moves all selected posts to the end of the current list. This is useful for deprioritizing older or less important content without manually dragging each post, helping you organize large content collections more efficiently.
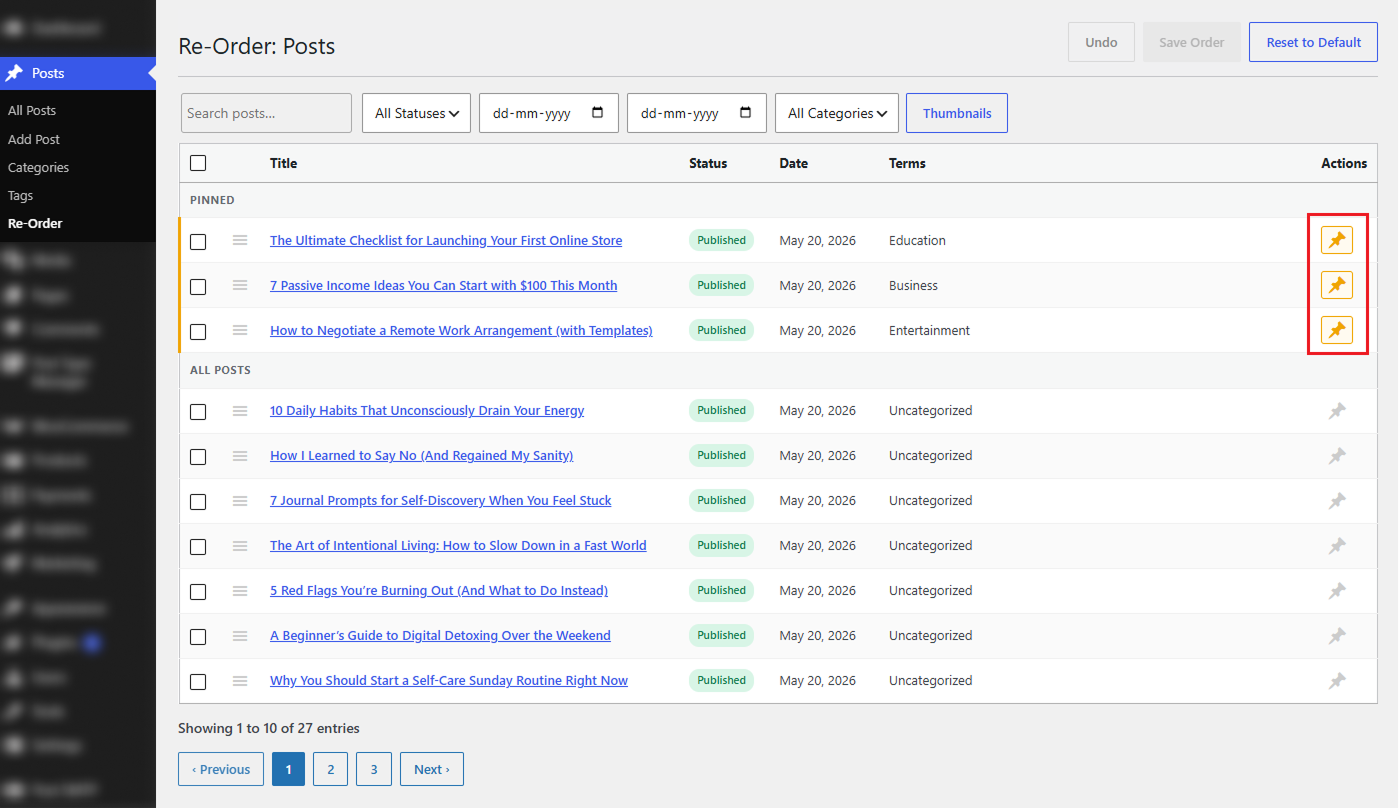
The Pinned Posts feature allows administrators to keep important content at the top of the Re-Order page. Pinned posts are displayed in a separate Pinned section above the regular post list and are clearly marked with a pin icon for easy identification.
This is ideal for featured announcements, important articles, products, or other high-priority content. Pinned posts can also be reordered independently, giving you complete control over the display order of featured items.
Pin Selected
The Pin Selected option moves all selected posts to the Pinned section at the top of the Re-Order page. Pinned posts are clearly marked with a pin icon and remain separate from the regular post list for better visibility.
This feature is useful for highlighting important content, featured articles, announcements, or products, ensuring they remain easily accessible and prioritized.
Unpin Selected
The Unpin Selected option removes selected posts from the Pinned section and returns them to the regular post list. Once unpinned, the posts follow the normal custom ordering system and are no longer prioritized at the top.
This allows administrators to easily manage featured content and adjust post visibility as content priorities change.
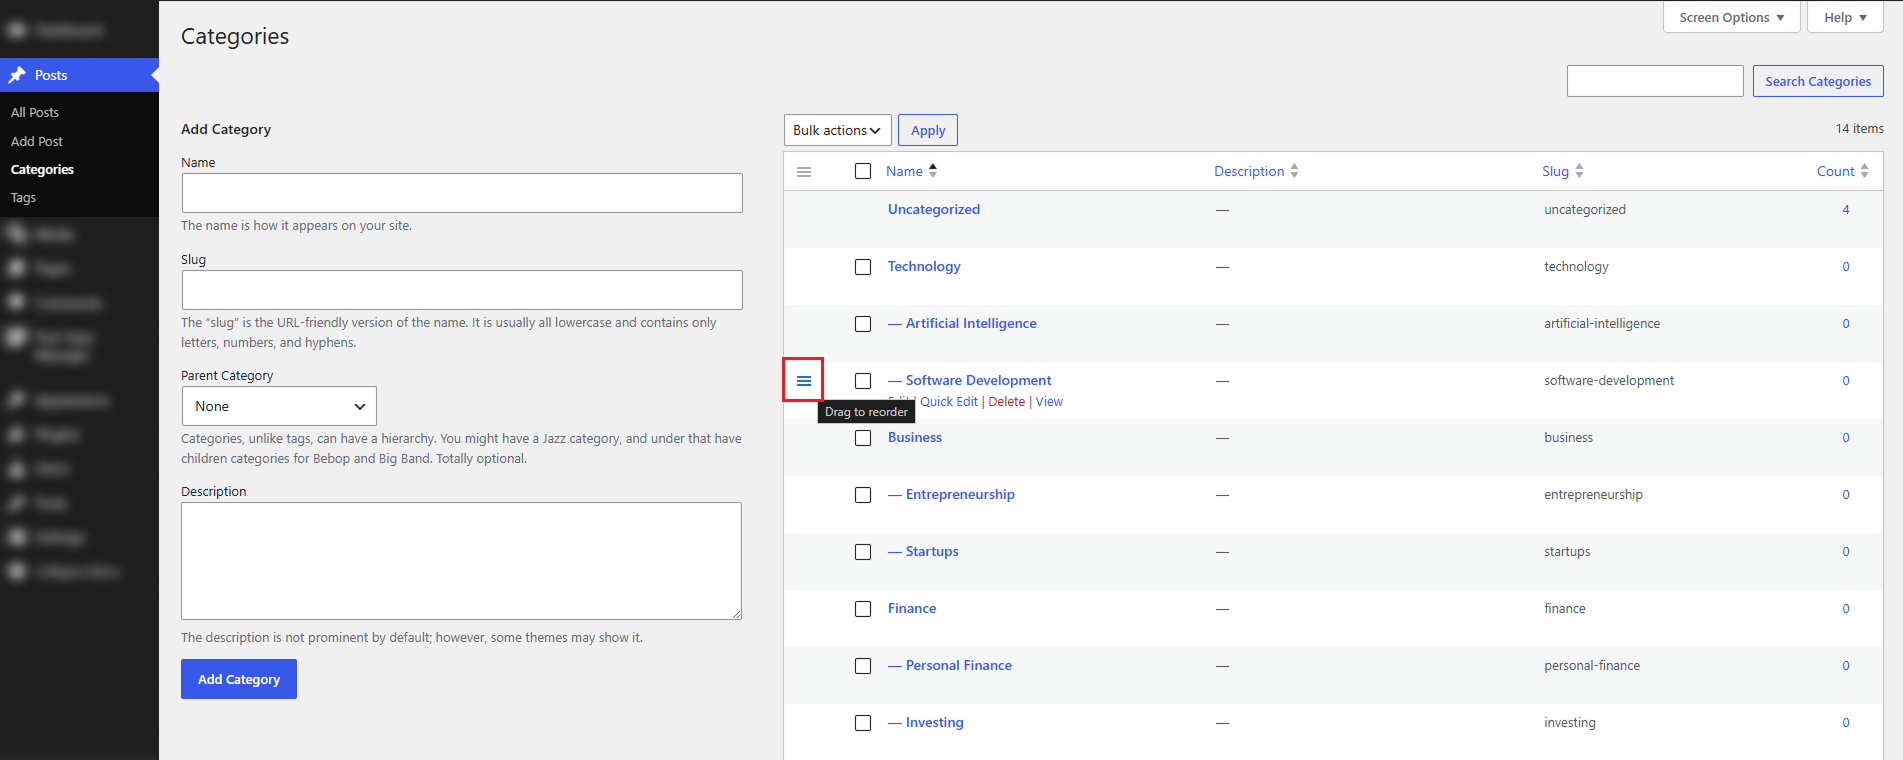
The Taxonomy Order Settings section lets you control the display order of taxonomy terms directly from the WordPress admin dashboard. By enabling this feature for a specific taxonomy, such as Categories, Tags, or Pattern Categories, you can manually rearrange terms using a simple drag-and-drop interface inside the taxonomy list screen. This is especially useful when you want to organize taxonomy terms in a preferred sequence instead of relying on the default WordPress ordering.
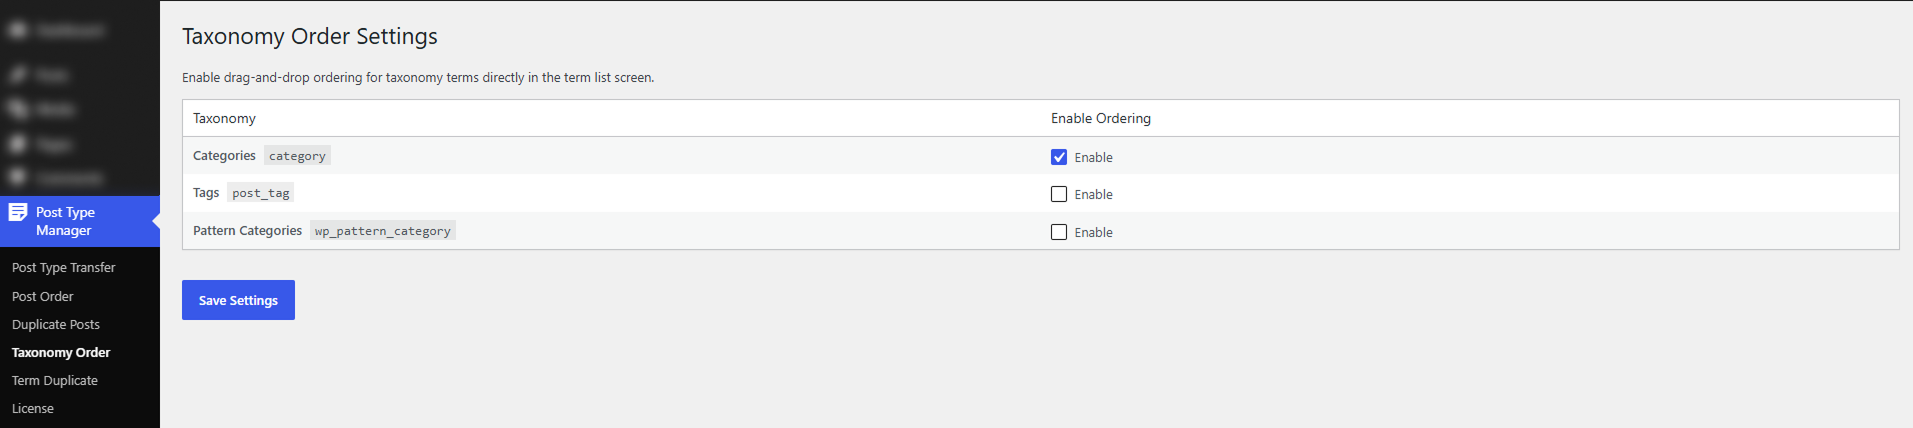
Once ordering is enabled, a drag handle appears next to each taxonomy term in the listing table. You can use this handle to move terms up or down and save the new order instantly.
Step-by-Step Instructions
The Duplicate Posts Settings section in Post Type Transfer Pro allows administrators to control how post duplication works across posts, pages, and custom post types. It helps streamline content management by enabling quick duplication of existing content, making it ideal for landing pages, products, announcements, templates, and other reusable content.
Administrators can choose which post types support duplication, define which content elements should be copied, configure a custom duplicate title prefix, and manage duplicate-related actions displayed in the WordPress admin area. These settings provide complete flexibility over how duplicated content is created and managed.
The plugin also supports pinned content, allowing pinned posts to be reordered independently for better control over featured content placement.
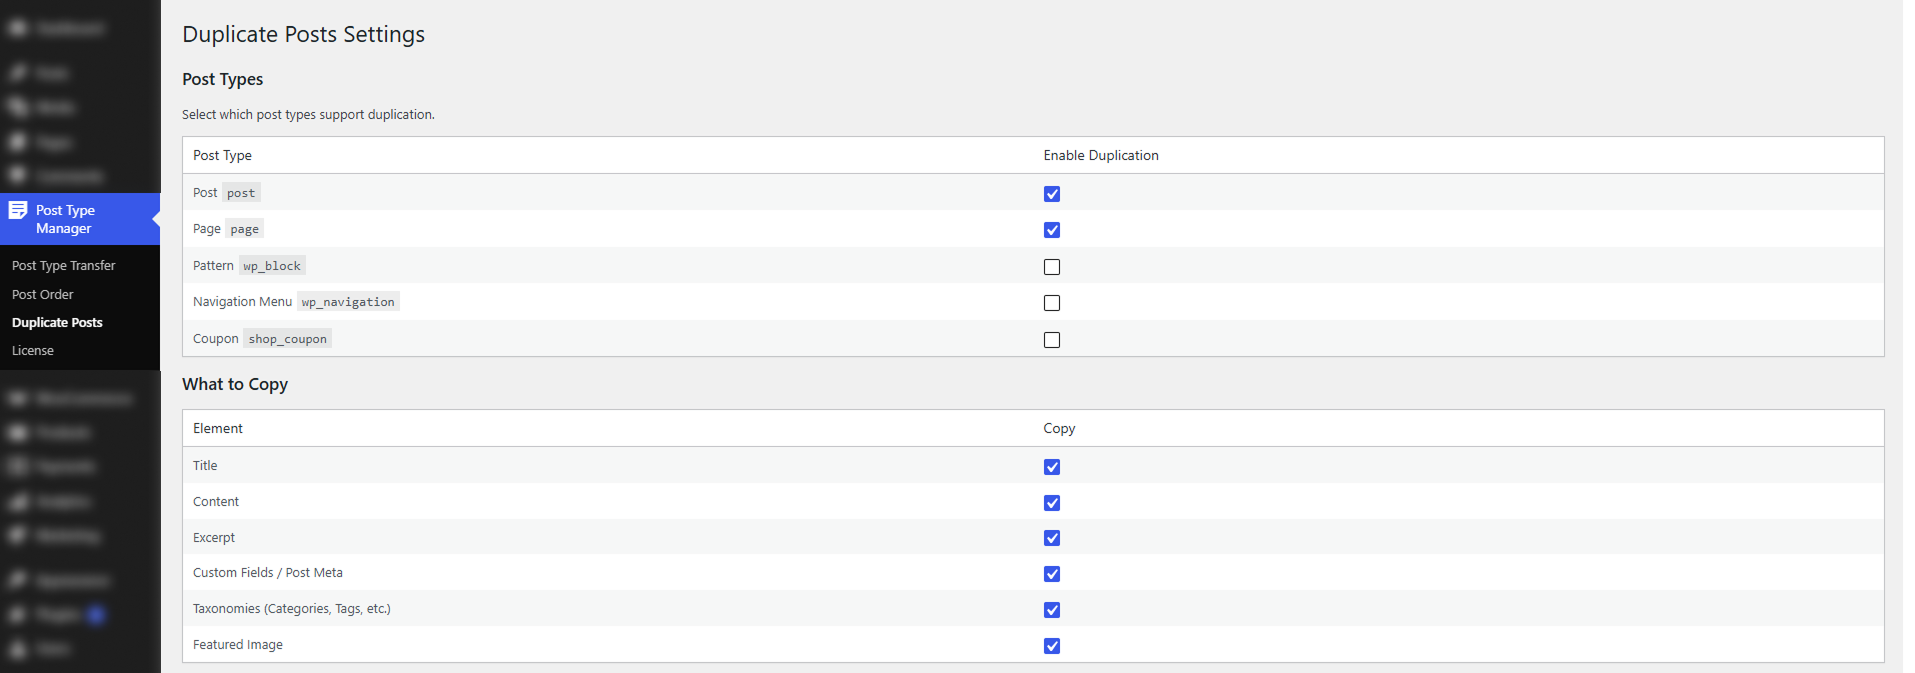
The Enable Duplication option allows administrators to decide which post types can use the duplication feature. Only the selected post types will display duplicate-related actions inside the admin listing page.
When duplication is enabled for a post type, a Clone option automatically appears in the row actions of the Posts listing page. This allows administrators to create a duplicate copy directly from the list view without opening the editor first.
The What to Copy section allows administrators to control exactly which content elements should be included when a post is duplicated. This gives greater flexibility and ensures duplicated posts contain only the information needed.
The Duplicate Title Prefix field defines the text automatically added at the beginning of every duplicated post title. This helps administrators easily identify duplicate content inside the Posts listing page and reduces confusion between original and copied posts.
For example:
Using a clear title prefix helps keep duplicated content organized and makes it easier to distinguish drafts, templates, or temporary copies from published content.
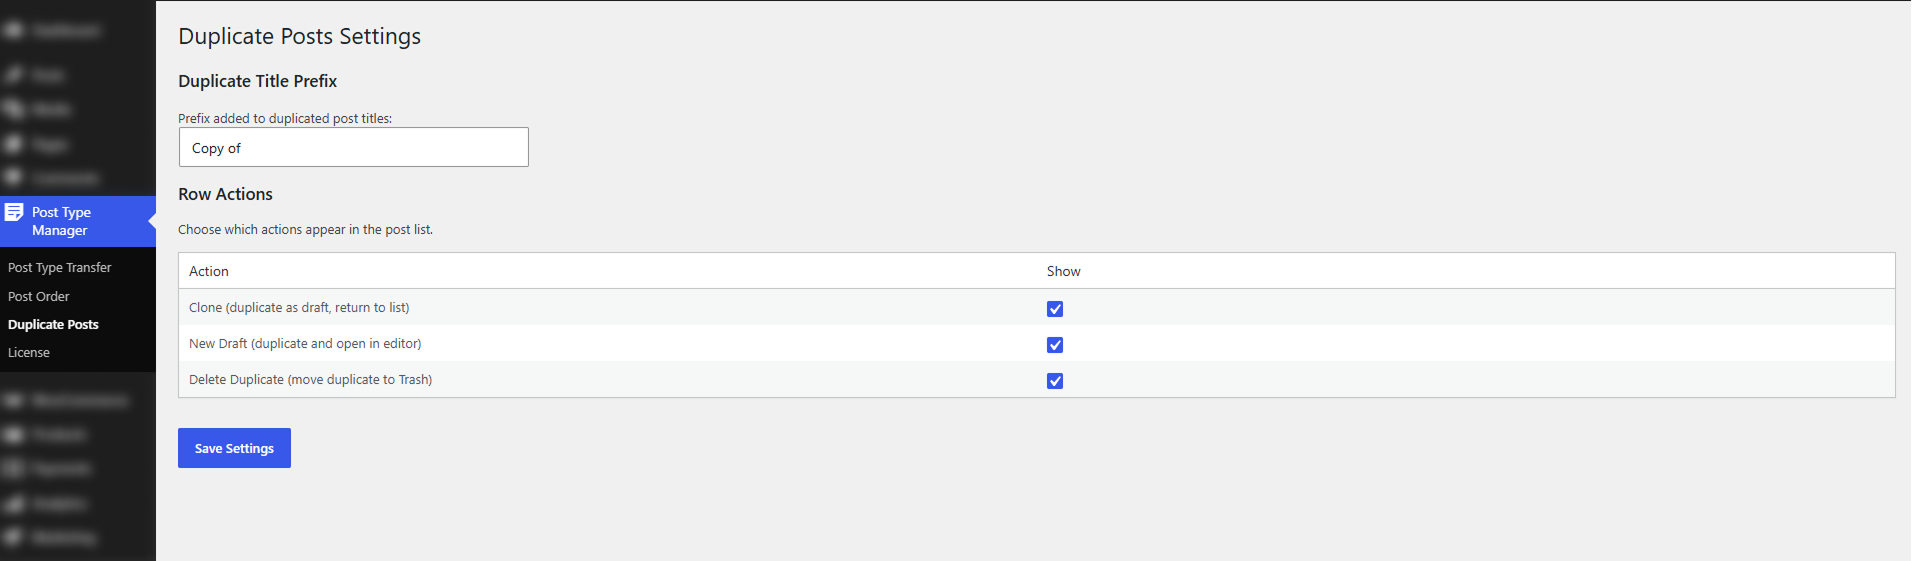
The Row Actions section controls which duplication-related actions appear when hovering over posts in the Posts listing page. These actions provide quick access to duplication tools directly from the admin list view.
Clone (Duplicate as Draft, Return to List)
The Clone row action provides a quick and efficient way to duplicate an existing post directly from the Posts listing page without opening the WordPress editor. When this option is enabled, a Clone link appears when you hover your mouse over a post title in the admin list view. Clicking this option instantly creates a duplicate copy of the selected post and saves it as a Draft.
After the duplicate is created, you are automatically returned to the Posts listing page, allowing you to continue managing content without interruption.
New Draft (Duplicate and Open in Editor)
The New Draft row action is designed for users who want to immediately edit a duplicated post after creating it. When enabled, a New Draft link appears in the row actions below each post title inside the Posts listing page. Clicking this option creates a duplicate copy of the selected post, saves it as a draft, and automatically opens the duplicated content in the WordPress editor.
Instead of returning to the Posts list after duplication, the editor opens automatically so the user can start editing the new draft right away.
Delete Duplicate (Move Duplicate to Trash)
The Delete Duplicate row action helps administrators easily manage and remove duplicated posts that are no longer needed. This option is specifically designed to work with posts created using the plugin’s duplication feature and identified through the configured Duplicate Title Prefix. By using the title prefix, the plugin can distinguish duplicate posts from original content and safely target only duplicated items for removal.
When the Delete Duplicate option is used, the selected duplicate post is moved to the WordPress Trash instead of being permanently deleted immediately. This provides an additional layer of safety, allowing administrators to restore accidentally removed duplicates if necessary.
The Duplicate Term Settings section in the Post Type Transfer Pro plugin allows administrators to manage how taxonomy term duplication works across different taxonomy types in WordPress. This feature makes it easier to create copies of existing taxonomy terms such as categories, tags, or custom taxonomies without having to recreate them manually from scratch.
From this settings page, you can choose which taxonomy types should support duplication, decide which term details should be copied into the duplicate, and define a custom duplicate name prefix for easier identification.
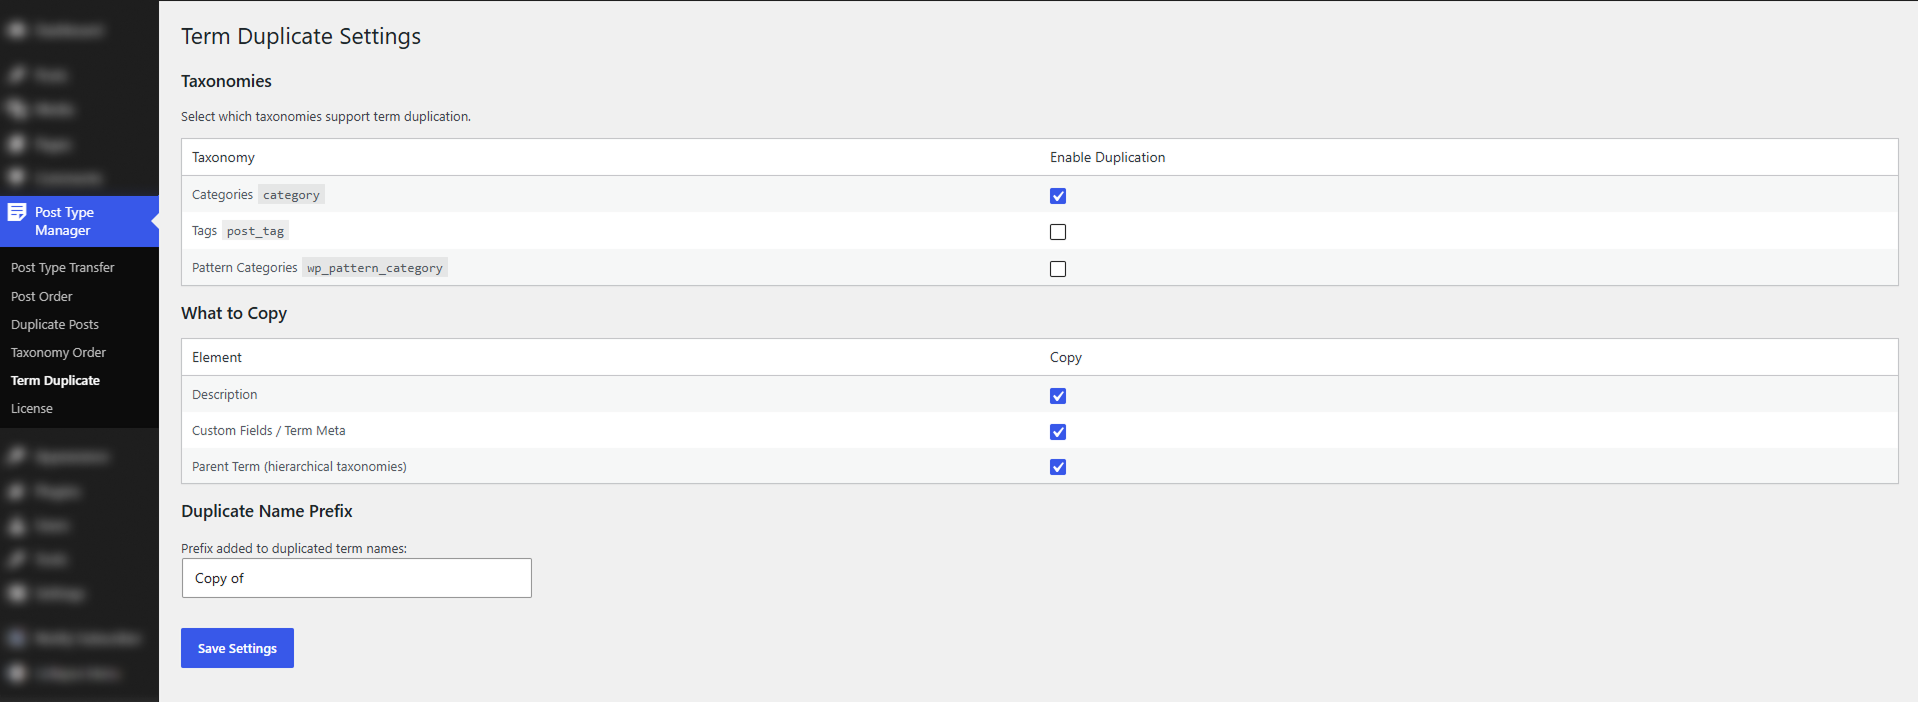
The Enable Duplication option lets administrators choose which taxonomy types should support the duplication feature. Only the taxonomy types selected here will show duplicate-related actions in the taxonomy listing page inside the WordPress admin area.
Once duplication is enabled for a taxonomy type, a Duplicate action becomes available in the row actions of the taxonomy listing page. This allows you to quickly create a copy of an existing term directly from the list view, without opening the term editor first.
The What to Copy section lets administrators choose exactly which term details should be included when a taxonomy term is duplicated. This gives you greater control over the duplication process and ensures that only the necessary information is carried over to the new term.
By selecting the appropriate options, you can control whether the duplicated term keeps its description, custom metadata, or parent term structure.
The Duplicate Name Prefix field defines the text that is automatically added to the beginning of every duplicated term name. This makes duplicated terms easy to identify inside the taxonomy listing page and helps avoid confusion between the original term and its copied version. It also makes taxonomy management cleaner and more organized when working with a large number of terms.
For example:
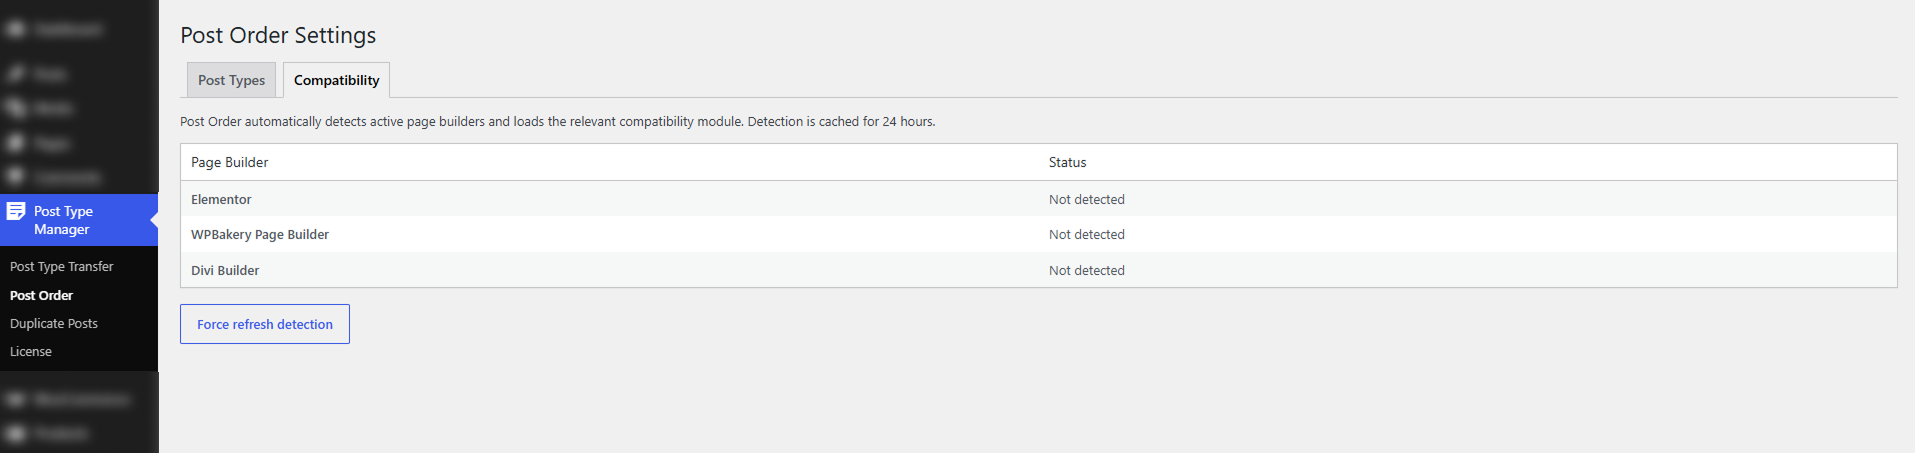
The Compatibility section in the Post Order Settings page helps the plugin work smoothly with popular page builders and theme layouts. As shown in the screenshot, the plugin can automatically detect supported builders such as Elementor, WPBakery Page Builder, and Divi Builder. When a compatible builder is detected, the plugin loads the correct module so your custom post ordering continues to work properly without affecting the design or display of your content.
This detection is checked automatically and is cached for 24 hours to improve performance. If you have recently installed, removed, or changed a page builder, you can use the force refresh detection button to run the check again and update the compatibility status immediately.
Post Type Transfer Pro includes WP-CLI support, allowing developers and site administrators to transfer posts between post types directly from the command line. This is ideal for automating content migrations, handling large-scale transfers, and integrating post type changes into deployment workflows.
The WP-CLI command supports transferring all posts or specific post IDs, managing taxonomies during the transfer, and previewing changes using the --dry-run option before applying them to live content.
Note: WP-CLI functionality is available only after activating Post Type Transfer Pro with a valid license key.
Example Usage:
The CSV importer and exporter provide several WordPress filters that allow developers to customize CSV generation and import behavior without modifying core plugin code.
/**
 * Filters the filename for the exported CSV file.
 *
 * @param string $filename The default filename.
 * @param string $post_type The post type being exported.
 * @return string The modified filename.
 */
add_filter(
    'ptt_csv_export_filename',
    function ( $filename, $post_type ) {
        return get_bloginfo( 'name' ) . '-' . $post_type . '-' . date( 'Y-m-d' ) . '.csv';
    },
    10,
2 );
Use this filter to customize the exported CSV filename based on your website name, post type, date, or any other naming convention.
/**
 * Filters the columns included in the exported CSV file.
 *
 * @param array $columns The default columns.
 * @param string $post_type The post type being exported.
 * @return array The modified columns.
 */
add_filter(
    'ptt_csv_export_columns',
    function ( $columns, $post_type ) {
        $columns[] = 'author_email';
        return $columns;
    },
    10,
    2
);
Use this filter to add, remove, or reorder columns in the exported CSV file based on your specific requirements.
/**
 * Filters the data for each row in the exported CSV file.
 *
 * @param array $row The default row data.
 * @param WP_Post $post The post object being exported.
 * @param string $post_type The post type being exported.
 * @return array The modified row data.
 */
add_filter(
    'ptt_csv_export_row',
    function ( $row, $post, $post_type ) {
        $author = get_userdata( $post->post_author );
        $row['author_email'] = $author
            ? $author->user_email
            : '';
        return $row;
    },
    10,
    3
);
Use this filter to customize exported row values, include additional post data, or populate custom columns added through the ptt_csv_export_columns filter.
/**
 * Filters the columns included in the exported CSV file.
 *
 * @param array $columns The default columns.
 * @param string $post_type The post type being exported.
 * @return array The modified columns.
 */
add_filter(
    'ptt_csv_export_columns',
    function ( $columns ) {
        $columns[] = 'author_email';
        return $columns;
    }
);
/**
 * Filters the data for each row in the exported CSV file.
 *
 * @param array $row The default row data.
 * @param WP_Post $post The post object being exported.
 * @param string $post_type The post type being exported.
 * @return array The modified row data.
 */
add_filter(
    'ptt_csv_export_row',
    function ( $row, $post ) {
        $author = get_userdata( $post->post_author );

        $row['author_email'] = $author
            ? $author->user_email
            : '';

        return $row;
    },
    10,
    2
);
This approach allows you to export any custom data, including author information, custom fields, taxonomy values, SEO metadata, or data from third-party plugins.
/**
 * Filters whether to skip importing a specific row from the CSV file.
 *
 * @param bool $skip Whether to skip the row.
 * @param array $data The row data.
 * @return bool Whether to skip the row.
 */
add_filter(
    'ptt_csv_import_skip_row',
    function ( $skip, $data ) {
        return empty( $data['external_id'] );
    },
    10,
    2
);
Use this filter to prevent specific rows from being imported based on custom validation rules.
/**
 * Filters the post data before importing a row from the CSV file.
 *
 * @param array $post_data The default post data.
 * @param array $data The row data from the CSV file.
 * @return array The modified post data.
 */
add_filter(
    'ptt_csv_import_post_data',
    function ( $post_data, $data ) {
        $post_data['post_author'] = 1;
        $post_data['menu_order']  = 100;

        return $post_data;
    },
    10,
    2
);
Use this filter to modify post properties such as author, status, menu order, slug, or publish date before saving.
/**
 * Filters the meta value before importing a row from the CSV file.
 *
 * @param mixed $value The default meta value.
 * @param string $key The meta key.
 * @return mixed The modified meta value.
 */
add_filter(
    'ptt_csv_import_meta_value',
    function ( $value, $key ) {
        if ( 'legacy_status' === $key ) {
            return strtoupper( $value );
        }

        return $value;
    },
    10,
    2
);
Skip a Meta Key
/**
 * Filters the meta value before importing a row from the CSV file.
 *
 * @param mixed $value The default meta value.
 * @param string $key The meta key.
 * @return mixed The modified meta value.
 */
add_filter(
    'ptt_csv_import_meta_value',
    function ( $value, $key ) {
        if ( '_edit_lock' === $key ) {
            return null;
        }

        return $value;
    },
    10,
    2
);
Use this filter to transform, sanitize, or exclude imported metadata.
/**
 * Filters the image URL before importing a row from the CSV file.
 *
 * @param string $url The default image URL.
 * @return string The modified image URL.
 */
add_filter(
    'ptt_csv_import_image_url',
    function ( $url ) {
        return str_replace(
            'staging.example.com',
            'www.example.com',
            $url
        );
    }
);
Skip Featured Image Imports
/**
 * Filters the image URL before importing a row from the CSV file.
 *
 * @param string $url The default image URL.
 * @return string The modified image URL.
 */
add_filter(
    'ptt_csv_import_image_url',
    function ( $url ) {
        return str_replace(
            'staging.example.com',
            'www.example.com',
            $url
        );
    }
);
Use this filter to modify image URLs before importing them.
The exporter always includes the following core columns:
All discovered post meta keys are automatically exported as additional columns.
Taxonomies
Example: News | Featured | Events
The exporter includes:
This allows imported content to fully restore ACF field mappings.
Array and object meta values are exported using a special prefix: __json__:["value1","value2"]
During import, these values are automatically decoded back into arrays or objects before being stored.
Do you have any questions? Email us at [email protected] for personal assistance.

