

 WordPress Plugins
 Notify Subscribers
This guide explains the Notify Subscribers plugin. Please review it before installation. For support, contact [email protected].
4th of July Sale: 10% OFF on all KrishaStore Products. Code: INDEPENDENCE10. Limited time.
This guide explains the Notify Subscribers plugin. Please review it before installation. For support, contact [email protected].

Notify Subscribers is a powerful WordPress plugin that helps website owners automatically notify subscribers whenever new content is published. Using customizable email templates and dynamic post fields such as post title, summary, and links, the plugin ensures your audience stays informed and engaged with your latest content. It supports multiple notification methods, Mailchimp integration, and allows notifications to be enabled or disabled for specific post types.
The plugin also provides complete subscriber management within WordPress, including subscriber import/export, custom subscription messages, widget, shortcode, and Gutenberg block support. With features such as Google reCAPTCHA v3 integration, Contact Form 7 integration, promotional email templates, and multi-language support, Notify Subscribers offers a complete solution for growing your subscriber base, increasing returning visitors, and improving user engagement.

Before installing Notify Subscribers, please ensure the following requirements are met:
Email Delivery Pro-Tip: For reliable email delivery and to ensure notification updates never land in spam folders, we highly recommend routing your WordPress transactional mail through an SMTP plugin paired with a dedicated email service provider.
It is always recommended to keep your WordPress, PHP, and MySQL/MariaDB versions up to date for security and performance reasons.
You can download the Notify Subscribers plugin from KrishaStore. After purchasing, you will receive a .zip file containing the plugin. You can install the plugin using one of the following methods:
If you are upgrading to the latest version of the Notify Subscribers plugin, it is strongly recommended that you first export and download your current subscribers list as a CSV file before installing the update.
In some cases, the plugin update may remove the existing subscriber data, which can lead to the loss of your mailing list.
After the new version is installed successfully, you can restore your previous subscribers by importing the saved CSV file. This will help you re-add all existing subscribers and keep your mailing list safe and complete.
When you purchase the Notify Subscribers plugin from the KrishaStore website, your license key is available in the My Account section on the front-end dashboard. This license key is required to activate Pro features within your WordPress admin panel.
Once the admin enters a valid license key, the user can access and use all the Pro features of the Notify Subscribers plugin.
The subscription remains active until the end of the current billing cycle, even if you choose to cancel it.
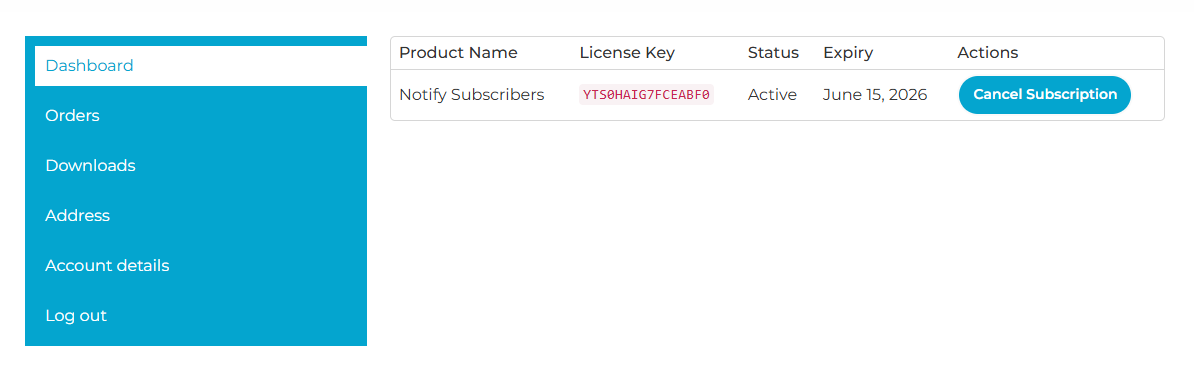
Follow these steps to manage your Notify Subscribers license from the WordPress admin panel:
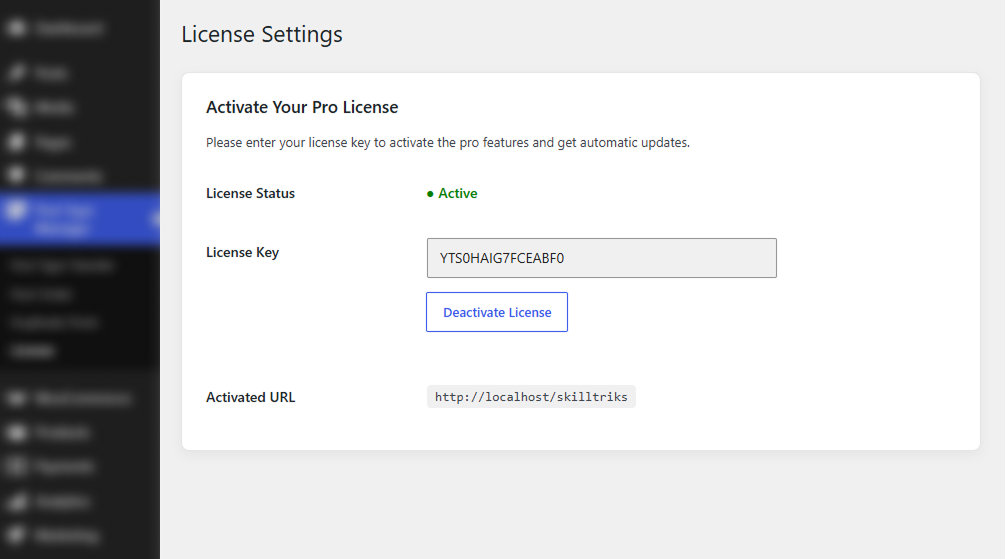
Once activated, you will see:
This process ensures that your Notify Subscribers plugin is fully activated and ready to use with all premium features.
The Post Settings section allows you to control which post types can send email notifications to subscribers. This gives you the flexibility to choose the types of content that should trigger subscriber notifications when they are published.
By default, notifications are disabled for all post types. You can enable or disable notifications for individual post types, including standard WordPress posts and custom post types (such as Products), using the available toggle switches.
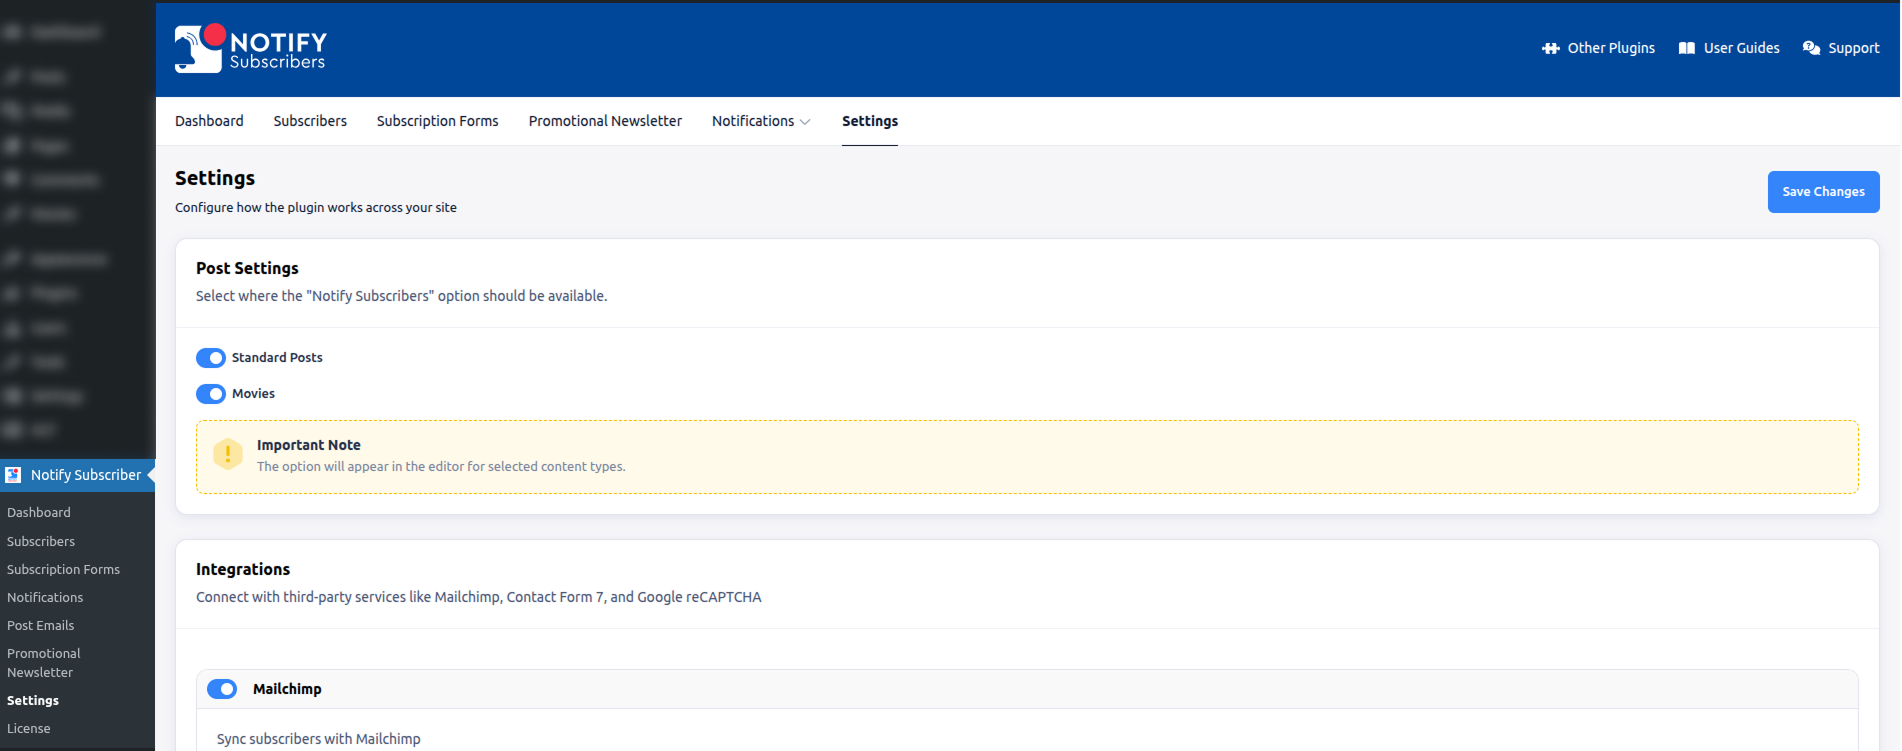
When a post type is enabled:
When a post type is disabled:
Integrations
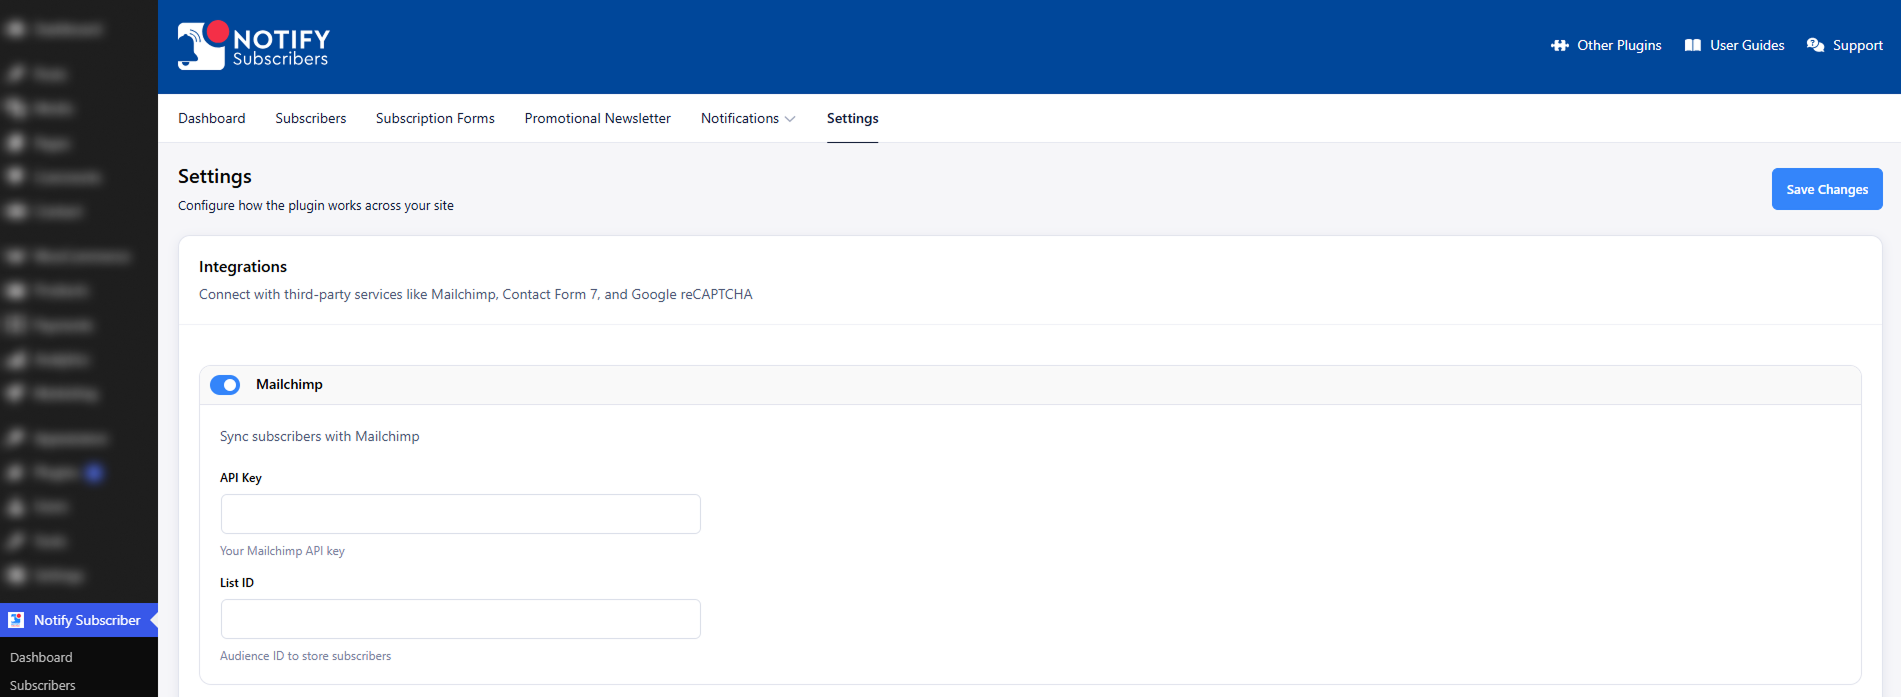
The Integrations section allows you to connect Notify Subscribers with external services and third-party tools to expand its features and make subscriber management easier. From this section, you can set up tools such as Mailchimp, Contact Form 7, and Google reCAPTCHA v3 to improve email list syncing, turn contact forms into subscription forms, and protect your site from spam. Each integration can be enabled or disabled separately, so you can use only the options that fit your website’s needs.
The Mailchimp Integration connects Notify Subscribers with your Mailchimp account, so that subscriber details can be synced automatically. After enabling this option and entering your Mailchimp API Key and List ID, new subscribers who sign up through the form on your website will be added to your selected Mailchimp audience.
This helps you manage subscribers in one place and use Mailchimp for email campaigns and list organization. Once the subscription is successful, the user is created in WordPress with the Subscriber role, and the same subscriber information is also sent to Mailchimp for further management.
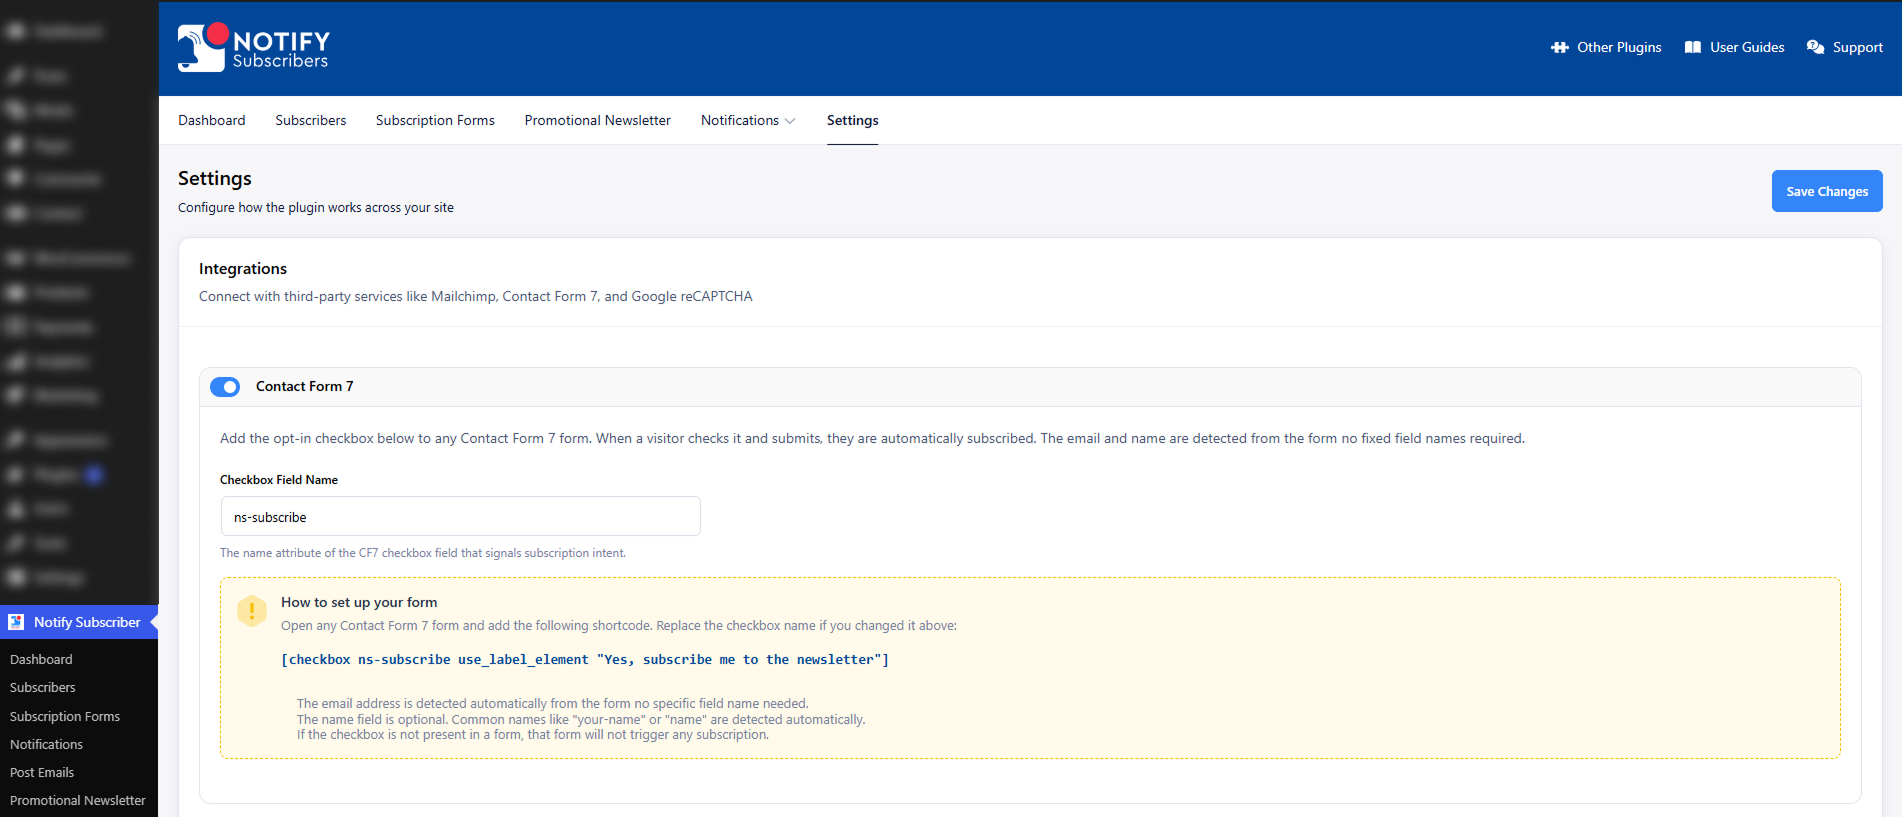
The Contact Form 7 Integration lets you use Contact Form 7 forms as subscription forms for your newsletter. By adding a subscription checkbox to a Contact Form 7 form, visitors can choose to join your mailing list while submitting their contact details.
When a user checks the subscription option and submits the form, the plugin processes the request automatically, creates a WordPress user if needed, and assigns the Subscriber role. This is a convenient way to collect newsletter subscribers without creating a separate subscription form.
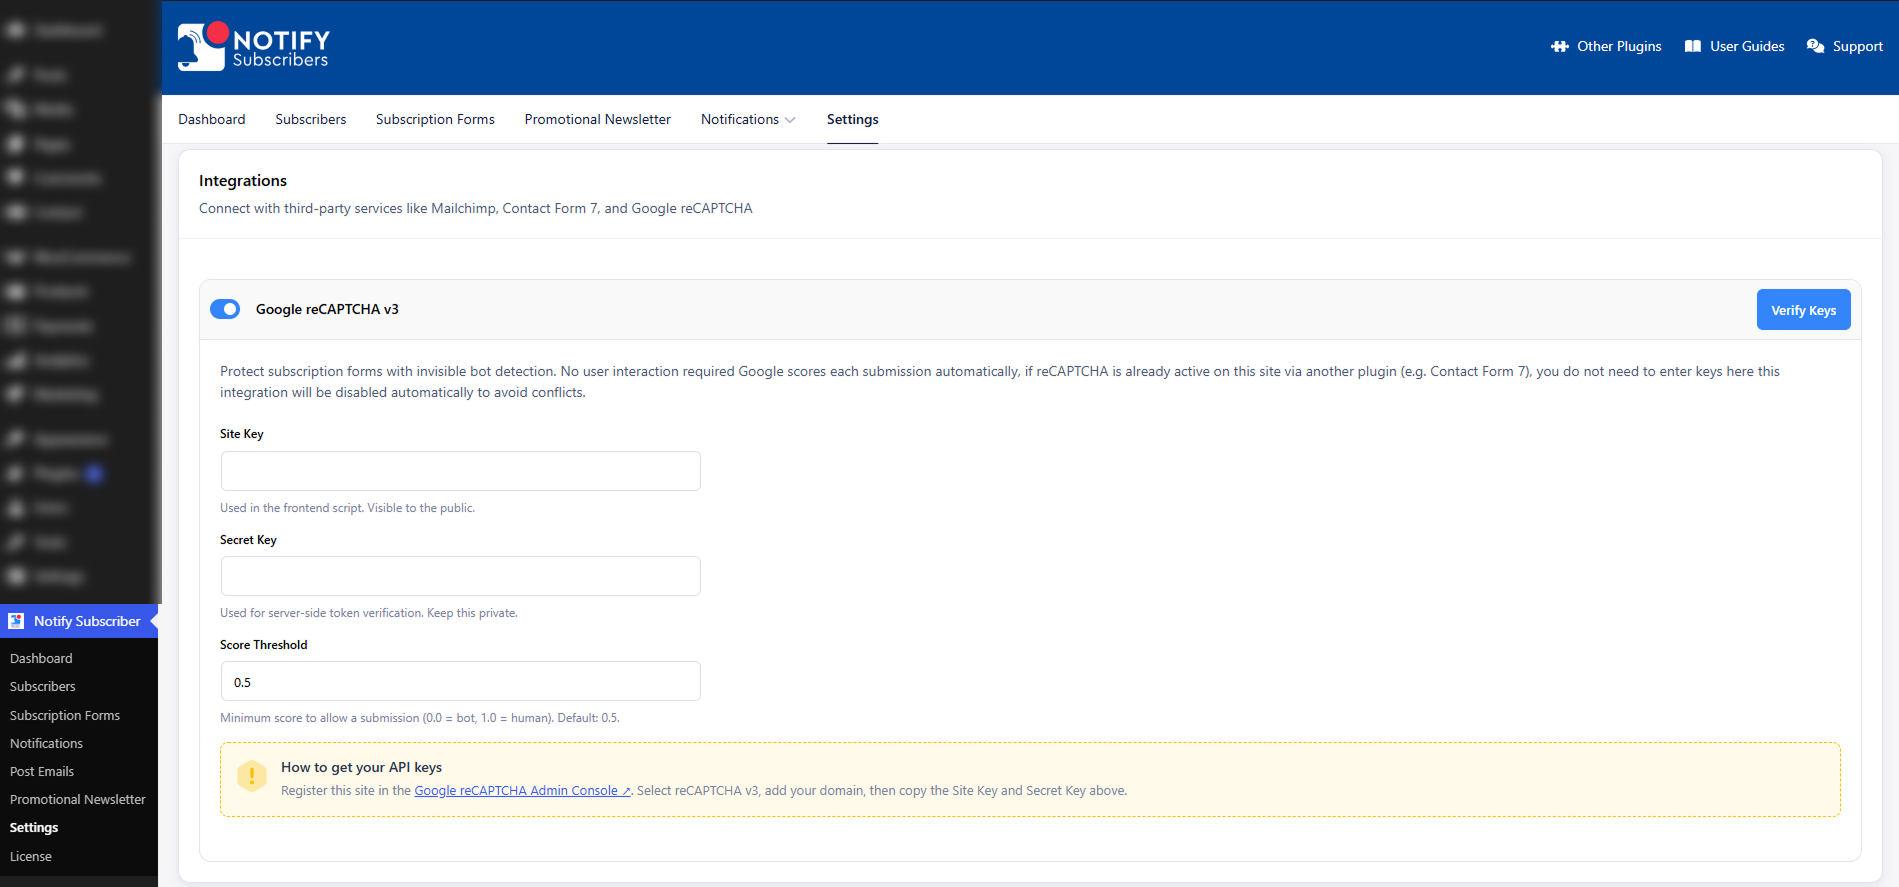
The Google reCAPTCHA v3 Integration protects your subscription forms from spam and fake submissions. reCAPTCHA v3 checks visitor behavior quietly and helps block automated bots and suspicious activity before they can submit the form. This keeps your subscription system secure while still providing a simple experience for real users.
The Subscribers page is the main control center for managing all users who are subscribed through the Notify Subscribers plugin. It gives administrators a clear view of subscriber records in one place, including important details such as name, username, email address, user role, subscription status, and the date the account was created. From this page, you can review, organize, add, import, export, subscribe, unsubscribe, and manage users without moving between multiple WordPress screens.
This page is designed to make subscriber management faster, simpler, and more reliable. Its main purpose is to help website administrators maintain an accurate subscriber list and ensure that only the right users receive notifications, newsletters, promotional emails, and other communication sent through the plugin. It also includes helpful bulk actions and export tools, which are especially useful when working with large subscriber lists, preparing reports, handling audits, or creating backups.
The Notify Subscribers plugin works by linking subscription status directly to WordPress user accounts. Each user profile includes a dedicated Subscriber checkbox, which controls whether that user is part of the plugin’s subscriber list and eligible to receive plugin-based communications. This gives administrators a simple way to manage subscriptions directly from the WordPress user profile area.
When an administrator opens a user profile and selects the Subscriber checkbox, that user is immediately marked as subscribed. The user then appears in the Subscribers page and becomes available for newsletters, notifications, promotional campaigns, and any other subscriber-related communication managed by the plugin. This process works for both the default WordPress Subscriber role and custom WordPress roles, as long as the checkbox remains enabled.
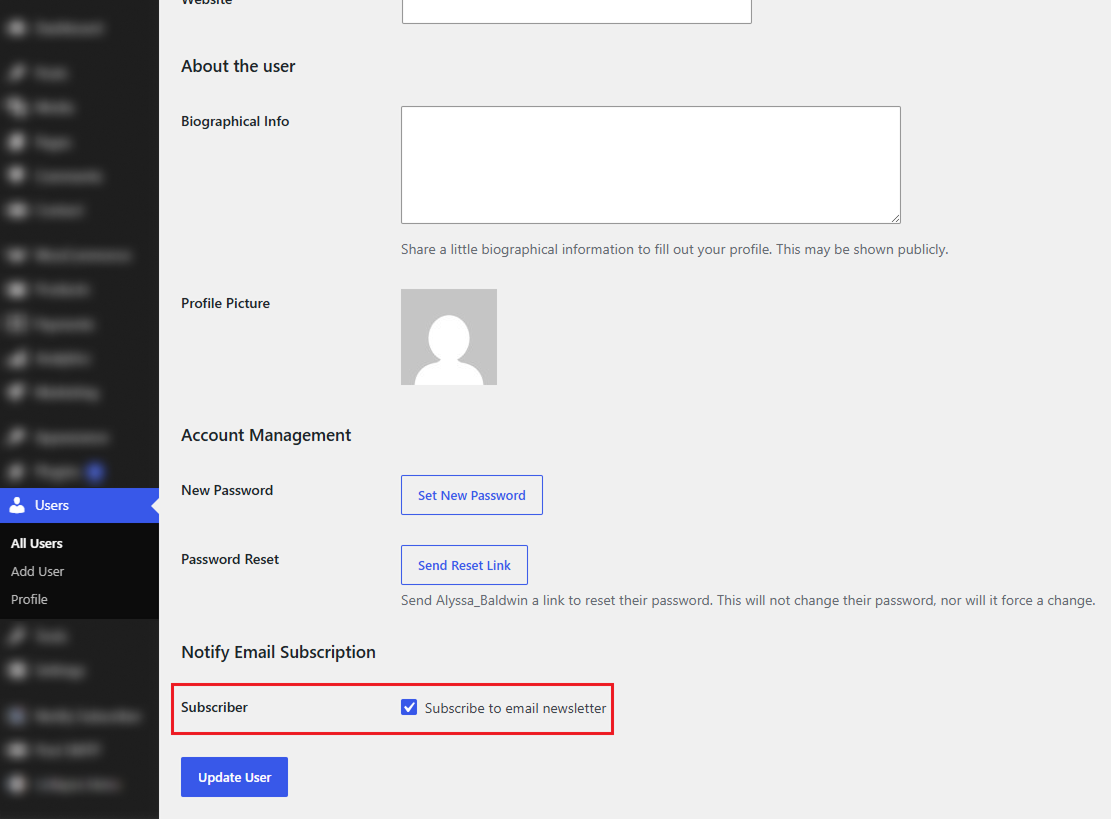
If the administrator later edits the same user profile and clears the Subscriber checkbox before saving, the user is unsubscribed from the plugin. What happens next depends on the user’s WordPress role. For users with the default WordPress Subscriber role, the record stays in the Subscribers table, but the status changes to Unsubscribed, allowing administrators to keep a history of past subscribers. For users with custom roles or other non-default roles, the user record is removed from the Subscribers list completely after unsubscribing.
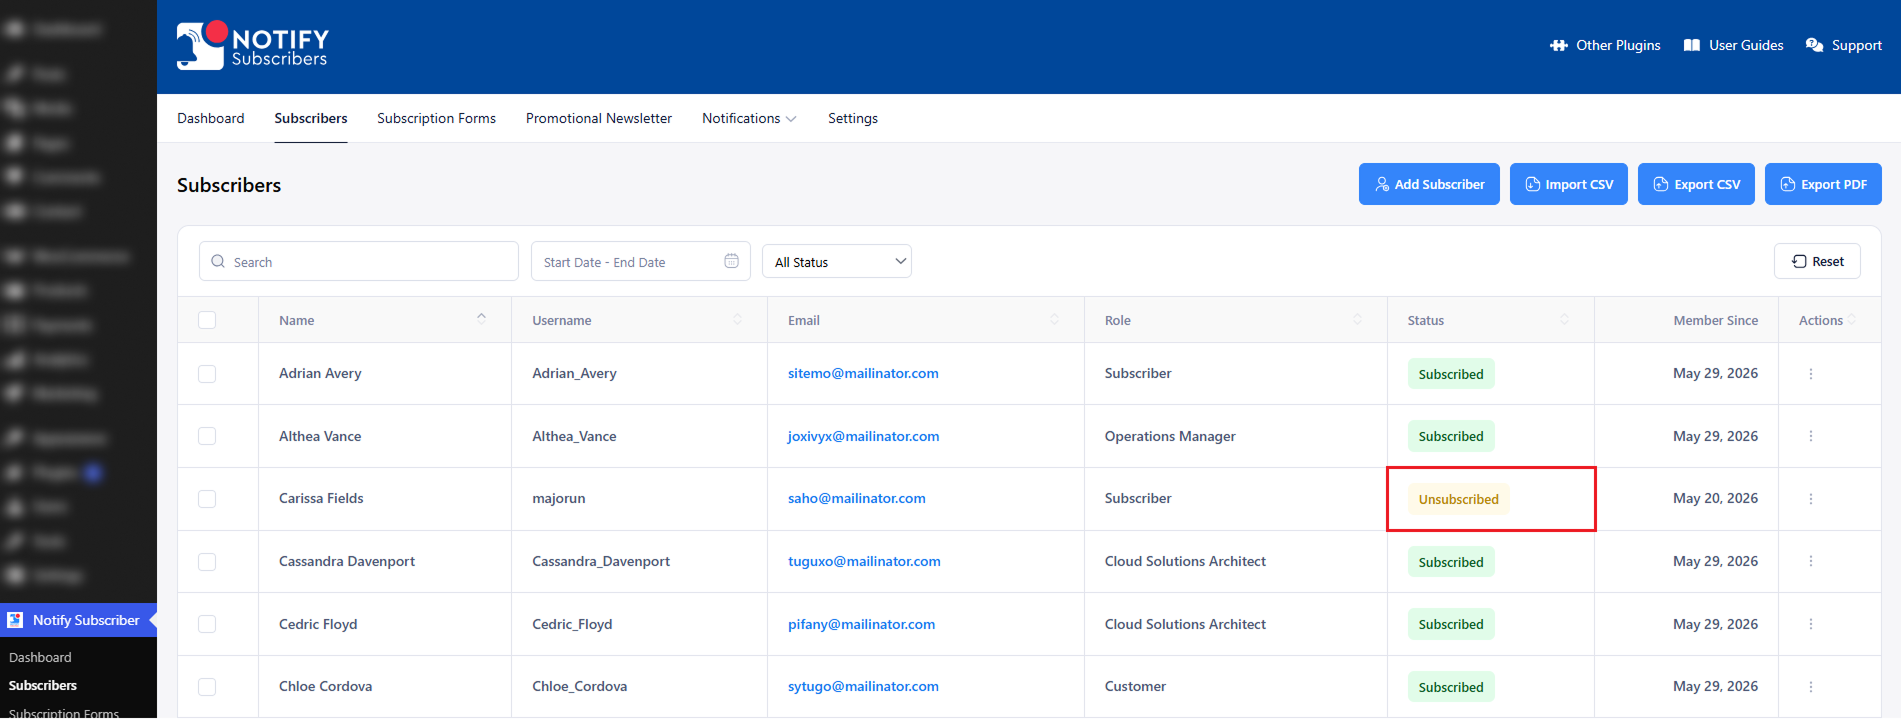
The Subscribers Table gives administrators a clear and organized view of all users who are subscribed through the Notify Subscribers plugin. It helps you quickly review key subscriber information in one place without switching between different WordPress screens. This section is designed to make subscriber tracking, management, and communication much easier.
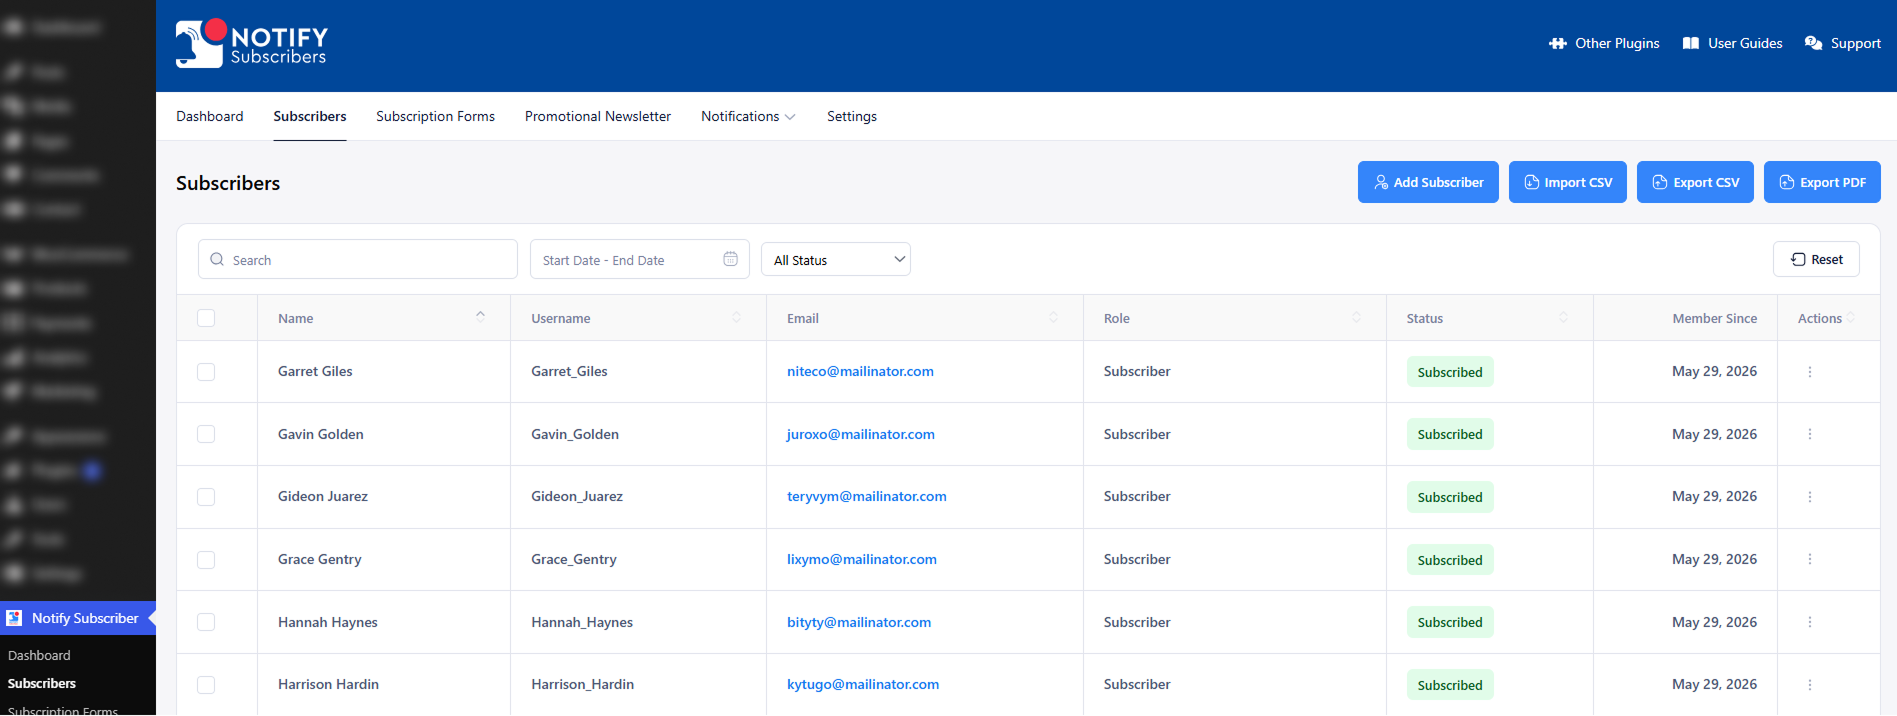
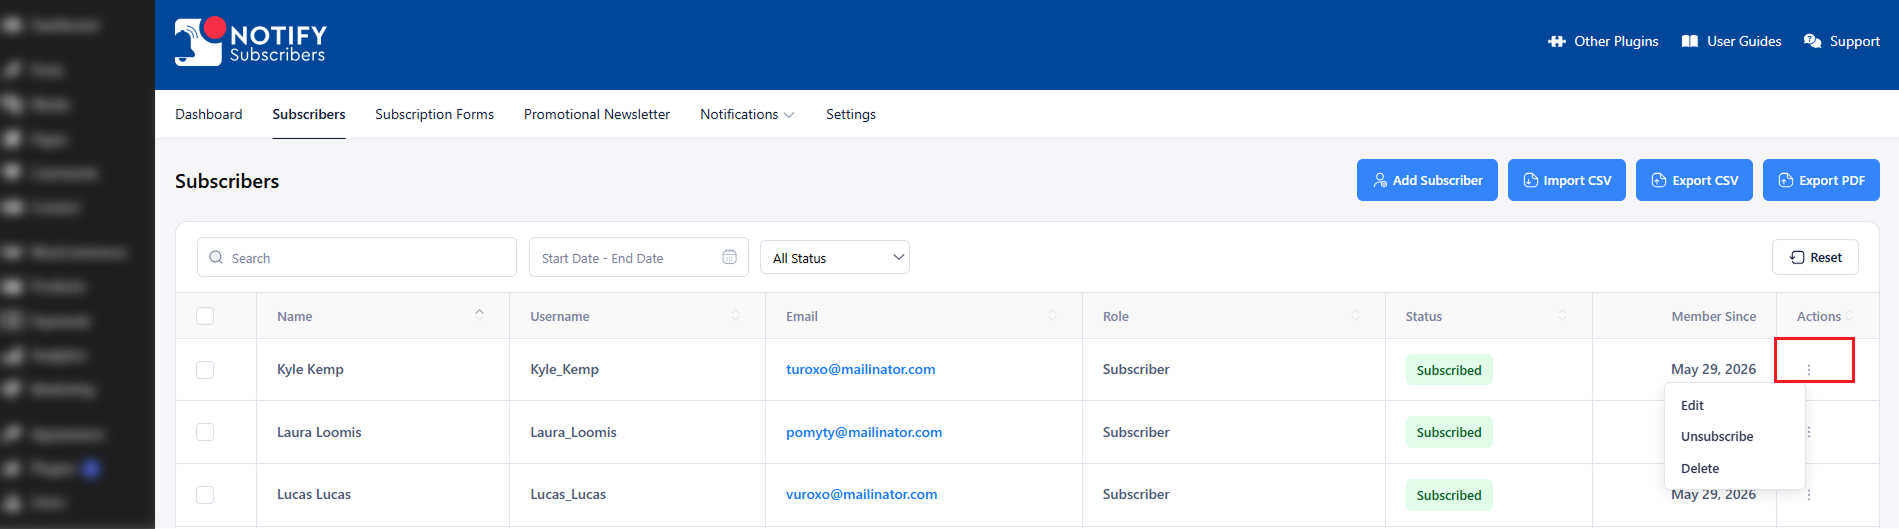
The Actions column gives quick access to the main management options for each subscriber. It allows administrators to handle user records directly from the Subscribers page. This saves time and makes subscriber control much more efficient.
The Subscribers page supports bulk user management for improved administrative efficiency. Administrators can select multiple users using the checkboxes displayed in the table and then choose Delete from the Bulk Actions dropdown menu.
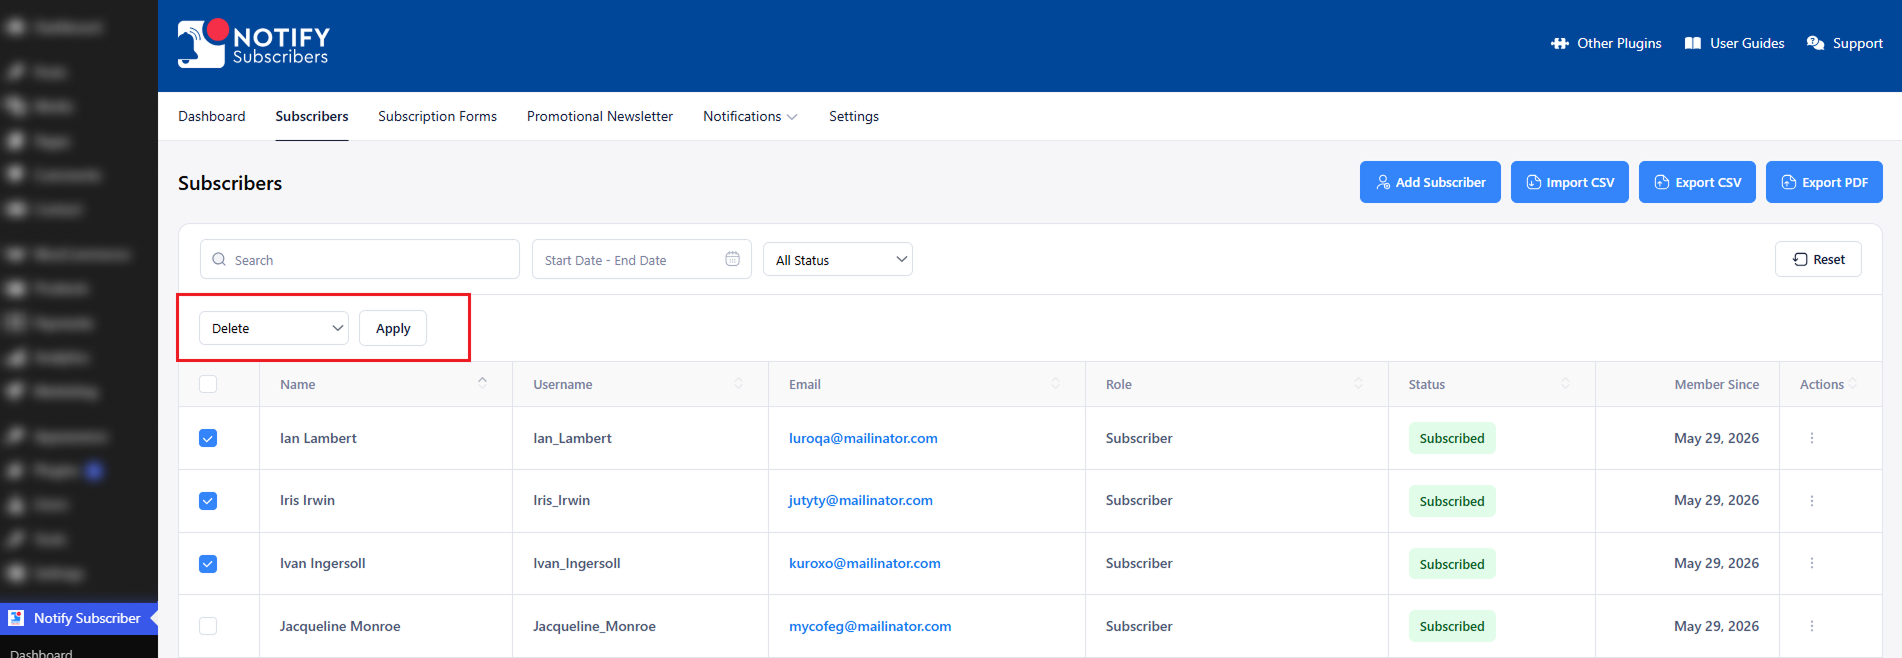
After clicking Apply, all selected user accounts are permanently removed from the website in a single operation. This feature is especially useful when cleaning up inactive users, removing test accounts, or managing large subscriber databases.
The Add Subscriber feature allows administrators to create a new subscriber directly from the Notify Subscribers page. This is useful when you want to add a user without going to the default WordPress Users section. It gives you a faster and more focused way to build your subscriber list.
When you click Add Subscriber, a form appears where you can enter the required user details such as first name, last name, and email address. After the form is submitted, the plugin creates the user account automatically and marks that user as subscribed. Once the user is successfully created, the system should automatically assign the Subscriber role in WordPress. The new subscriber then appears in the Subscribers table immediately.
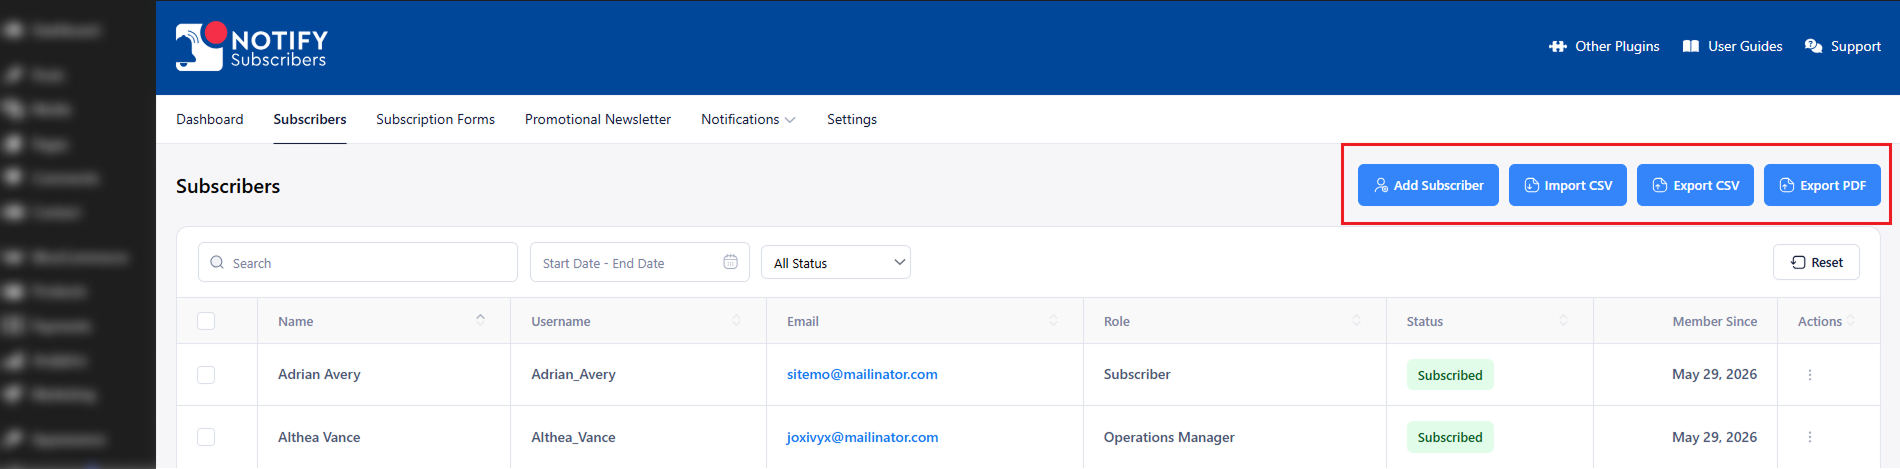
The Import CSV feature lets administrators add many subscribers at once by uploading a CSV file. This is the fastest way to bring large user lists into the plugin without entering each record manually. It is especially useful when moving subscribers from another platform or preparing a list for bulk upload.
To use this feature, upload a CSV file that contains the supported user details such as first name, last name, and email address. After the file is processed, the plugin creates the user accounts automatically and assigns each imported user the default WordPress Subscriber role. Those users are then added to the Subscribers table and become available for notifications and newsletters.
The Export options allow administrators to download subscriber details for use outside the website. You can export the subscriber list in CSV format or PDF format depending on your needs. This makes it easy to keep records, share reports, or back up subscriber data.
The CSV export is useful when you want to open the data in spreadsheet tools, sort it, filter it, or use it for further processing. The PDF export is better when you need a clean, readable report that can be shared or stored as a document. Both formats include important subscriber details such as first name, last name, username, email address, and subscription status.
These export tools are helpful for reporting, analysis, compliance, backup, and internal record-keeping. They give administrators a simple way to maintain complete access to subscriber information whenever needed.
The Notify Subscribers Dashboard gives you a quick and organized overview of your subscriber activity and email notification performance. From this page, you can easily monitor how your audience is growing, check recent subscription and unsubscribe activity, view the latest subscribers, and see how many posts have been configured to send notifications. It also provides a few quick actions, so you can manage the plugin faster from one place.
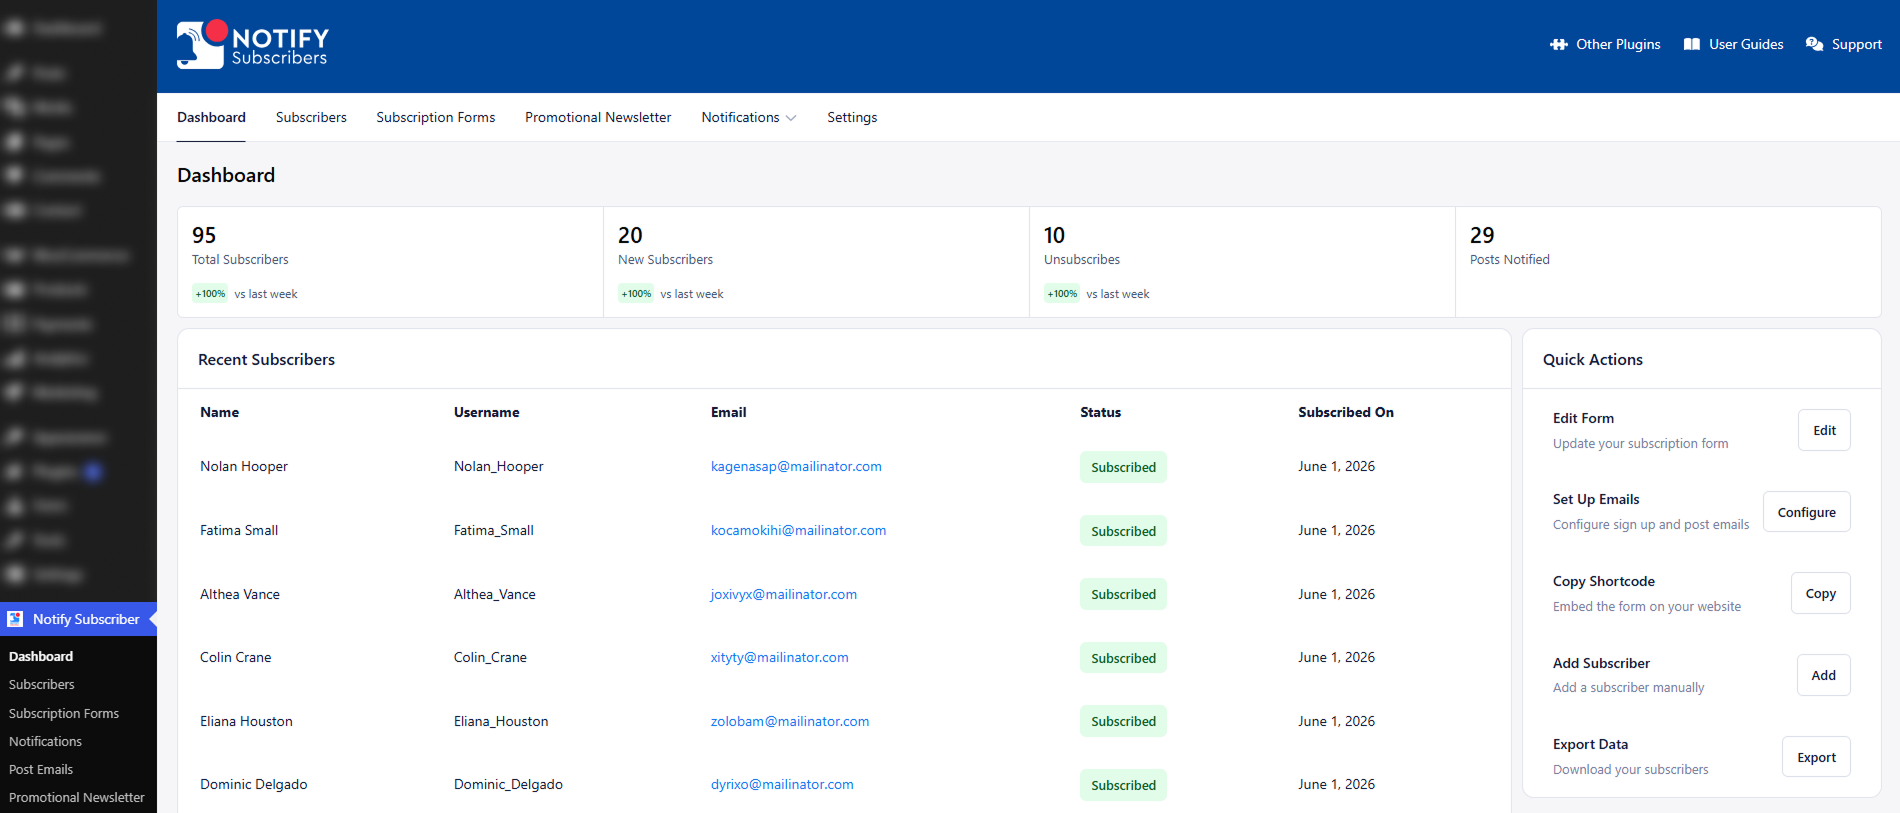
The Recent Subscribers section displays the 10 most recently added subscribers. This table provides a quick overview of the latest subscription activity without requiring administrators to navigate to the full Subscribers page.
The table includes the following details:
The Notify Subscribers → Subscription Forms page lets you control how the subscription form looks and behaves on the frontend. From this section, you can configure form fields such as First Name, Last Name, Email, and the Submit button to match your website’s requirements. From here, you can manage visible fields, validation text, layout style, and custom CSS classes to match your website’s design.
This section controls which fields appear on the subscription form and how each field is displayed to visitors. Use it to show only the information you need and keep the form simple, clear, and user-friendly.
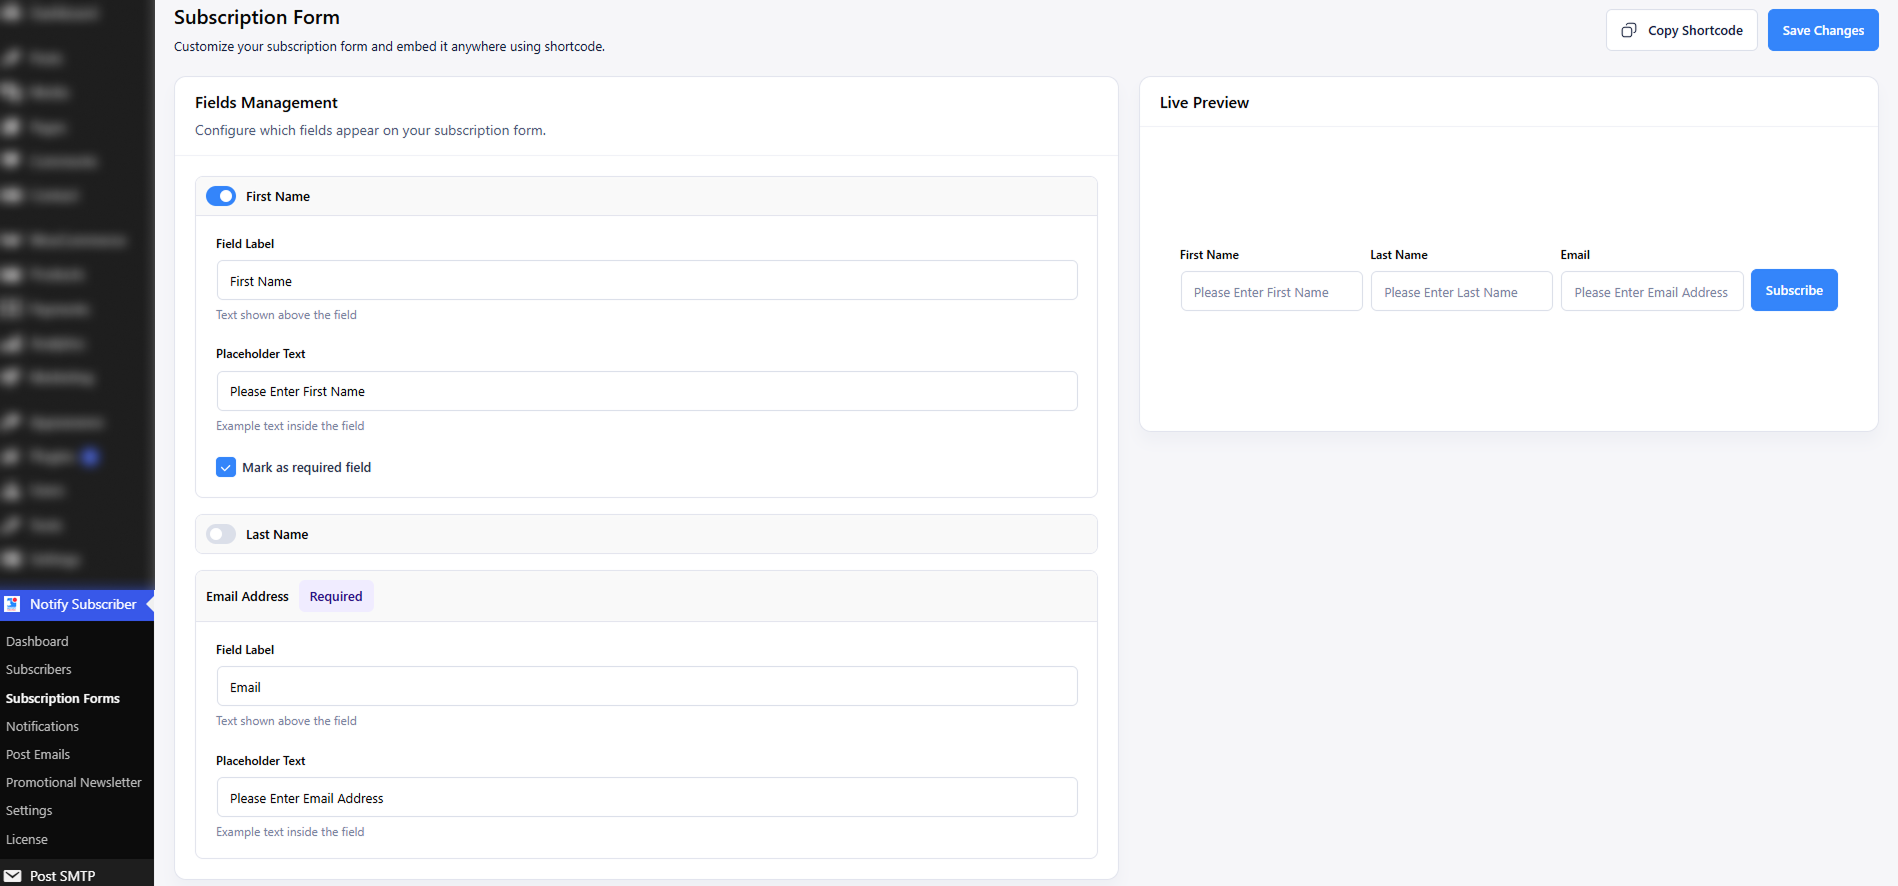
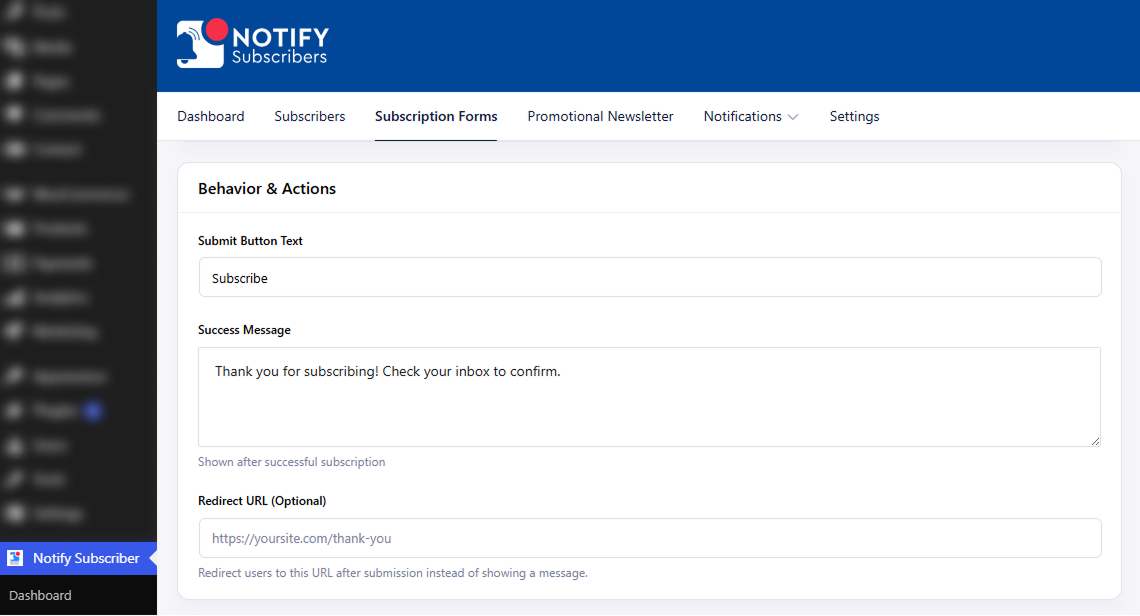
This section defines what happens when a visitor submits the form. You can change the button text, show a success message, or send subscribers to another page after submission.
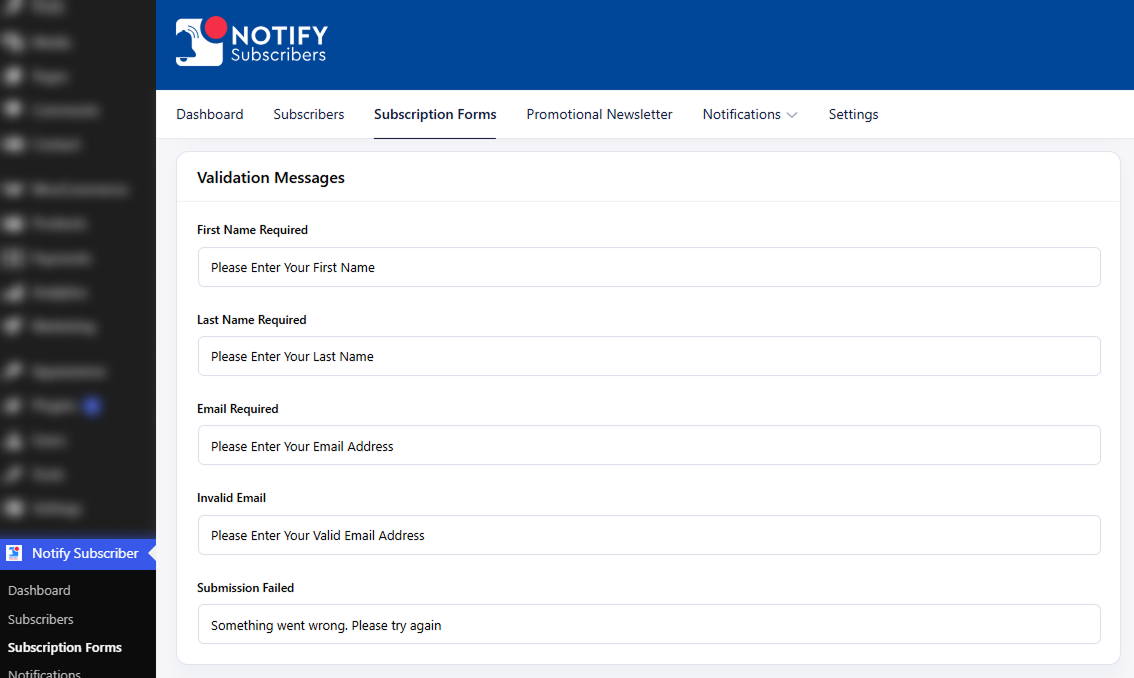
This section lets you customize the error messages shown when form input is missing or invalid. Clear validation text helps users understand what needs to be corrected before they can submit the form successfully.
This section controls how the form fields are arranged on the page. Choose the layout that best fits your page design and keeps the form easy to use on different screen sizes.
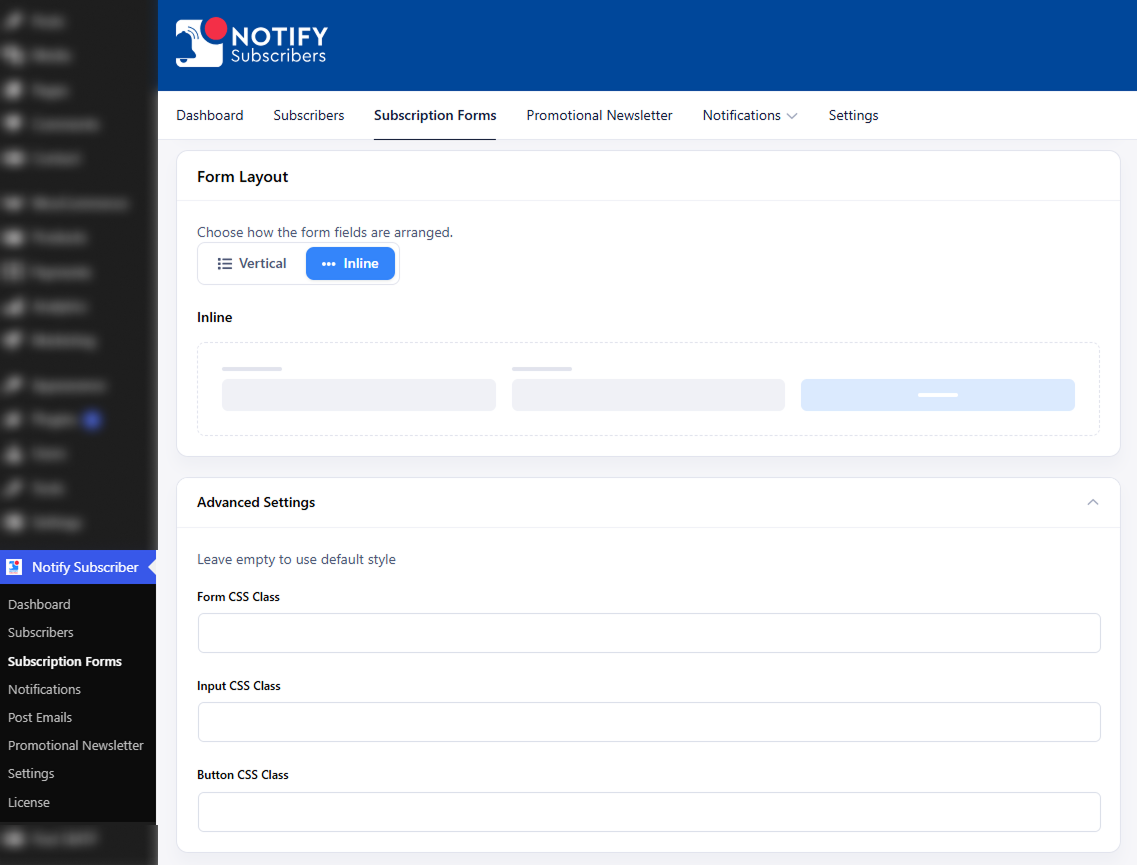
This section allows you to add custom CSS classes for deeper styling control. Use these options when you want to apply custom theme styles or create a more personalized form design.
After configuring the form settings, click Save Changes to store your updates. Then click Copy Shortcode to copy the shortcode and paste it into any page, post, or widget area where you want the form to appear.
Note:
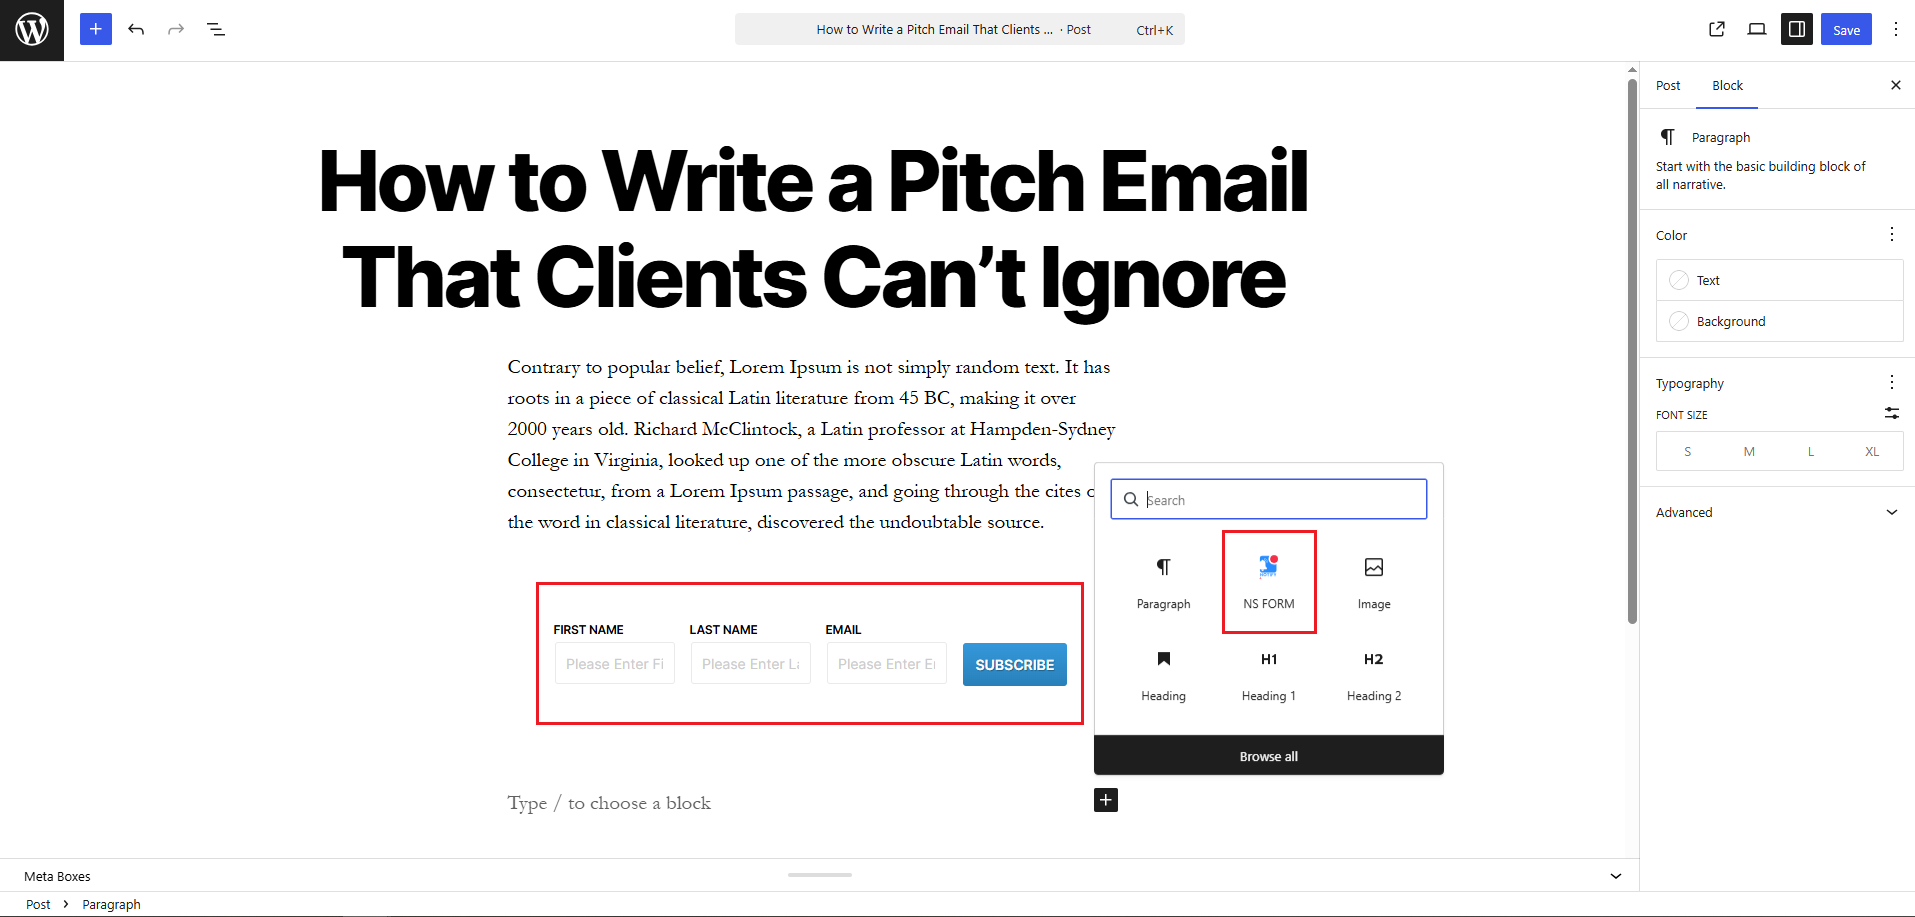
You can display the Notify Subscribers subscription form on any post or page by using the NS Form block in the Gutenberg editor. This is a simple, no-code method that makes it easy to place the signup form directly inside your content and collect subscribers from the front end of your website.
Follow the steps below to add the subscriber form using widgets:
After that, visitors will be able to subscribe directly from the page using the form you added. This is a quick and effective way to grow your subscriber list and keep your audience updated with new posts.
You can also display the Notify Subscribers subscription form using a shortcode. This method is flexible and allows you to place the form anywhere on your website, including posts, pages, and theme files.
Use this method when you want the subscription form to appear directly inside a theme template or a custom PHP file. Add the following code where you want the form to display: echo do_shortcode('[notify-subscribers]');
Place this code in the appropriate theme file, such as page.php, single.php, or a custom template file.
Use this method if you want to add the subscription form from the WordPress editor without writing any code.
[notify-subscribers]The Notify Subscribers form will now appear on the frontend in the selected location, allowing visitors to subscribe easily.
The Notify Subscribers → Notifications → Sign Up Emails Settings page lets you manage the automated emails sent to users and administrators. From this page, you can edit email content, change sender details, enable or disable notifications, and personalize messages with dynamic variables. You can also preview your templates by sending test emails before they are delivered to subscribers or site admins.
Email Templates
This section contains the built-in email templates used for subscriber and admin communication. Each template can be edited to match your branding, tone, and notification workflow. These templates help you handle subscription activity in a clear and professional way.
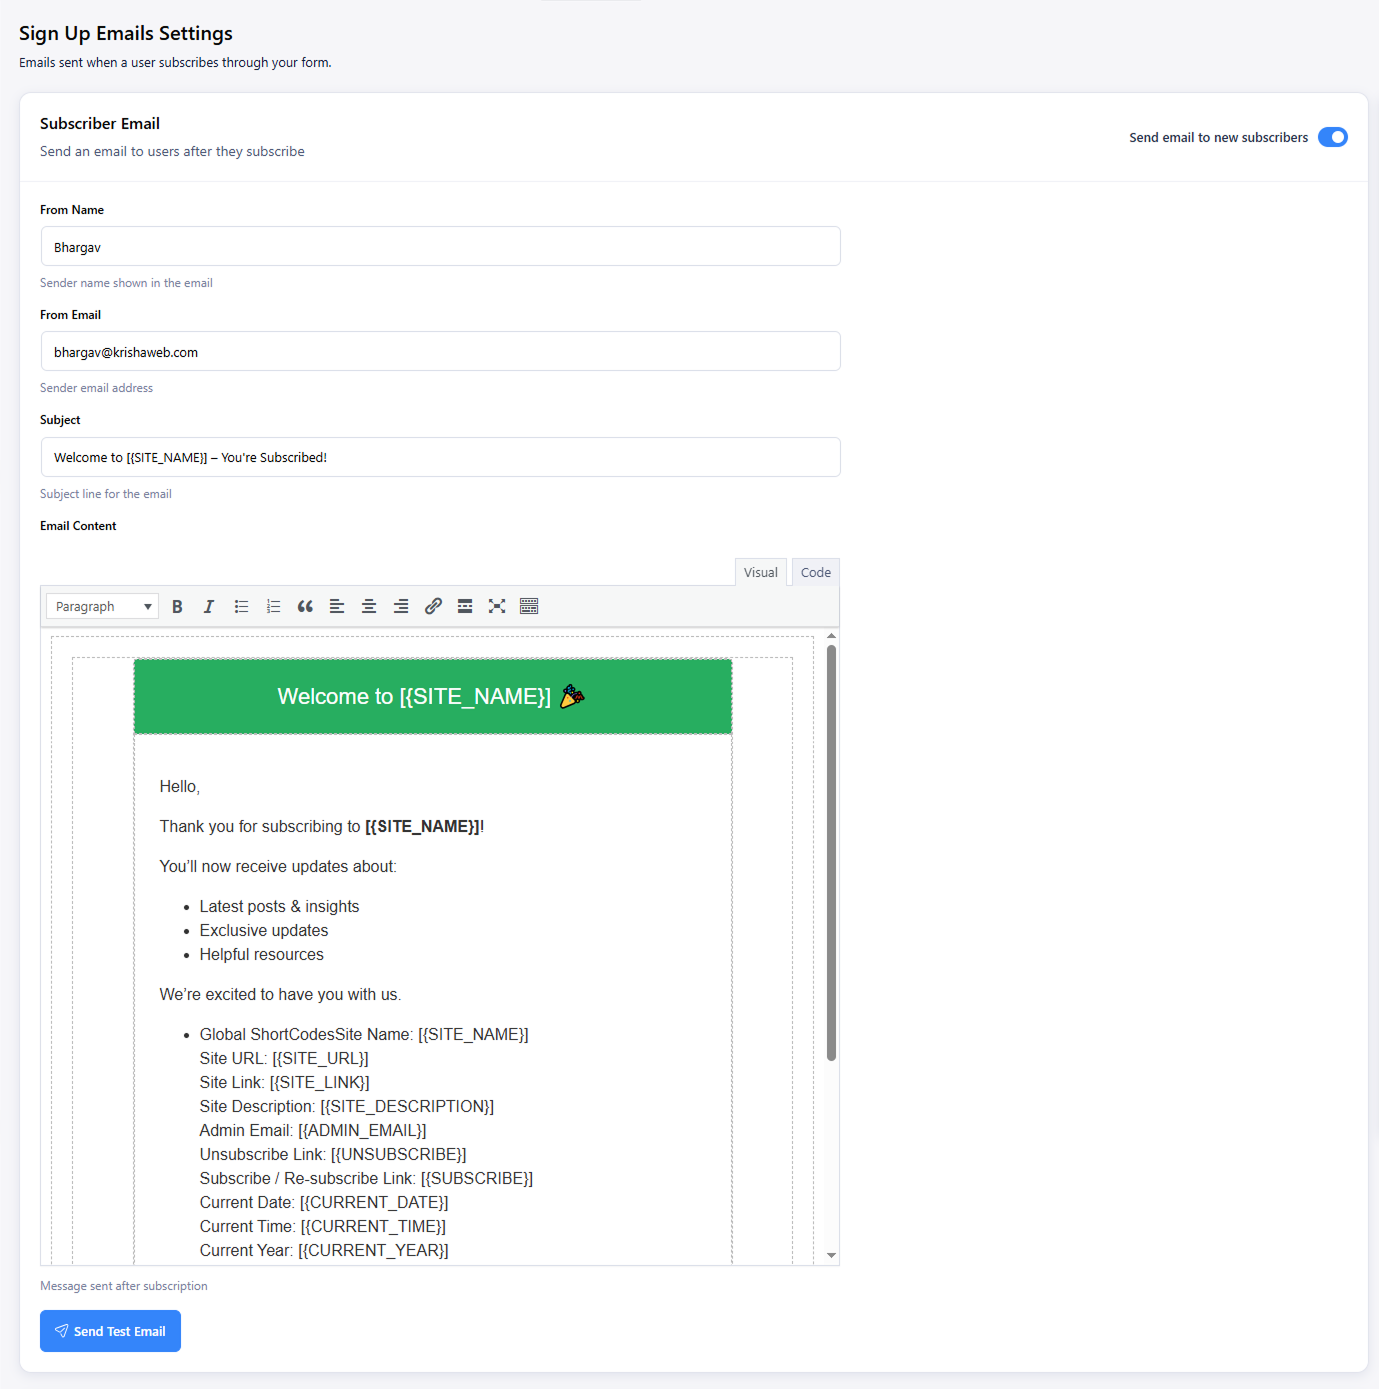
The Subscriber Email is sent automatically when someone subscribes through your form. It works as a welcome email and can introduce your website, services, or newsletter content. You can customize this message to create a better first impression for new subscribers.
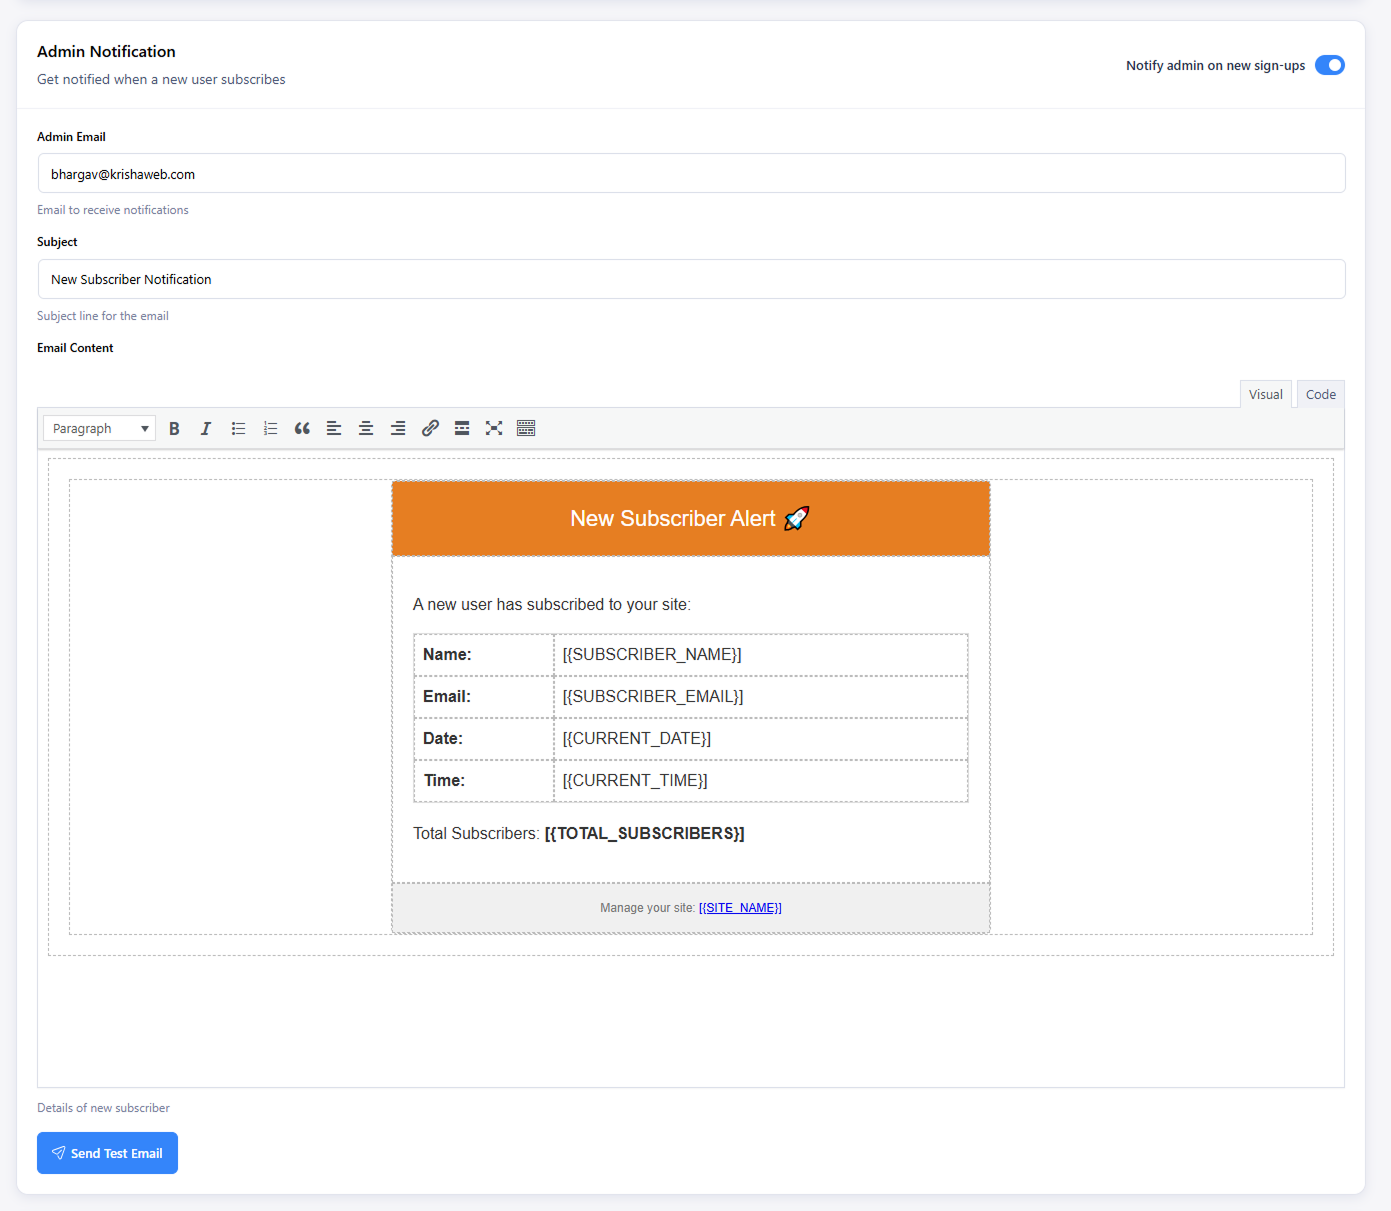
The Admin Notification email is sent to the website administrator whenever a new user subscribes. It helps you monitor sign-ups and stay informed about subscriber activity in real time. This message can be customized to include the details you want to review after each new registration.
The Unsubscribe Email is sent automatically when a user removes themselves from your mailing list. It confirms the unsubscribe action and can guide users if they want to subscribe again later. You can customize this email to keep the experience clear and respectful.
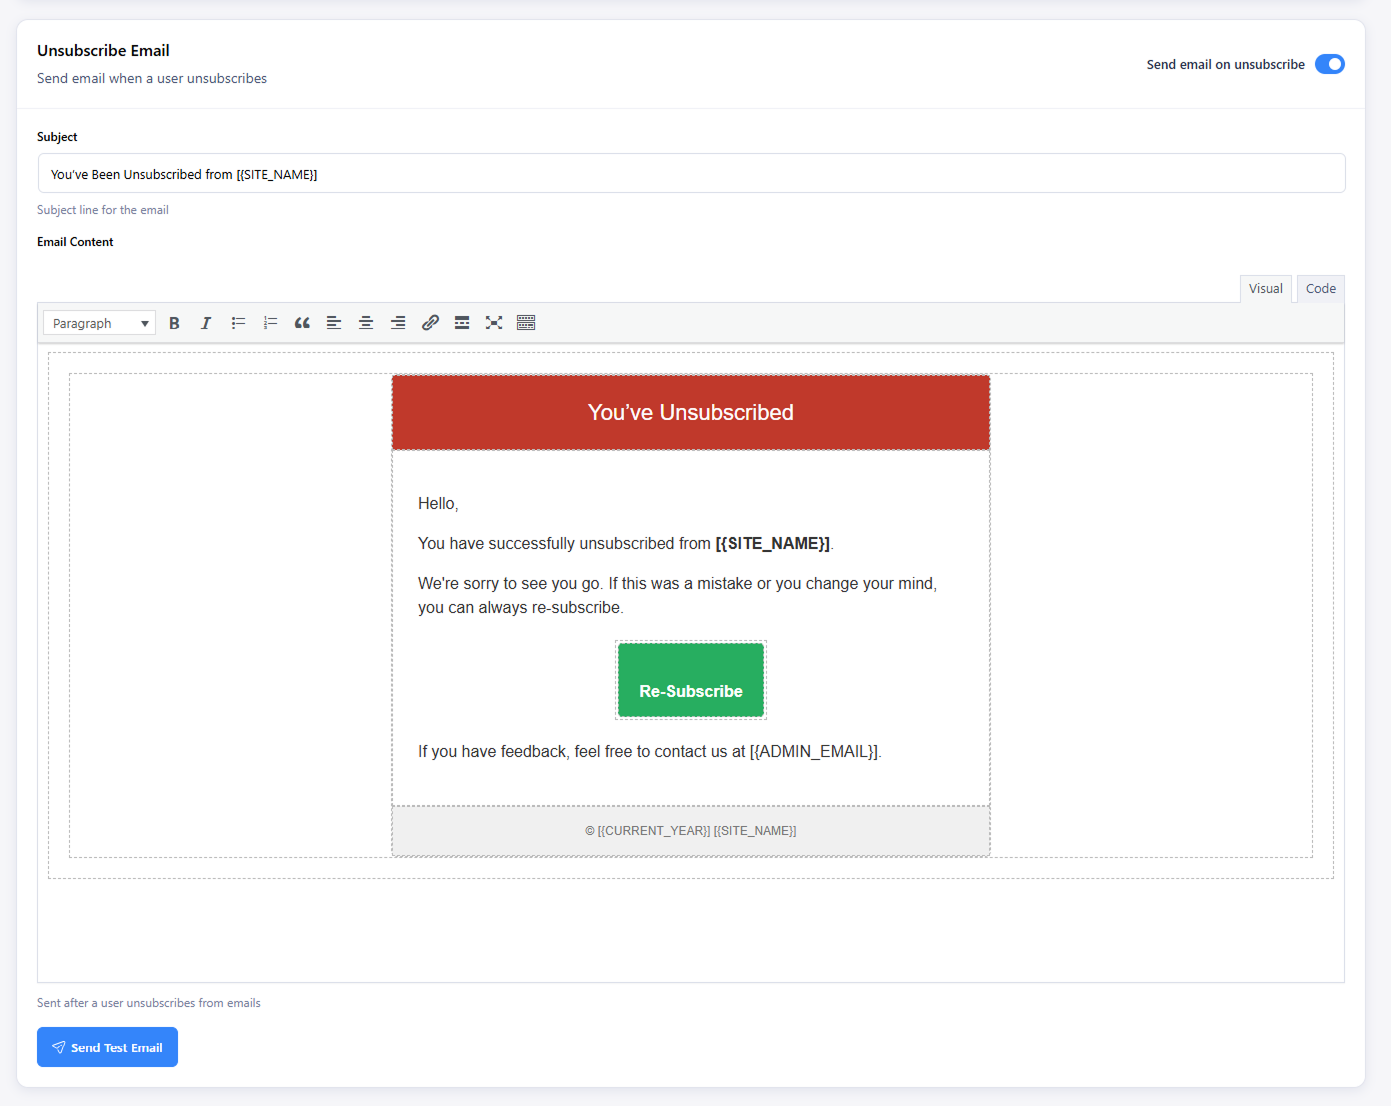
The Send Test Email feature lets you preview how your email templates look before sending them to real users. It is useful for checking formatting, content, links, and variable output across email clients. This helps you verify that the template appears correctly and works as expected.
Save Changes Button
The Save Changes button stores all updates made on the Sign Up Emails Settings page. Always click this button after editing templates or notification settings to apply your changes.
The Available Variables section shows dynamic placeholders that can be inserted into email subject lines or content. These variables automatically pull site and subscriber information into your emails. Using them helps you personalize messages without manually updating every template.
Note
You can place these variables anywhere in the subject line or email content. When the email is sent, the plugin replaces each variable with the correct live value automatically. This makes your emails more dynamic, accurate, and personalized.
The Notify Subscribers → Notifications → Post Emails Settings page lets you configure the email sent when a post is published with Notify Subscribers enabled in the post editor. From this page, you can customize the email template, sender details, subject line, and content that subscribers receive after a new post goes live.
Emails are sent only when the Notify Subscribers checkbox is selected in the post editor before publishing. If this option is not enabled, subscribers will not receive a post notification email.
This section controls the main post notification email that is sent to subscribers after a new post is published. You can customize the sender information, email subject, and message content to match your website’s style and communication needs.
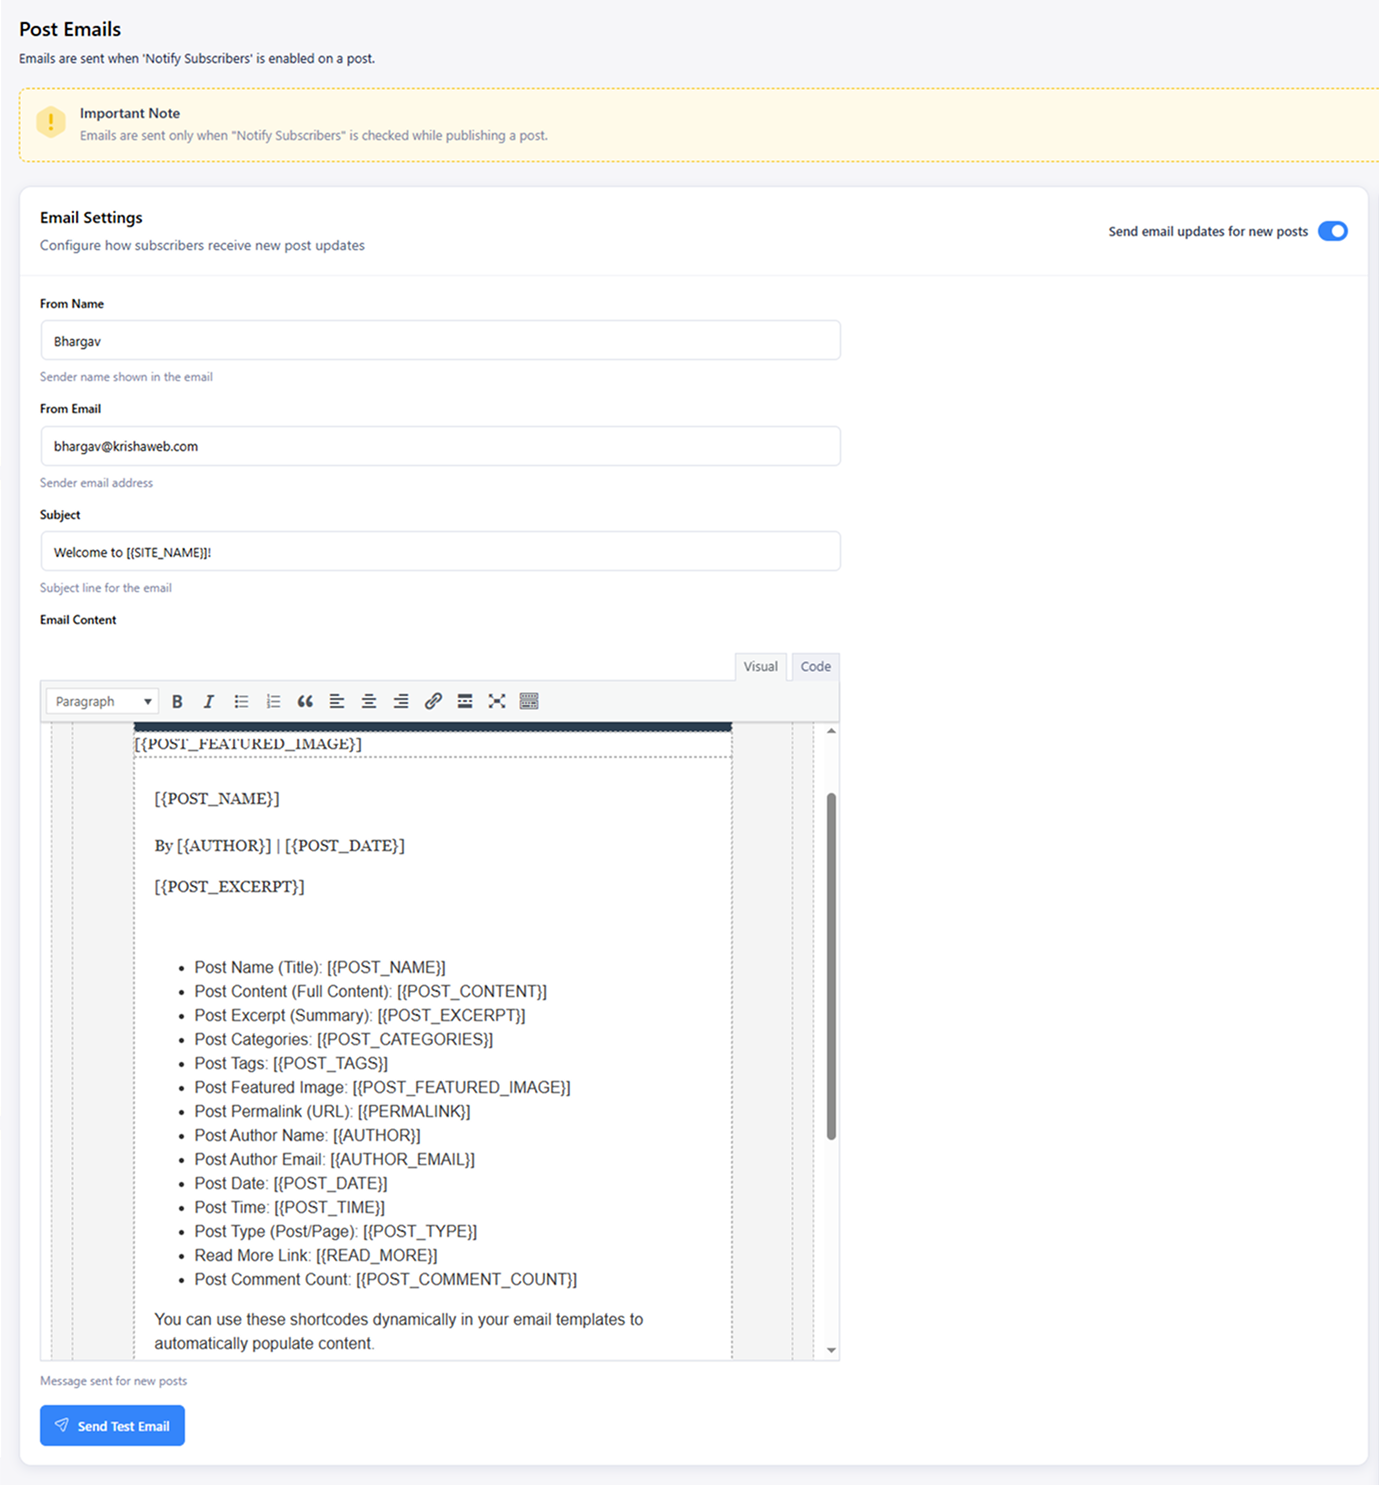
This section provides dynamic placeholders that automatically insert post, author, and subscriber details into your email. These variables help you create personalized and informative notification emails without updating the content manually each time.
Note
You can place these variables anywhere in the subject line or email content. When the email is sent, the plugin automatically replaces each shortcode with the correct live value.
The Notify Subscribers → Promotional Newsletter page allows administrators to create and send promotional emails to subscribers who have opted in to receive updates from your website.
From this page, you can design marketing messages, customize sender details, preview the email, and choose whether to send it to selected subscribers or your entire mailing list.
This feature is useful for sharing special offers, product updates, announcements, seasonal campaigns, and other important messages with your audience. By using the built-in email editor and available shortcodes, you can personalize your newsletter content and make each campaign more relevant to your subscribers.
Note: Use Responsibly
Promotional emails should only be sent to subscribers who have explicitly chosen to receive communications from your website. Sending irrelevant, excessive, or unsolicited emails may lead to spam complaints, reduced deliverability, and damage to your sender reputation.
Always make sure your content is useful, relevant, and appropriate for your audience. To support best practices and allow subscribers to opt out easily, include the [{UNSUBSCRIBE}] shortcode in every promotional email.
This section controls the main details of your promotional email campaign. Here, you can set the sender name, sender email, subject line, and the email content that subscribers will receive.
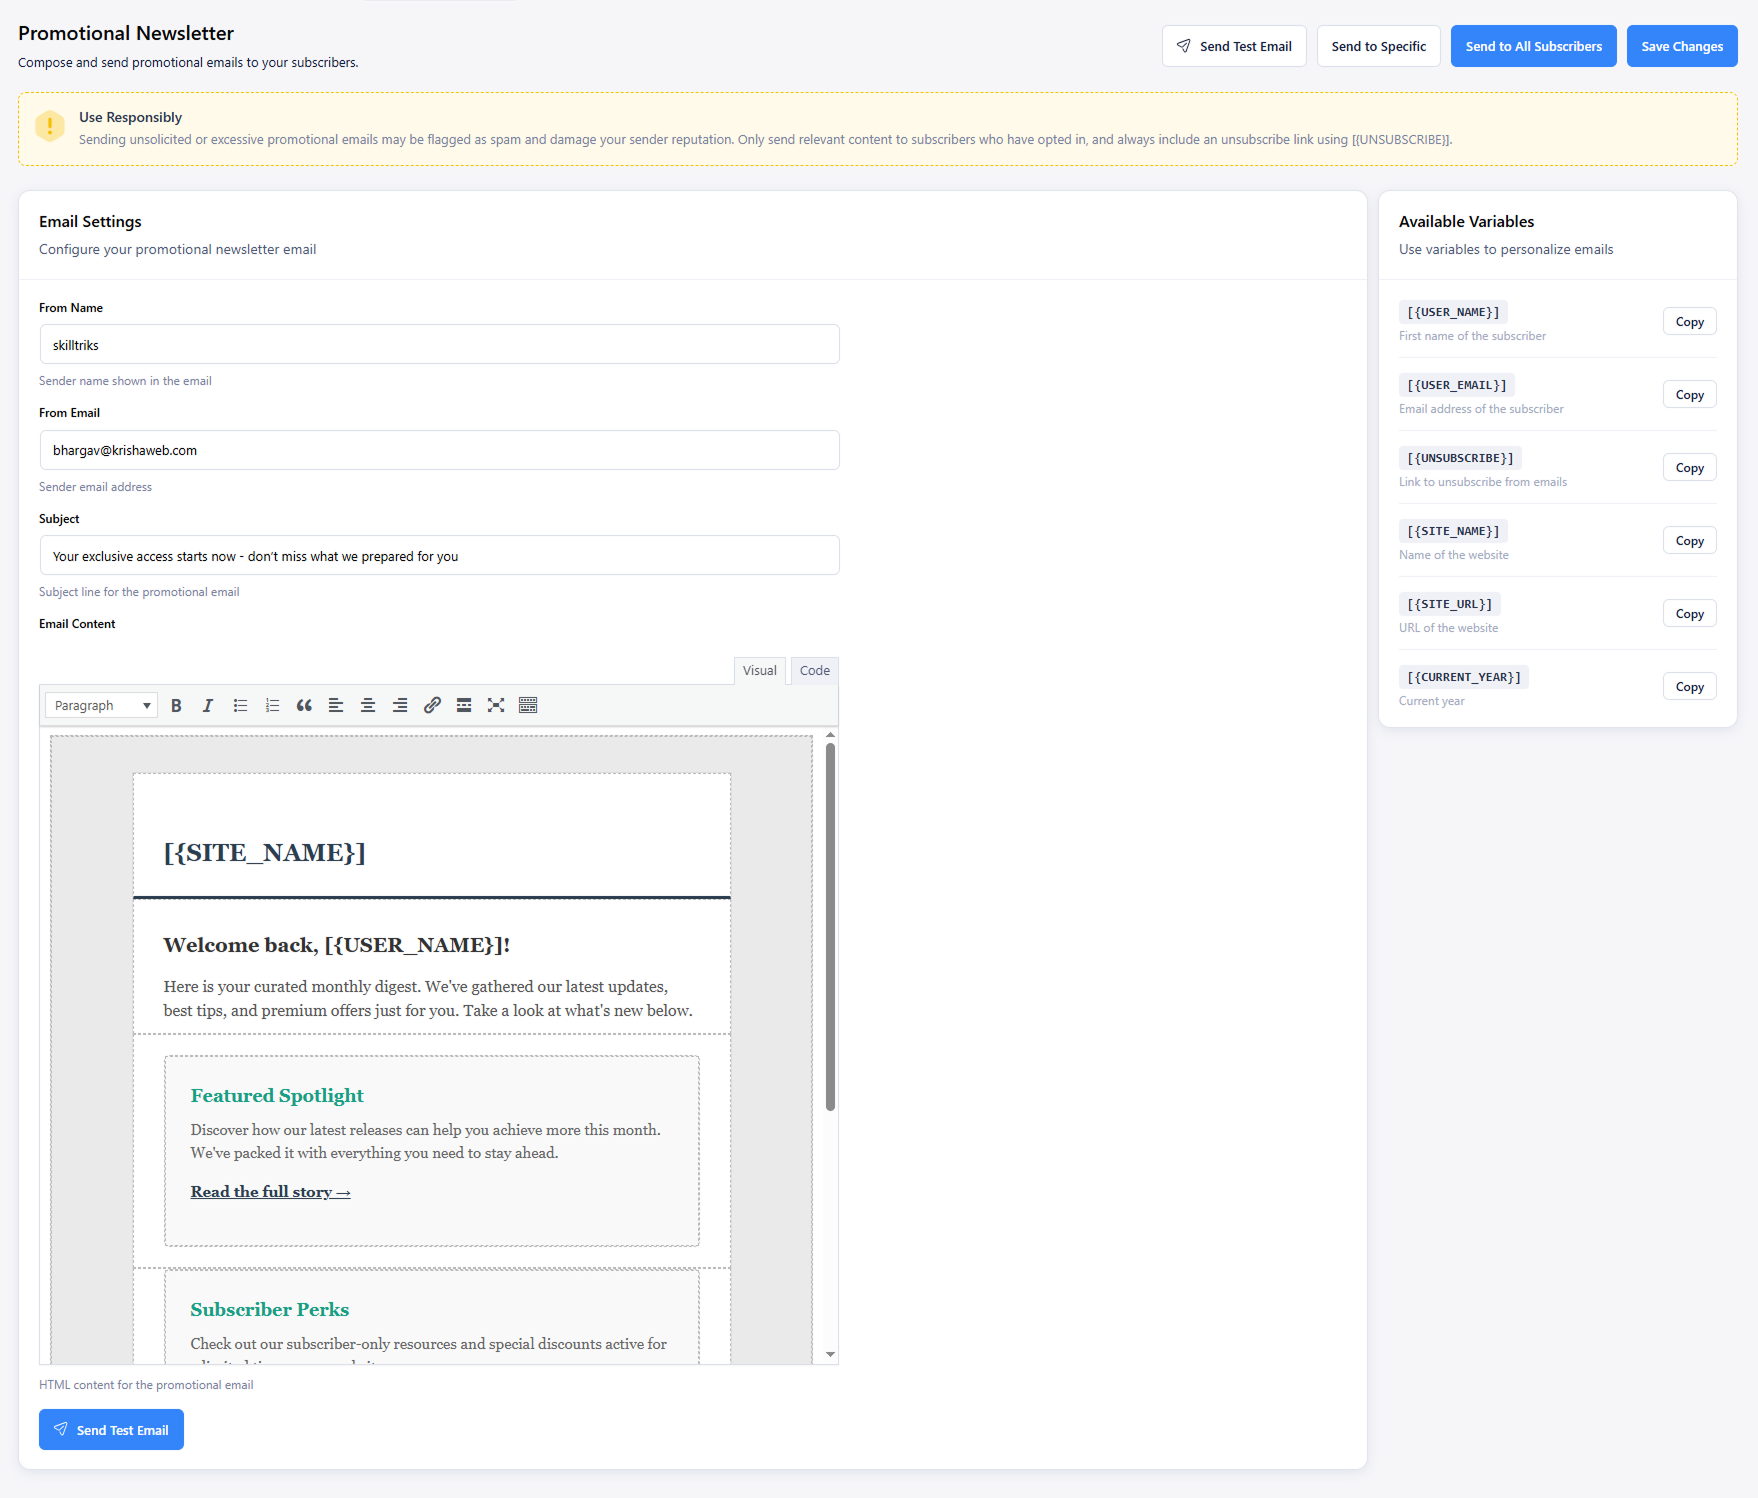
The Send Test Email option allows you to preview how your promotional email looks before sending it to real subscribers. This helps you check the design, layout, content, and shortcode output before launching the campaign.
The Send to Specific button lets you send a promotional email only to selected subscribers instead of your full list. After clicking it, a pop-up appears where you can choose one or more subscribers for a targeted campaign.
This option is useful for personalized promotions, segmented offers, product announcements, loyalty rewards, or subscriber-specific messages. It gives you better control when you want only certain users to receive a particular email campaign.
The Send to All Subscribers button sends the promotional email to every active subscriber in your list. This is the fastest way to distribute newsletters, campaigns, announcements, and broad updates to your full audience.
Before sending to all subscribers, review the content carefully and send a test email to confirm everything looks correct. This helps ensure your message is accurate and professional before it reaches your entire subscriber base.
Save Changes Button
The Save Changes button stores all updates made on the Promotional Newsletter page. Always click it after editing your sender details, subject line, or email content so your changes are applied correctly.
The Available Variables section provides dynamic shortcodes that automatically insert subscriber and website information into your promotional emails. These shortcodes help you personalize your messages and keep your content updated without editing each email manually.
Note
You can place these shortcodes anywhere in the subject line or email content. When the email is sent, the plugin automatically replaces each shortcode with the correct live value.
The Notify Subscribers plugin includes several hooks and filters that allow developers to customize functionality and integrate custom code without modifying the plugin files.
/**
 * Force the subscription form to use the inline layout.
 */
add_filter( 'ns_block_layout_override', function( $layout ) {
    return 'inline'; // 'vertical' | 'inline'
} );
Overrides the subscription form layout when rendered through the Gutenberg block.
Type: Filter (apply_filters)
Location: admin/fields.php
/**
 * Filters the subscription form fields before the form is rendered on the frontend.
 *
 * @param array $form_array The form fields array.
 */
add_filter( 'notify_subscribers_create_form', function( $form_array ) {
    // Append a custom field to the form
    $form_array[] = '';
    return $form_array;
} );
Filters the subscription form fields before the form is rendered on the frontend. Use this filter to add, modify, remove, or reorder form elements without editing the plugin files.
Type: Filter (apply_filters)
Location: functions.php
/**
 * Hooks into the Mailchimp subscriber synchronization process.
 *
 * @param mixed  $result     The result from the default handler.
 * @param string $email      The subscriber's email address.
 * @param string $first_name The subscriber's first name.
 * @param string $last_name  The subscriber's last name.
 */
add_filter( 'ns_mailchimp', function( $result, $email, $first_name, $last_name ) {
    // $result is whatever the default handler returned
    error_log( "MailChimp sync for: $email" );
    return $result;
}, 10, 4 );
Hooks into the Mailchimp subscriber synchronization process during AJAX subscription requests. Use this filter to modify the Mailchimp response, perform additional processing, or integrate with external systems when a subscriber is synced.
Type: Filter (apply_filters)
Location: functions.php
/**
 * Filters plugin option values before they are returned.
 *
 * @param mixed  $value      The option value.
 * @param string $option_key The option key.
 */
add_filter( 'ns_options', function( $value, $option_key ) {
    if ( 'ns-config' === $option_key ) {
        // Inject a default if the option is empty
        return $value ?: [ 'from_name' => 'My Site' ];
    }
    return $value;
}, 10, 2 );
Filters plugin option values before they are returned. Use this filter to modify, override, or provide default values for Notify Subscribers configuration settings such as Mailchimp and general plugin options.
Type: Filter (apply_filters)
Location: admin/pages/mailchimp.php
/**
 * Filters the Contact Form 7 integration status before it is initialized.
 *
 * @param bool $enabled Whether the integration is enabled.
 */
 */
add_filter( 'ns_cf7_enable_integration', function( $enabled ) {
    if ( is_singular( 'product' ) ) {
        return false;
    }
    return $enabled;
} );
Filters the Contact Form 7 integration status before it is initialized. Use this filter to programmatically enable or disable the Contact Form 7 integration based on custom conditions.
Type: Filter (apply_filters)
Location: includes/integrations/class-cf7-integration.php
/**
 * Filters the Contact Form 7 checkbox field name used to determine whether a user has opted in to subscribe.
 *
 * @param string $checkbox_name The checkbox field name.
 * @param array  $posted_data   The posted form data.
 * @param object $cf7           The Contact Form 7 instance.
 */
add_filter( 'ns_cf7_checkbox_name', function( $checkbox_name, $posted_data, $cf7 ) {
    // Use a different field name depending on the form ID
    if ( 123 === (int) $cf7->id() ) {
        return 'subscribe_newsletter';
    }
    return $checkbox_name;
}, 10, 3 );
Filters the Contact Form 7 checkbox field name used to determine whether a user has opted in to subscribe. Use this filter to customize the subscription checkbox field name for different forms or integration scenarios.
Type: Filter (apply_filters)
Location: includes/integrations/class-cf7-integration.php
/**
 * Filters the email address extracted from a Contact Form 7 submission before the subscriber is created.
 *
 * @param string $email       The email address.
 * @param array  $posted_data The posted form data.
 * @param object $cf7         The Contact Form 7 instance.
 */
add_filter( 'ns_cf7_email', function( $email, $posted_data, $cf7 ) {
    // Prefer a "work_email" field if present
    if ( ! empty( $posted_data['work_email'] ) ) {
        return sanitize_email( $posted_data['work_email'] );
    }
    return $email;
}, 10, 3 );
Filters the email address extracted from a Contact Form 7 submission before the subscriber is created. Use this filter to customize how the subscriber's email address is identified when processing form submissions.
Type: Filter (apply_filters)
Location: includes/integrations/class-cf7-integration.php
/**
 * Filters the subscriber name extracted from a Contact Form 7 submission before the subscriber is created.
 *
 * @param string $name        The subscriber name.
 * @param array  $posted_data The posted form data.
 * @param object $cf7         The Contact Form 7 instance.
 */
add_filter( 'ns_cf7_name', function( $name, $posted_data, $cf7 ) {
    // Combine first + last name fields
    $first = $posted_data['first-name'] ?? '';
    $last  = $posted_data['last-name'] ?? '';
    return trim( "$first $last" ) ?: $name;
}, 10, 3 );
Filters the subscriber name extracted from a Contact Form 7 submission before the subscriber is created. Use this filter to customize how the subscriber's name is generated from submitted form data.
Type: Filter (apply_filters)
Location: includes/integrations/class-cf7-integration.php
/**
 * Filters the minimum reCAPTCHA v3 score required for a subscription request to be considered valid.
 *
 * @param float $threshold The reCAPTCHA v3 score threshold.
 */
add_filter( 'your_plugin_recaptcha_threshold', function( $threshold ) {
    return 0.7;
} );
Filters the minimum reCAPTCHA v3 score required for a subscription request to be considered valid. Use this filter to increase or decrease the spam detection sensitivity based on your website's requirements.
Type: Filter (apply_filters)
Location: includes/integrations/class-recaptcha-service.php
/**
 * Filters whether Google reCAPTCHA v3 validation should be enabled during the subscription process.
 *
 * @param bool $enabled Whether reCAPTCHA validation is enabled.
 */
add_filter( 'your_plugin_recaptcha_enabled', function( $enabled ) {
    return is_user_logged_in() ? false : $enabled;
} );
Filters whether Google reCAPTCHA v3 validation should be enabled during the subscription process. Use this filter to conditionally enable or disable reCAPTCHA verification based on custom business rules, user roles, or page conditions.
Type: Filter (apply_filters)
Location: includes/integrations/class-recaptcha-service.php
/**
 * Fires immediately before a new subscriber is created.
 *
 * @param array $data The subscriber data.
 */
add_action( 'ns_subscriber_before', function( $data ) {
    // $data = compact( 'email', 'first_name', 'last_name' )
    error_log( 'About to subscribe: ' . $data['email'] );
} );
Fires immediately before a new subscriber is created. This action runs for subscribers added through the frontend subscription form as well as subscribers created programmatically using the ns_add_subscriber() function.
Type: Action (do_action)
Location: functions.php
/**
 * Fires immediately after a subscriber has been successfully created.
 *
 * @param WP_User $user The newly created WordPress user object.
 */
add_action( 'ns_subscriber_after', function( WP_User $user ) {
    // Send a custom welcome email
    wp_mail(
        $user->user_email,
        'Welcome aboard!',
        'Thanks for subscribing.'
    );
} );
Fires immediately after a subscriber has been successfully created. This action provides access to the newly created WordPress user object, allowing developers to perform additional processing, integrations, or custom actions.
Type: Action (do_action)
Location: functions.php
/**
 * Fires immediately before a Contact Form 7 submission creates a subscriber.
 *
 * @param string $email The subscriber's email address.
 * @param string $name The subscriber's name.
 * @param array $posted_data The submitted form data.
 * @param WPCF7_ContactForm $cf7 The Contact Form 7 instance.
 */
add_action( 'ns_cf7_before_subscribe', function( $email, $name, $posted_data, $cf7 ) {
    // Log or validate before subscriber is created
    if ( str_ends_with( $email, '@spam.test' ) ) {
        wp_die( 'Subscription blocked.' );
    }
}, 10, 4 );
Fires immediately before a Contact Form 7 submission creates a subscriber. Use this action to validate submitted data, perform custom checks, log subscription attempts, or prevent subscriber creation based on your own business rules.
Type: Action (do_action)
Location: includes/integrations/class-cf7-integration.php
/**
 * Fires immediately after a subscriber has been successfully created through a Contact Form 7 submission.
 *
 * @param string $email The subscriber's email address.
 * @param string $name The subscriber's name.
 * @param array $posted_data The submitted form data.
 * @param WPCF7_ContactForm $cf7 The Contact Form 7 instance.
 */
add_action( 'ns_cf7_after_subscribe', function( $email, $name, $posted_data, $cf7 ) {
    // Sync to a CRM after CF7-triggered subscription
    my_crm_sync( $email, $name );
}, 10, 4 );
Fires immediately after a subscriber has been successfully created through a Contact Form 7 submission. Use this action to trigger custom integrations, synchronize subscriber data with external systems, log activity, or perform additional processing after the subscription is completed.
Type: Action (do_action)
Location: includes/integrations/class-cf7-integration.php
/**
 * Fires when the Contact Form 7 integration cannot directly access the ns_add_subscriber() function.
 *
 * @param string $email The subscriber's email address.
 * @param string $name The subscriber's name.
 * @param array $posted_data The submitted form data.
 */
add_action( 'ns_add_subscriber', function( $email, $name, $data ) {
    // Handle subscriber creation manually when the function is unavailable
    ns_add_subscriber( $email, $name );
}, 10, 3 );
Fires when the Contact Form 7 integration cannot directly access the ns_add_subscriber() function, such as during early WordPress initialization or in decoupled environments. This action allows developers to handle subscriber creation manually and maintain compatibility with custom workflows.
Type: Action (do_action)
Location: includes/integrations/class-cf7-integration.php
/**
 * Fires when a reCAPTCHA validation fails during a Contact Form 7 submission.
 *
 * @param string $token The reCAPTCHA token.
 */
add_action( 'your_plugin_recaptcha_failed', function( $token ) {
    // Log failed attempts for security auditing
    error_log( 'reCAPTCHA failed for token: ' . substr( $token, 0, 10 ) . '...' );
} );
Fires when Google reCAPTCHA v3 verification fails during a subscription attempt. Use this action to log failed verification attempts, trigger security monitoring, notify administrators, or perform custom handling for suspicious activity.
Type: Action (do_action)
Location: includes/integrations/class-recaptcha-service.php
/**
 * Fires when a reCAPTCHA validation passes during a Contact Form 7 submission.
 *
 * @param string $token The reCAPTCHA token.
 */
add_action( 'your_plugin_recaptcha_passed', function( $token ) {
    // Optional: track successful verifications
} );
Fires when Google reCAPTCHA v3 verification succeeds during a subscription attempt. Use this action to track successful validations, trigger custom workflows, collect analytics, or perform additional processing after a user passes reCAPTCHA verification.
Type: Action (do_action)
Location: includes/integrations/class-recaptcha-service.php
Do you have any questions? Email us at [email protected] for personal assistance.